Canon PC300 Instruction Manual - Page 68
USB Memory Screen, USB Memory Display, Upward] button, Edit] button, Format] button - stick
 |
View all Canon PC300 manuals
Add to My Manuals
Save this manual to your list of manuals |
Page 68 highlights
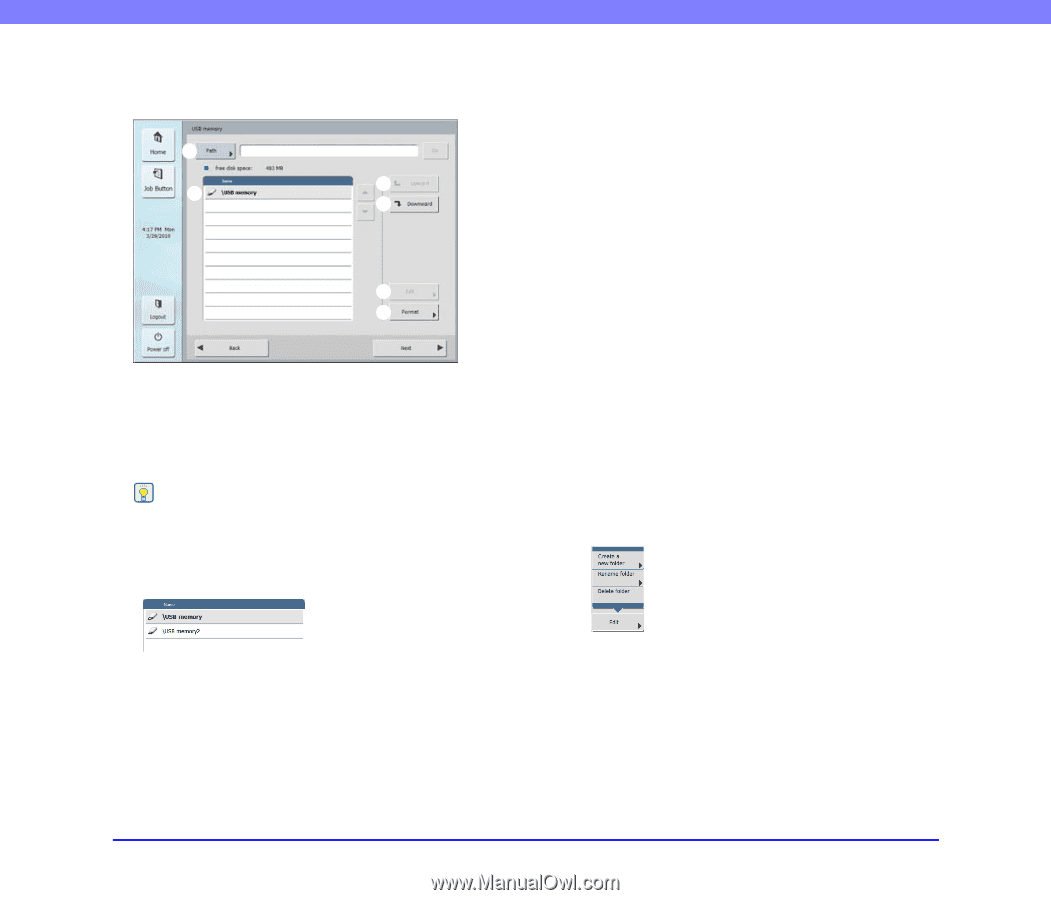
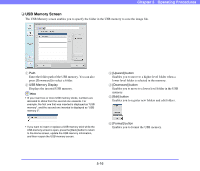
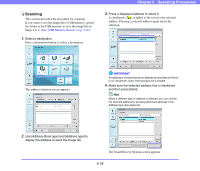
Chapter 5 Operating Procedures ❏ USB Memory Screen The USB Memory screen enables you to specify the folder in the USB memory to save the image file. a b c d e f a Path Enter the folder path of the USB memory. You can also press [Downward] to select a folder. b USB Memory Display Displays the inserted USB memory. Hint • lIf you insert two or more USB memory sticks, numbers are allocated to sticks from the second one onwards. For example, the first one that was inserted is displayed as "USB memory", and the second one inserted is displayed as "USB memory 2". • If you want to insert or replace a USB memory stick while the USB memory screen is open, press the [Back] button to return to the Home screen, update the USB memory information, and then reopen the USB memory screen. c [Upward] button Enables you to move to a higher level folder when a lower level folder is selected in the memory. d [Downward] button Enables you to move to a lower level folder in the USB memory. e [Edit] button Enables you to register new folders and edit folders. f [Format] button Enables you to format the USB memory. 5-16
-
 1
1 -
2
-
3
-
4
-
5
-
6
-
7
-
8
-
9
-
10
-
11
-
12
-
13
-
14
-
15
-
16
-
17
-
18
-
19
-
20
-
21
-
22
-
23
-
24
-
25
-
26
-
27
-
28
-
29
-
30
-
31
-
32
-
33
-
34
-
35
-
36
-
37
-
38
-
39
-
40
-
41
-
42
-
43
-
44
-
45
-
46
-
47
-
48
-
49
-
50
-
51
-
52
-
53
-
54
-
55
-
56
-
57
-
58
-
59
-
60
-
61
-
62
-
 63
63 -
 64
64 -
 65
65 -
 66
66 -
 67
67 -
 68
68 -
 69
69 -
 70
70 -
 71
71 -
 72
72 -
 73
73 -
74
-
75
-
76
-
77
-
78
-
79
-
80
-
81
-
82
-
83
-
84
-
85
-
86
-
87
-
88
-
89
-
90
-
91
-
92
-
93
-
94
-
95
-
96
-
97
-
98
-
99
-
100
-
101
-
102
-
103
-
104
-
105
-
106
-
107
-
108
-
109
-
110
-
111
-
112
-
113
-
114
-
115
-
116
-
117
-
118
-
119
-
120
-
121
-
122
-
123
-
124
-
125
-
126
-
127
-
128
-
129
-
130
-
131
-
132
-
133
-
134
-
135
-
136
-
137
-
138
-
139
-
140
-
141
-
142
-
143
-
144
-
145
-
146
-
147
-
148
-
149
-
150
-
151
-
152
-
153
-
154
-
155
-
156
-
157
-
158
-
159
-
160
-
161
-
162
-
163
-
164
-
165
-
166
-
167
-
168
-
169
-
170
-
171
-
172
-
173
-
174
-
175
-
176
-
177
-
178
-
179
-
180
-
181
-
182
-
183
-
184
-
185
-
186
-
187
-
188
-
189
-
190
-
191
-
192
-
193
 |
 |