Canon PC300 Instruction Manual - Page 164
Cleaning the Scanning Glass and Rollers, scanner may be dirty. Use the procedure below to clean
 |
View all Canon PC300 manuals
Add to My Manuals
Save this manual to your list of manuals |
Page 164 highlights
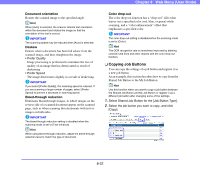
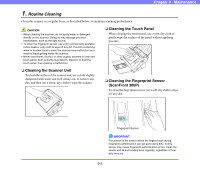
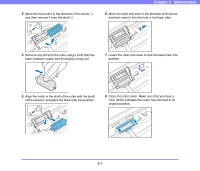
❏ Cleaning the Scanning Glass and Rollers If scanned images contain streaks or scanned documents become dirty, the scanning glass and rollers inside the scanner may be dirty. Use the procedure below to clean them on a regular basis. 1. Pull the lock lever toward you and then fully open the panel unit. Chapter 9 Maintenance 2. Use a commercially available air blower to remove any dust and paper particles that have accumulated inside the scanner. 3. Use a clean, dry cloth to wipe any dirt off the scanning glass. Scanning Glass Lock lever CAUTION The open/close movement of the panel unit is linked to the up/ down movement of the document eject tray. Do not press on the document eject tray when you open the panel unit. Hint There is one scanning glass for the front side of documents, and another for the back side. Wipe both of them clean. CAUTION Do not spray water or detergent directly on the scanner. Doing so may damage precision mechanisms, such as the light source. IMPORTANT Scratches on the scanning glass may cause streaks on scanned images, as well as feeding errors. If there are scratches on a scanning glass, contact your local authorized Canon dealer. 9-3
-
 1
1 -
2
-
3
-
4
-
5
-
6
-
7
-
8
-
9
-
10
-
11
-
12
-
13
-
14
-
15
-
16
-
17
-
18
-
19
-
20
-
21
-
22
-
23
-
24
-
25
-
26
-
27
-
28
-
29
-
30
-
31
-
32
-
33
-
34
-
35
-
36
-
37
-
38
-
39
-
40
-
41
-
42
-
43
-
44
-
45
-
46
-
47
-
48
-
49
-
50
-
51
-
52
-
53
-
54
-
55
-
56
-
57
-
58
-
59
-
60
-
61
-
62
-
63
-
64
-
65
-
66
-
67
-
68
-
69
-
70
-
71
-
72
-
73
-
74
-
75
-
76
-
77
-
78
-
79
-
80
-
81
-
82
-
83
-
84
-
85
-
86
-
87
-
88
-
89
-
90
-
91
-
92
-
93
-
94
-
95
-
96
-
97
-
98
-
99
-
100
-
101
-
102
-
103
-
104
-
105
-
106
-
107
-
108
-
109
-
110
-
111
-
112
-
113
-
114
-
115
-
116
-
117
-
118
-
119
-
120
-
121
-
122
-
123
-
124
-
125
-
126
-
127
-
128
-
129
-
130
-
131
-
132
-
133
-
134
-
135
-
136
-
137
-
138
-
139
-
140
-
141
-
142
-
143
-
144
-
145
-
146
-
147
-
148
-
149
-
150
-
151
-
152
-
153
-
154
-
155
-
156
-
157
-
158
-
 159
159 -
 160
160 -
 161
161 -
 162
162 -
 163
163 -
 164
164 -
 165
165 -
 166
166 -
 167
167 -
 168
168 -
 169
169 -
170
-
171
-
172
-
173
-
174
-
175
-
176
-
177
-
178
-
179
-
180
-
181
-
182
-
183
-
184
-
185
-
186
-
187
-
188
-
189
-
190
-
191
-
192
-
193
 |
 |
