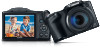
Canon PowerShot SX400 IS User Guide
Canon PowerShot SX400 IS Manual
 |
View all Canon PowerShot SX400 IS manuals
Add to My Manuals
Save this manual to your list of manuals |
Canon PowerShot SX400 IS manual content summary:
- Canon PowerShot SX400 IS | User Guide - Page 1
before you clicked a link ●● To jump to the beginning of a chapter, click the chapter title at right. Before Use Basic Guide Advanced Guide 1 Camera Basics 2 Auto Mode 3 Other Shooting Modes 4 P Mode 5 Playback Mode 6 Setting Menu 7 Accessories 8 Appendix Index ©CANON INC. 2014 CDD-E601-010 1 - Canon PowerShot SX400 IS | User Guide - Page 2
of the card is not permitted. If it is unclear whether the card has been approved for use in the area, please check with the card manufacturer. Before Use Basic Guide Advanced Guide 1 Camera Basics 2 Auto Mode 3 Other Shooting Modes 4 P Mode 5 Playback Mode 6 Setting Menu 7 Accessories 8 Appendix - Canon PowerShot SX400 IS | User Guide - Page 3
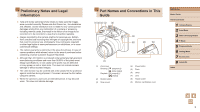
[ (index)] (2) Shutter button (3) Strap mount (4) Power button (5) Flash (6) Lamp (7) Lens (8) Tripod socket (9) Memory card/battery cover Before Use Basic Guide Advanced Guide 1 Camera Basics 2 Auto Mode 3 Other Shooting Modes 4 P Mode 5 Playback Mode 6 Setting Menu 7 Accessories 8 Appendix Index - Canon PowerShot SX400 IS | User Guide - Page 4
"memory card". ●● The symbols " Still Images" and " Movies" below titles indicate how the function is used-whether for still images or movies. Before Use Basic Guide Advanced Guide 1 Camera Basics 2 Auto Mode 3 Other Shooting Modes 4 P Mode 5 Playback Mode 6 Setting Menu 7 Accessories 8 Appendix - Canon PowerShot SX400 IS | User Guide - Page 5
15 Inserting the Battery Pack and Memory Card 16 Removing the Battery Pack and Memory Card 16 Setting the Date and Time 17 Changing the Date and Time 17 Display Language 18 Trying the Camera Out 19 Shooting (Smart Auto 19 Viewing 20 Erasing Images 21 Advanced Guide 1 Camera Basics 22 On - Canon PowerShot SX400 IS | User Guide - Page 6
58 On 58 Slow Synchro 58 Off 59 Shooting with the FE Lock 59 Other Settings 59 Changing the Compression Ratio (Image Quality 59 Before Use Basic Guide Advanced Guide 1 Camera Basics 2 Auto Mode 3 Other Shooting Modes 4 P Mode 5 Playback Mode 6 Setting Menu 7 Accessories 8 Appendix Index 6 - Canon PowerShot SX400 IS | User Guide - Page 7
80 Formatting Memory Cards 80 Low-Level Formatting 81 File Numbering 81 Date-Based Image Storage 82 Checking Certification Logos 82 Display Language 82 Adjusting Other Settings 82 Restoring Defaults 83 Before Use Basic Guide Advanced Guide 1 Camera Basics 2 Auto Mode 3 Other Shooting Modes - Canon PowerShot SX400 IS | User Guide - Page 8
114 Camera Specifications 114 Digital Zoom Focal Length (35mm film equivalent 115 Number of Shots/Recording Time, Playback Time 115 Number of Shots per Memory Card 115 Recording Time per Memory Card 116 Before Use Basic Guide Advanced Guide 1 Camera Basics 2 Auto Mode 3 Other Shooting Modes - Canon PowerShot SX400 IS | User Guide - Page 9
116 Shutter Speed 116 Aperture 116 Battery Pack NB-11LH 117 Battery Charger CB-2LF/CB-2LFE 117 Index 118 Trademarks and Licensing 120 Disclaimer 120 Before Use Basic Guide Advanced Guide 1 Camera Basics 2 Auto Mode 3 Other Shooting Modes 4 P Mode 5 Playback Mode 6 Setting Menu 7 Accessories - Canon PowerShot SX400 IS | User Guide - Page 10
through images quickly -- =63 ●● Erase images -- =69 Shoot/View Movies ●● Shoot movies -- =28 ●● View movies (Playback Mode) -- =61 Before Use Basic Guide Advanced Guide 1 Camera Basics 2 Auto Mode 3 Other Shooting Modes 4 P Mode 5 Playback Mode 6 Setting Menu 7 Accessories 8 Appendix Index 10 - Canon PowerShot SX400 IS | User Guide - Page 11
apply heat to the product. ●● Do not peel off the label, if the battery pack has one. ●● Avoid dropping or subjecting the product to severe impacts. ●● Use Basic Guide Advanced Guide 1 Camera Basics 2 Auto Mode 3 Other Shooting Modes 4 P Mode 5 Playback Mode 6 Setting Menu 7 Accessories 8 Appendix - Canon PowerShot SX400 IS | User Guide - Page 12
or clothing, immediately flush with water. ●● If the product uses a battery charger, note the following precautions. -- Remove the plug periodically and, using Use Basic Guide Advanced Guide 1 Camera Basics 2 Auto Mode 3 Other Shooting Modes 4 P Mode 5 Playback Mode 6 Setting Menu 7 Accessories 8 - Canon PowerShot SX400 IS | User Guide - Page 13
lenses, lens filters, or filter adapters (if applicable), be sure to attach these accessories firmly. If the lens accessory ●● Unplug any battery charger used with the Guide Advanced Guide 1 Camera Basics 2 Auto Mode 3 Other Shooting Modes 4 P Mode 5 Playback Mode 6 Setting Menu 7 Accessories - Canon PowerShot SX400 IS | User Guide - Page 14
the loop (2). ●●Always remove the lens cap before turning the camera on. ●●Keep the lens cap on the lens when the camera is not in use. Before Use Basic Guide Advanced Guide 1 Camera Basics 2 Auto Mode 3 Other Shooting Modes 4 P Mode 5 Playback Mode 6 Setting Menu 7 Accessories 8 Appendix Index 14 - Canon PowerShot SX400 IS | User Guide - Page 15
for more than 24 hours. ●● For battery chargers that use a power cord, do not attach the charger or cord to other objects. Doing so battery pack. Before Use Basic Guide Advanced Guide 1 Camera Basics 2 Auto Mode 3 Other Shooting Modes 4 P Mode 5 Playback Mode 6 Setting Menu 7 Accessories - Canon PowerShot SX400 IS | User Guide - Page 16
The battery pack will pop up. Remove the memory card. ●●Push the memory card in until it clicks, and then slowly release it. ●●The memory card will pop up. Before Use Basic Guide Advanced Guide 1 Camera Basics 2 Auto Mode 3 Other Shooting Modes 4 P Mode 5 Playback Mode 6 Setting Menu 7 Accessories - Canon PowerShot SX400 IS | User Guide - Page 17
time. ●●Follow step 2 in "Setting the Date and Time" (=17) to adjust the settings. ●●Press the [ menu screen. ] button to close the Before Use Basic Guide Advanced Guide 1 Camera Basics 2 Auto Mode 3 Other Shooting Modes 4 P Mode 5 Playback Mode 6 Setting Menu 7 Accessories 8 Appendix Index 17 - Canon PowerShot SX400 IS | User Guide - Page 18
display language has been set, the setting screen is no longer displayed. Before Use Basic Guide Advanced Guide 1 Camera Basics 2 Auto Mode 3 Other Shooting Modes 4 P Mode 5 Playback Mode 6 Setting Menu 7 Accessories 8 Appendix Index ●● The current time is displayed if you wait too long in step - Canon PowerShot SX400 IS | User Guide - Page 19
. ●●Keep the camera still until the shutter sound ends. ●●After displaying your shot, the camera will revert to the shooting screen. Before Use Basic Guide Advanced Guide 1 Camera Basics 2 Auto Mode 3 Other Shooting Modes 4 P Mode 5 Playback Mode 6 Setting Menu 7 Accessories 8 Appendix Index - Canon PowerShot SX400 IS | User Guide - Page 20
are identified by a [ To play movies, go to step 3. ] icon. Before Use Basic Guide Advanced Guide 1 Camera Basics 2 Auto Mode 3 Other Shooting Modes 4 P Mode 5 Playback Mode 6 Setting Menu 7 Accessories 8 Appendix Index 3 Play movies. ●●Press the [ ] button, press the [ ][ ] buttons to choose - Canon PowerShot SX400 IS | User Guide - Page 21
●● To switch to Shooting mode from Playback mode, press the shutter button halfway. Erasing Images You images to erase at once (=69). Before Use Basic Guide Advanced Guide 1 Camera Basics 2 Auto Mode 3 Other Shooting Modes 4 P Mode 5 Playback Mode 6 Setting Menu 7 Accessories 8 Appendix Index 21 - Canon PowerShot SX400 IS | User Guide - Page 22
one minute once the camera is in Playback mode. You can turn the camera off when the lens is retracted by pressing the [ ] button. Before Use Basic Guide Advanced Guide 1 Camera Basics 2 Auto Mode 3 Other Shooting Modes 4 P Mode 5 Playback Mode 6 Setting Menu 7 Accessories 8 Appendix Index 22 - Canon PowerShot SX400 IS | User Guide - Page 23
longer in some shooting scenes, and images will be blurry if you move the camera (or the subject moves) before the shutter sound ends. Before Use Basic Guide Advanced Guide 1 Camera Basics 2 Auto Mode 3 Other Shooting Modes 4 P Mode 5 Playback Mode 6 Setting Menu 7 Accessories 8 Appendix Index 23 - Canon PowerShot SX400 IS | User Guide - Page 24
Options labeled with a [ ] icon can be configured by pressing the [ ] button. ●●To return to the menu items, press the [ ] button. Before Use Basic Guide Advanced Guide 1 Camera Basics 2 Auto Mode 3 Other Shooting Modes 4 P Mode 5 Playback Mode 6 Setting Menu 7 Accessories 8 Appendix Index 24 - Canon PowerShot SX400 IS | User Guide - Page 25
switch screens, and then press the [ ][ ] buttons to select the menu item. ●●To return to the previous screen, press the [ ] button. Before Use Basic Guide Advanced Guide 1 Camera Basics 2 Auto Mode 3 Other Shooting Modes 4 P Mode 5 Playback Mode 6 Setting Menu 7 Accessories 8 Appendix Index 25 - Canon PowerShot SX400 IS | User Guide - Page 26
off, open the memory card/battery cover, or shake or jolt the camera, which may corrupt images or damage the camera or memory card. Before Use Basic Guide Advanced Guide 1 Camera Basics 2 Auto Mode 3 Other Shooting Modes 4 P Mode 5 Playback Mode 6 Setting Menu 7 Accessories 8 Appendix Index 26 - Canon PowerShot SX400 IS | User Guide - Page 27
to cancel the clock display. ●● When the camera is off, press and hold the [ ] button, then press the power button to display the clock. Before Use Basic Guide Advanced Guide 1 Camera Basics 2 Auto Mode 3 Other Shooting Modes 4 P Mode 5 Playback Mode 6 Setting Menu 7 Accessories 8 Appendix Index 27 - Canon PowerShot SX400 IS | User Guide - Page 28
specific scenes, simply let the camera determine the subject and shooting conditions. Shooting (Smart Auto) Still Images Movies 1 Turn the camera Use Basic Guide Advanced Guide 1 Camera Basics 2 Auto Mode 3 Other Shooting Modes 4 P Mode 5 Playback Mode 6 Setting Menu 7 Accessories 8 Appendix - Canon PowerShot SX400 IS | User Guide - Page 29
camera still until the shutter sound ends. ●●After displaying your shot, the camera will revert to the shooting screen. Shooting Movies 1) Start shooting. Basic Guide Advanced Guide 1 Camera Basics 2 Auto Mode 3 Other Shooting The black bars indicate image areas not recorded. 7 Accessories 8 - Canon PowerShot SX400 IS | User Guide - Page 30
camera shake. To shoot subjects at the same size shown before shooting, adjust the image stabilization setting (=60). ●● Audio recording is monaural. Before Use Basic Guide Advanced Guide 1 Camera Basics 2 Auto Mode 3 Other Shooting Modes 4 P Mode 5 Playback Mode 6 Setting Menu 7 Accessories - Canon PowerShot SX400 IS | User Guide - Page 31
icon does not match actual shooting conditions, or if it is not possible to shoot with your expected effect, color, or brightness. Before Use Basic Guide Advanced Guide 1 Camera Basics 2 Auto Mode 3 Other Shooting Modes 4 P Mode 5 Playback Mode 6 Setting Menu 7 Accessories 8 Appendix Index 31 - Canon PowerShot SX400 IS | User Guide - Page 32
are displayed, if frames are not displayed around desired subjects, or if frames are displayed on the background or similar areas. Before Use Basic Guide Advanced Guide 1 Camera Basics 2 Auto Mode 3 Other Shooting Modes 4 P Mode 5 Playback Mode 6 Setting Menu 7 Accessories 8 Appendix Index 32 - Canon PowerShot SX400 IS | User Guide - Page 33
Images: Press the shutter button halfway to focus on the subject, and then press it all the way down. ●●For Movies: Press the movie button. Before Use Basic Guide Advanced Guide 1 Camera Basics 2 Auto Mode 3 Other Shooting Modes 4 P Mode 5 Playback Mode 6 Setting Menu 7 Accessories 8 Appendix Index - Canon PowerShot SX400 IS | User Guide - Page 34
memory card becomes full. ●● When a delay longer than two seconds is specified, two seconds before the shot, the lamp blinking and self-timer sound will speed up. (The lamp will remain lit in case the flash fires.) Before Use Basic Guide Advanced Guide 1 Camera Basics 2 Auto Mode 3 Other Shooting - Canon PowerShot SX400 IS | User Guide - Page 35
menu, and then choose [ ] (=24). ●●Once the setting is complete, [ ] is displayed. Before Use Basic Guide Advanced Guide 1 Camera Basics 2 Auto Mode 3 Other Shooting Modes 4 P Mode 5 Playback Mode 6 Setting Menu 7 Accessories 8 Appendix Index 2 Shoot. ●●Hold the shutter button all the way down to - Canon PowerShot SX400 IS | User Guide - Page 36
-definition televisions or similar display devices, or for printing images at 3.5 x 5-inch or A-series sizes. Square aspect ratio. Before Use Basic Guide Advanced Guide 1 Camera Basics 2 Auto Mode 3 Other Shooting Modes 4 P Mode 5 Playback Mode 6 Setting Menu 7 Accessories 8 Appendix Index 36 - Canon PowerShot SX400 IS | User Guide - Page 37
how many shots at each resolution setting can fit on a memory card, see "Number of Shots per Memory Card" (= 115). ●●Press the [ ] button, choose [ Use Basic Guide Advanced Guide 1 Camera Basics 2 Auto Mode 3 Other Shooting Modes 4 P Mode 5 Playback Mode 6 Setting Menu 7 Accessories 8 Appendix - Canon PowerShot SX400 IS | User Guide - Page 38
maximum movie length at each level of image quality that will fit on a memory card, see "Recording Time per Memory Card" (= 116). ●●Press the [ ] button Use Basic Guide Advanced Guide 1 Camera Basics 2 Auto Mode 3 Other Shooting Modes 4 P Mode 5 Playback Mode 6 Setting Menu 7 Accessories 8 Appendix - Canon PowerShot SX400 IS | User Guide - Page 39
[2 sec.], [4 sec.], [8 sec.], or [Hold] in [Display Time] (=40). ●● This feature is not available in continuous shooting mode (= 35). Before Use Basic Guide Advanced Guide 1 Camera Basics 2 Auto Mode 3 Other Shooting Modes 4 P Mode 5 Playback Mode 6 Setting Menu 7 Accessories 8 Appendix Index 39 - Canon PowerShot SX400 IS | User Guide - Page 40
[Review image after shooting] screen. ●●Press the [ ] button, choose [Review image after shooting] on the [ ] tab, and then press the [ ] button (= 25). Before Use Basic Guide Advanced Guide 1 Camera Basics 2 Auto Mode 3 Other Shooting Modes 4 P Mode 5 Playback Mode 6 Setting Menu 7 Accessories - Canon PowerShot SX400 IS | User Guide - Page 41
another shot by pressing the shutter button halfway again. Displays images until you press the shutter button halfway. No image display . Before Use Basic Guide Advanced Guide 1 Camera Basics 2 Auto Mode 3 Other Shooting Modes 4 P Mode 5 Playback Mode 6 Setting Menu 7 Accessories 8 Appendix Index 41 - Canon PowerShot SX400 IS | User Guide - Page 42
adjust the value as you watch the screen. ●●Press the [ ] button. 3 Shoot. For brighter images, adjust the level to the right, and for darker images, Guide Advanced Guide 1 Camera Basics 2 Auto Mode 3 Other Shooting Modes 4 P Mode 5 Playback Mode 6 Setting Menu 7 Accessories 8 Appendix Index - Canon PowerShot SX400 IS | User Guide - Page 43
changed. ●● In [ ] mode, although no frames are displayed when you press the shutter button halfway, optimal focus is still determined. Before Use Basic Guide Advanced Guide 1 Camera Basics 2 Auto Mode 3 Other Shooting Modes 4 P Mode 5 Playback Mode 6 Setting Menu 7 Accessories 8 Appendix Index 43 - Canon PowerShot SX400 IS | User Guide - Page 44
shot will look with the effect applied. 3 Shoot. ●● Try taking some test shots first, to make sure you obtain the desired results. Before Use Basic Guide Advanced Guide 1 Camera Basics 2 Auto Mode 3 Other Shooting Modes 4 P Mode 5 Playback Mode 6 Setting Menu 7 Accessories 8 Appendix Index 44 - Canon PowerShot SX400 IS | User Guide - Page 45
●● Movie image quality is [ ] at an aspect ratio of [ ] and [ ] at an aspect ratio of [ ] (=36). These quality settings cannot be changed. Before Use Basic Guide Advanced Guide 1 Camera Basics 2 Auto Mode 3 Other Shooting Modes 4 P Mode 5 Playback Mode 6 Setting Menu 7 Accessories 8 Appendix Index - Canon PowerShot SX400 IS | User Guide - Page 46
your shot will look with the effect applied. 3 Shoot. B/W Sepia Blue Black and white shots. Sepia tone shots. Blue and white shots. Before Use Basic Guide Advanced Guide 1 Camera Basics 2 Auto Mode 3 Other Shooting Modes 4 P Mode 5 Playback Mode 6 Setting Menu 7 Accessories 8 Appendix Index 46 - Canon PowerShot SX400 IS | User Guide - Page 47
Movies Specify a shutter speed of 1 - 15 seconds to shoot long exposures. In this case, mount the camera on a tripod or take other measures to prevent camera shake. 1 Choose [ ]. ●●Follow step 1 in "Specific Scenes" (=43) and choose [ ]. Before Use Basic Guide Advanced Guide 1 Camera Basics 2 Auto - Canon PowerShot SX400 IS | User Guide - Page 48
to secure the camera (=60). ●● If the flash fires, your shot may be overexposed. In this case, set the flash to [ ] and shoot again (=58). Before Use Basic Guide Advanced Guide 1 Camera Basics 2 Auto Mode 3 Other Shooting Modes 4 P Mode 5 Playback Mode 6 Setting Menu 7 Accessories 8 Appendix Index - Canon PowerShot SX400 IS | User Guide - Page 49
Follow step 1 in "Specific Scenes" (=43) and choose [ ]. 2 Customize the settings as desired (=50 - =60), and then shoot. ●● If adequate exposure cannot be obtained when you press the shutter button halfway, shutter speeds and aperture values are displayed in orange. In this case, try adjusting the - Canon PowerShot SX400 IS | User Guide - Page 50
the shutter button and press the [ ] button again. In this case, [ ] is no longer displayed. 2 Compose the shot and shoot. ●● AE: Auto Exposure Before Use Basic Guide Advanced Guide 1 Camera Basics 2 Auto Mode 3 Other Shooting Modes 4 P Mode 5 Playback Mode 6 Setting Menu 7 Accessories 8 Appendix - Canon PowerShot SX400 IS | User Guide - Page 51
ISO speed will increase shutter speed, which may reduce subject and camera shake and increase the flash range. However, shots may look grainy. Before Use Basic Guide Advanced Guide 1 Camera Basics 2 Auto Mode 3 Other Shooting Modes 4 P Mode 5 Playback Mode 6 Setting Menu 7 Accessories 8 Appendix - Canon PowerShot SX400 IS | User Guide - Page 52
lighting. Fluorescent H Custom For shooting under daylight fluorescent lighting. For manually setting a custom white balance (= 53). Before Use Basic Guide Advanced Guide 1 Camera Basics 2 Auto Mode 3 Other Shooting Modes 4 P Mode 5 Playback Mode 6 Setting Menu 7 Accessories 8 Appendix Index 52 - Canon PowerShot SX400 IS | User Guide - Page 53
as converting images to sepia or black and white. ●●Press the [ reds in images. Makes red subjects more vivid. Adjust contrast, sharpness, color saturation, and other qualities Guide Advanced Guide 1 Camera Basics 2 Auto Mode 3 Other Shooting Modes 4 P Mode 5 Playback Mode 6 Setting Menu 7 Accessories - Canon PowerShot SX400 IS | User Guide - Page 54
not focus. ] will turn ●● To prevent camera shake, try mounting the camera on a tripod and shooting with the camera set to [ ] (=34). Before Use Basic Guide Advanced Guide 1 Camera Basics 2 Auto Mode 3 Other Shooting Modes 4 P Mode 5 Playback Mode 6 Setting Menu 7 Accessories 8 Appendix Index 54 - Canon PowerShot SX400 IS | User Guide - Page 55
(Focus Lock). ●● The AF frame position is enlarged when you press the shutter button halfway and [AF-Point Zoom] (=39) is set to [On]. Before Use Basic Guide Advanced Guide 1 Camera Basics 2 Auto Mode 3 Other Shooting Modes 4 P Mode 5 Playback Mode 6 Setting Menu 7 Accessories 8 Appendix Index 55 - Canon PowerShot SX400 IS | User Guide - Page 56
Press the shutter button all the way down to shoot. ●●Even after your shot, [ ] is still displayed and the camera continues to track the subject. Before Use Basic Guide Advanced Guide 1 Camera Basics 2 Auto Mode 3 Other Shooting Modes 4 P Mode 5 Playback Mode 6 Setting Menu 7 Accessories 8 Appendix - Canon PowerShot SX400 IS | User Guide - Page 57
Use Basic Guide Advanced Guide 1 Camera Basics 2 Auto Mode 3 Other Shooting Modes 4 P Mode 5 Playback Mode 6 Setting Menu 7 Accessories 8 Appendix Index Helps avoid missing sudden photo opportunities, because On the camera constantly focuses on subjects until you press the shutter button halfway - Canon PowerShot SX400 IS | User Guide - Page 58
to illuminate the main subject (such as people) while shooting at a slower shutter speed to illuminate backgrounds out of flash range. Before Use Basic Guide Advanced Guide 1 Camera Basics 2 Auto Mode 3 Other Shooting Modes 4 P Mode 5 Playback Mode 6 Setting Menu 7 Accessories 8 Appendix Index 58 - Canon PowerShot SX400 IS | User Guide - Page 59
fit on a memory card, see "Number of Shots per Memory Card" (= 115). ●●Press the [ ] button, choose [ ] in the menu, and choose the desired option (= 24). Before Use Basic Guide Advanced Guide 1 Camera Basics 2 Auto Mode 3 Other Shooting Modes 4 P Mode 5 Playback Mode 6 Setting Menu 7 Accessories - Canon PowerShot SX400 IS | User Guide - Page 60
camera shake, mount the camera on a tripod or take other measures to hold it still. In this case, set [IS Mode] to [Off]. Shooting shown before shooting. Before Use Basic Guide Advanced Guide 1 Camera Basics 2 Auto Mode 3 Other Shooting Modes 4 P Mode 5 Playback Mode 6 Setting Menu 7 Accessories 8 - Canon PowerShot SX400 IS | User Guide - Page 61
fun reviewing your shots, and browse or edit them in many ways ●● To prepare the camera for shooting date, press the [ ][ ] buttons in Scroll Display mode. Before Use Basic Guide Advanced Guide 1 Camera Basics 2 Auto Mode 3 Other Shooting Modes 4 P Mode 5 Playback Mode 6 Setting Menu 7 Accessories - Canon PowerShot SX400 IS | User Guide - Page 62
movie is finished, [ ] is displayed. ●● To switch to Shooting mode from Playback mode, press the shutter button halfway. ●● To deactivate Scroll Display, choose MENU (=25) Guide Advanced Guide 1 Camera Basics 2 Auto Mode 3 Other Shooting Modes 4 P Mode 5 Playback Mode 6 Setting Menu 7 Accessories - Canon PowerShot SX400 IS | User Guide - Page 63
. ●●An orange frame is displayed around the selected image. ●●Press the [ ] button to view the selected image in single-image display. Before Use Basic Guide Advanced Guide 1 Camera Basics 2 Auto Mode 3 Other Shooting Modes 4 P Mode 5 Playback Mode 6 Setting Menu 7 Accessories 8 Appendix Index 63 - Canon PowerShot SX400 IS | User Guide - Page 64
you edit images and save them as new images (=73 - =76), a message is displayed, and the images that were found are no longer shown. Before Use Basic Guide Advanced Guide 1 Camera Basics 2 Auto Mode 3 Other Shooting Modes 4 P Mode 5 Playback Mode 6 Setting Menu 7 Accessories 8 Appendix Index 64 - Canon PowerShot SX400 IS | User Guide - Page 65
Viewing Slideshows Still Images Movies Automatically play back images from a memory card as follows. Each image is displayed for about three seconds. Use Basic Guide Advanced Guide 1 Camera Basics 2 Auto Mode 3 Other Shooting Modes 4 P Mode 5 Playback Mode 6 Setting Menu 7 Accessories 8 Appendix - Canon PowerShot SX400 IS | User Guide - Page 66
cases: -- There are less than 50 shots taken with this camera -- An unsupported image is currently displayed -- Images are shown in filtered display (=64) Before Use Basic Guide Advanced Guide 1 Camera Basics 2 Auto Mode 3 Other Shooting Modes 4 P Mode 5 Playback Mode 6 Setting Menu 7 Accessories - Canon PowerShot SX400 IS | User Guide - Page 67
images on a memory card will be erased if you format the card (=80, =81). ●● Protected images cannot be erased using the camera's erasure function. To Use Basic Guide Advanced Guide 1 Camera Basics 2 Auto Mode 3 Other Shooting Modes 4 P Mode 5 Playback Mode 6 Setting Menu 7 Accessories 8 Appendix - Canon PowerShot SX400 IS | User Guide - Page 68
[ ] button to choose [Protect], and then press the [ ] button. ●● To cancel protection for groups of images, choose [Unlock] in step 4. Before Use Basic Guide Advanced Guide 1 Camera Basics 2 Auto Mode 3 Other Shooting Modes 4 P Mode 5 Playback Mode 6 Setting Menu 7 Accessories 8 Appendix Index 68 - Canon PowerShot SX400 IS | User Guide - Page 69
. Choosing a Selection Method 1 Access the setting screen. ●●Press the [ ] button, and then choose [Erase] on the [ ] tab (=25). Before Use Basic Guide Advanced Guide 1 Camera Basics 2 Auto Mode 3 Other Shooting Modes 4 P Mode 5 Playback Mode 6 Setting Menu 7 Accessories 8 Appendix Index 69 - Canon PowerShot SX400 IS | User Guide - Page 70
All Images] and press the [ ] button. 2 Erase the images. ●●Press the [ ][ ] buttons to choose [OK], and then press the [ ] button. Before Use Basic Guide Advanced Guide 1 Camera Basics 2 Auto Mode 3 Other Shooting Modes 4 P Mode 5 Playback Mode 6 Setting Menu 7 Accessories 8 Appendix Index 70 - Canon PowerShot SX400 IS | User Guide - Page 71
is set to [Off], images shot vertically will be displayed vertically, and rotated images will be displayed in the rotated orientation. Before Use Basic Guide Advanced Guide 1 Camera Basics 2 Auto Mode 3 Other Shooting Modes 4 P Mode 5 Playback Mode 6 Setting Menu 7 Accessories 8 Appendix Index 71 - Canon PowerShot SX400 IS | User Guide - Page 72
images will have a three-star rating ( ) when transferred to computers running Windows 8 or Windows 7. (Does not apply to movies.) Before Use Basic Guide Advanced Guide 1 Camera Basics 2 Auto Mode 3 Other Shooting Modes 4 P Mode 5 Playback Mode 6 Setting Menu 7 Accessories 8 Appendix Index 72 - Canon PowerShot SX400 IS | User Guide - Page 73
available when the memory card has sufficient free is now saved as a new file. 5 Review the new image. ●●Press the [ ] button. [Display new image?] is displayed. ●●Press Guide Advanced Guide 1 Camera Basics 2 Auto Mode 3 Other Shooting Modes 4 P Mode 5 Playback Mode 6 Setting Menu 7 Accessories - Canon PowerShot SX400 IS | User Guide - Page 74
the [ ] button. 4 Save as a new image and review. ●●Follow steps 4 - 5 in "Resizing Images" (= 73). ●● Image quality of pictures you repeatedly edit this way will be Basic Guide Advanced Guide 1 Camera Basics 2 Auto Mode 3 Other Shooting Modes 4 P Mode 5 Playback Mode 6 Setting Menu 7 Accessories 8 - Canon PowerShot SX400 IS | User Guide - Page 75
[ ] button. 4 Save as a new image and review. ●●Follow steps 4 - 5 in " case, the original image will be erased. ●● Protected images cannot be overwritten. Before Use Basic Guide Advanced Guide 1 Camera Basics 2 Auto Mode 3 Other Shooting Modes 4 P Mode 5 Playback Mode 6 Setting Menu 7 Accessories - Canon PowerShot SX400 IS | User Guide - Page 76
saving is in progress. ●● When editing movies, you should use a fully charged battery pack or an AC adapter kit (sold separately, =85). Before Use Basic Guide Advanced Guide 1 Camera Basics 2 Auto Mode 3 Other Shooting Modes 4 P Mode 5 Playback Mode 6 Setting Menu 7 Accessories 8 Appendix Index 76 - Canon PowerShot SX400 IS | User Guide - Page 77
as follows. ●●Choose [Volume], and then press the [ ] button. ●●Choose an item, and then press the [ ][ ] buttons to adjust the volume. Before Use Basic Guide Advanced Guide 1 Camera Basics 2 Auto Mode 3 Other Shooting Modes 4 P Mode 5 Playback Mode 6 Setting Menu 7 Accessories 8 Appendix Index 77 - Canon PowerShot SX400 IS | User Guide - Page 78
on the shooting screen (= 105). ●● Adjusting the date or time while in [ ] mode (=17) will automatically update your [ Home] time and date. Before Use Basic Guide Advanced Guide 1 Camera Basics 2 Auto Mode 3 Other Shooting Modes 4 P Mode 5 Playback Mode 6 Setting Menu 7 Accessories 8 Appendix - Canon PowerShot SX400 IS | User Guide - Page 79
you to conserve battery power in Shooting mode. When the camera is not in use, the screen quickly darkens to reduce battery consumption. 1 Configure Basic Guide Advanced Guide 1 Camera Basics 2 Auto Mode 3 Other Shooting Modes 4 P Mode 5 Playback Mode 6 Setting Menu 7 Accessories 8 Appendix Index 79 - Canon PowerShot SX400 IS | User Guide - Page 80
transferring or disposing of memory cards, take steps to protect personal information if necessary, as by physically destroying cards. Before Use Basic Guide Advanced Guide 1 Camera Basics 2 Auto Mode 3 Other Shooting Modes 4 P Mode 5 Playback Mode 6 Setting Menu 7 Accessories 8 Appendix Index 80 - Canon PowerShot SX400 IS | User Guide - Page 81
(=80)) memory card. ●● Refer to "Software Instruction Manual" (= 89) for information on the card folder structure and image formats. Before Use Basic Guide Advanced Guide 1 Camera Basics 2 Auto Mode 3 Other Shooting Modes 4 P Mode 5 Playback Mode 6 Setting Menu 7 Accessories 8 Appendix Index - Canon PowerShot SX400 IS | User Guide - Page 82
Other Settings The following settings can also be adjusted on the [ ●● [Video System] (=87) ●● [Eye-Fi Settings] (=99) ] tab. Before Use Basic Guide Advanced Guide 1 Camera Basics 2 Auto Mode 3 Other Shooting Modes 4 P Mode 5 Playback Mode 6 Setting Menu 7 Accessories 8 Appendix Index 82 - Canon PowerShot SX400 IS | User Guide - Page 83
Zone] (=78), [Language ] (=82), and [Video System] (=87) -- Custom white balance data you have recorded (=53) -- Shooting mode (=43) Before Use Basic Guide Advanced Guide 1 Camera Basics 2 Auto Mode 3 Other Shooting Modes 4 P Mode 5 Playback Mode 6 Setting Menu 7 Accessories 8 Appendix Index 83 - Canon PowerShot SX400 IS | User Guide - Page 84
the camera in more ways with optional Canon accessories and other compatible accessories sold separately System Map Included Accessories Wrist Strap Battery Pack NB-11LH*1 Battery Charger CB-2LF/CB-2LFE*1 Lens Cap (with cord) USB Cable (camera end: Mini-B)*2 Power Memory Card Card Reader - Canon PowerShot SX400 IS | User Guide - Page 85
over extended periods, or when connecting the camera to a printer or computer. Cannot be used to charge the battery pack in the camera. Before Use Basic Guide Advanced Guide 1 Camera Basics 2 Auto Mode 3 Other Shooting Modes 4 P Mode 5 Playback Mode 6 Setting Menu 7 Accessories 8 Appendix Index 85 - Canon PowerShot SX400 IS | User Guide - Page 86
using a computer, you can print images by connecting the camera directly to a printer. For details, visit your nearest Canon retailer. Before Use Basic Guide Advanced Guide 1 Camera Basics 2 Auto Mode 3 Other Shooting Modes 4 P Mode 5 Playback Mode 6 Setting Menu 7 Accessories 8 Appendix Index 86 - Canon PowerShot SX400 IS | User Guide - Page 87
the Battery Pack and Memory Card" (=16) to (1) open the memory card/battery cover, and then open the coupler cable port cover as shown. Before Use Basic Guide Advanced Guide 1 Camera Basics 2 Auto Mode 3 Other Shooting Modes 4 P Mode 5 Playback Mode 6 Setting Menu 7 Accessories 8 Appendix - Canon PowerShot SX400 IS | User Guide - Page 88
damage the camera. ●● Do not attach the adapter or adapter cord to other objects. Doing so could result in malfunction or damage to the product. Before Use Basic Guide Advanced Guide 1 Camera Basics 2 Auto Mode 3 Other Shooting Modes 4 P Mode 5 Playback Mode 6 Setting Menu 7 Accessories 8 Appendix - Canon PowerShot SX400 IS | User Guide - Page 89
Mac OS Mac OS X 10.9 Mac OS X 10.8 ●● Check the Canon website for the latest system requirements, including supported OS versions. Before Use Basic Guide Advanced Guide 1 Camera Basics 2 Auto Mode 3 Other Shooting Modes 4 P Mode 5 Playback Mode 6 Setting Menu 7 Accessories 8 Appendix Index 89 - Canon PowerShot SX400 IS | User Guide - Page 90
, access http://www.canon.com/ icpd/. ●● camera on. ●●Mac OS: CameraWindow is displayed when a connection is established between the camera and computer. Before Use Basic Guide Advanced Guide 1 Camera Basics 2 Auto Mode 3 Other Shooting Modes 4 P Mode 5 Playback Mode 6 Setting Menu 7 Accessories - Canon PowerShot SX400 IS | User Guide - Page 91
] button to turn the camera off, and unplug the cable. ●●For instructions on viewing images on a computer, refer to "Software Instruction Manual" (= 89). ●● Windows Basic Guide Advanced Guide 1 Camera Basics 2 Auto Mode 3 Other Shooting Modes 4 P Mode 5 Playback Mode 6 Setting Menu 7 Accessories 8 - Canon PowerShot SX400 IS | User Guide - Page 92
the camera and printer off and disconnect the cable. ●● For Canon-brand PictBridge-compatible printers (sold separately), see "Printer" (= 86). Before Use Basic Guide Advanced Guide 1 Camera Basics 2 Auto Mode 3 Other Shooting Modes 4 P Mode 5 Playback Mode 6 Setting Menu 7 Accessories 8 Appendix - Canon PowerShot SX400 IS | User Guide - Page 93
image sizes, or at some aspect ratios. ●● Dates may not be printed correctly if you crop images shot with [Date Stamp ] selected. Before Use Basic Guide Advanced Guide 1 Camera Basics 2 Auto Mode 3 Other Shooting Modes 4 P Mode 5 Playback Mode 6 Setting Menu 7 Accessories 8 Appendix Index 93 - Canon PowerShot SX400 IS | User Guide - Page 94
image. Available Layout Options Default Bordered Borderless N-up ID Photo Fixed Size Matches current printer settings. Prints with blank Before Use Basic Guide Advanced Guide 1 Camera Basics 2 Auto Mode 3 Other Shooting Modes 4 P Mode 5 Playback Mode 6 Setting Menu 7 Accessories 8 Appendix Index - Canon PowerShot SX400 IS | User Guide - Page 95
ordering prints from a photo development service can be set up on the camera. Choose up to 998 images on a memory card and configure relevant settings, such as the number of copies, as follows. The printing information you prepare this way will conform to DPOF (Digital Print Order Format) standards - Canon PowerShot SX400 IS | User Guide - Page 96
in printing by the printer or photo development service, in some cases. ●● [ ] may be displayed on the camera to warn you that the memory card has print settings that were configured on another camera. Changing the print settings using this camera may overwrite all previous settings. ●● Setting - Canon PowerShot SX400 IS | User Guide - Page 97
you will select images. Before Use Basic Guide Advanced Guide 1 Camera Basics 2 Auto Mode 3 Other Shooting Modes 4 P Mode 5 Playback Mode 6 Setting Menu 7 Accessories 8 Appendix Index ●● [ ] may be displayed on the camera to warn you that the memory card has print settings that were configured on - Canon PowerShot SX400 IS | User Guide - Page 98
computer, also refer to "Software Instruction Manual" (= 89) and the printer manual for further information. Adding Images ] button. Before Use Basic Guide Advanced Guide 1 Camera Basics 2 Auto Mode 3 Other Shooting Modes 4 P Mode 5 Playback Mode 6 Setting Menu 7 Accessories 8 Appendix Index 98 - Canon PowerShot SX400 IS | User Guide - Page 99
to a photo-sharing website. Images are transferred by the Eye-Fi card. Refer to the card's user manual or contact the manufacturer for instructions on preparing and using cards or resolving transfer problems. ●● When using an Eye-Fi card, keep the following points in mind. -- Cards may continue - Canon PowerShot SX400 IS | User Guide - Page 100
position. For this reason, you cannot change settings for an inserted Eye-Fi card if the write-protect tab is in the locked position. Before Use Basic Guide Advanced Guide 1 Camera Basics 2 Auto Mode 3 Other Shooting Modes 4 P Mode 5 Playback Mode 6 Setting Menu 7 Accessories 8 Appendix Index 100 - Canon PowerShot SX400 IS | User Guide - Page 101
not solve your problem, contact a Canon Customer Support Help Desk. Power Nothing happens when the power button is pressed. ●● Confirm that the battery pack is charged (=15). ●● Confirm that the battery pack is inserted facing the correct way (=16). ●● Confirm that the memory card/battery cover is - Canon PowerShot SX400 IS | User Guide - Page 102
lamp. Also try increasing the lighting in indoor scenes and shooting at closer range. ●● Edit images using red-eye correction (=75). Before Use Basic Guide Advanced Guide 1 Camera Basics 2 Auto Mode 3 Other Shooting Modes 4 P Mode 5 Playback Mode 6 Setting Menu 7 Accessories 8 Appendix Index 102 - Canon PowerShot SX400 IS | User Guide - Page 103
one of the following measures. -- Use the camera to perform low-level formatting of the memory card (=81). -- Lower the image quality (=38). -- Switch to a memory card that supports high-speed recording (=116). Zooming is not possible. ●● Zooming is not possible when shooting movies in [ ] mode (=45 - Canon PowerShot SX400 IS | User Guide - Page 104
a memory card in the camera. To shoot, insert a memory card facing the correct way (=16). Memory card error (=81) ●● If the same error message is displayed even after you have formatted a supported memory card (=2) and have inserted it facing the correct way (=16), contact a Canon Customer Support - Canon PowerShot SX400 IS | User Guide - Page 105
33), Digital tele-converter (=55) (15) Focusing range (=54, =55), AF lock (=58) (16) Shooting mode (=107), Scene icon (=31) (17) Flash mode (=58) (18) Red-eye correction (=37) (19) AF frame (=55), Spot AE point frame (=51) (20) Date stamp (=35) Before Use Basic Guide Advanced Guide 1 Camera Basics - Canon PowerShot SX400 IS | User Guide - Page 106
via Eye-Fi (=99) (9) Battery level (=106) (10) Metering method (=51) (11) Folder number - File number (= 81) (12) Current image no. / Total no. of images (13) Shutter speed (still images), Image quality / Frame rate (movies) (= 38) (14) Aperture value (15) Flash (=58) (16) i-Contrast (=52, =75) (17 - Canon PowerShot SX400 IS | User Guide - Page 107
to adjust the playback speed. No sound is black icons, such as . Unavailable functions are indicated by gray icons, such as . Functions Available in Each Shooting Basic Guide Advanced Guide 1 Camera Basics 2 Auto Mode 3 Other Shooting Modes 4 P Mode 5 Playback Mode 6 Setting Menu 7 Accessories - Canon PowerShot SX400 IS | User Guide - Page 108
/ / / / My Colors (=53) / / / / *1 / *1 2 / / White Balance (=52) / / / / /// / / // // / / / / // / / Before Use Basic Guide Advanced Guide 1 Camera Basics 2 Auto Mode 3 Other Shooting Modes 4 P Mode 5 Playback Mode 6 Setting Menu 7 Accessories 8 Appendix Index 108 - Canon PowerShot SX400 IS | User Guide - Page 109
sharpness, color saturation, red, green, blue, and skin tone. *3 Synchronizes with the aspect ratio setting and is automatically set (=45). Before Use Basic Guide Advanced Guide 1 Camera Basics 2 Auto Mode 3 Other Shooting Modes 4 P Mode 5 Playback Mode 6 Setting Menu 7 Accessories 8 Appendix Index - Canon PowerShot SX400 IS | User Guide - Page 110
Continuous AF (=57) On / / // // / / / / // / / Off / / AF-assist Beam (=40) On / / // // / / / / // / / Off / / Before Use Basic Guide Advanced Guide 1 Camera Basics 2 Auto Mode 3 Other Shooting Modes 4 P Mode 5 Playback Mode 6 Setting Menu 7 Accessories 8 Appendix Index 110 - Canon PowerShot SX400 IS | User Guide - Page 111
/ // / / IS Settings (=60) IS Mode Continuous/Off / / // // / / / / // / / Shoot Only / / Dynamic IS 1 / / 2 / / Before Use Basic Guide Advanced Guide 1 Camera Basics 2 Auto Mode 3 Other Shooting Modes 4 P Mode 5 Playback Mode 6 Setting Menu 7 Accessories 8 Appendix Index 111 - Canon PowerShot SX400 IS | User Guide - Page 112
Ref. Page = 77 = 77 = 78 = 17 = 78 = 79 = 79 =23, =79 = 80 = 80 =80, =81 = 81 = 82 = 87 = 99 = 82 = 18 = 83 Before Use Basic Guide Advanced Guide 1 Camera Basics 2 Auto Mode 3 Other Shooting Modes 4 P Mode 5 Playback Mode 6 Setting Menu 7 Accessories 8 Appendix Index 112 - Canon PowerShot SX400 IS | User Guide - Page 113
Item Rotate Protect Favorites Print Play Movie Smart Shuffle Image Search Slideshow Ref. Page = 71 = 67 = 72 = 92 = 61 = 66 = 64 = 65 Before Use Basic Guide Advanced Guide 1 Camera Basics 2 Auto Mode 3 Other Shooting Modes 4 P Mode 5 Playback Mode 6 Setting Menu 7 Accessories 8 Appendix Index 113 - Canon PowerShot SX400 IS | User Guide - Page 114
) Approx. 313 g (approx. 11.04 oz.; including the battery pack and memory card) Approx. 297 g (approx. 10.48 oz.; camera body only) Before Use Basic Guide Advanced Guide 1 Camera Basics 2 Auto Mode 3 Other Shooting Modes 4 P Mode 5 Playback Mode 6 Setting Menu 7 Accessories 8 Appendix Index 114 - Canon PowerShot SX400 IS | User Guide - Page 115
in the table are based on Canon measurement conditions and may change depending on the subject, memory card and camera settings. Before Use Basic Guide Advanced Guide 1 Camera Basics 2 Auto Mode 3 Other Shooting Modes 4 P Mode 5 Playback Mode 6 Setting Menu 7 Accessories 8 Appendix Index 115 - Canon PowerShot SX400 IS | User Guide - Page 116
shots/sec. Shutter Speed [ ] mode, automatically set range 1 - 1/1600 sec. Aperture f/number f/3.4 - f/8.0 (W), f/5.8 - f/8.0 (T) Before Use Basic Guide Advanced Guide 1 Camera Basics 2 Auto Mode 3 Other Shooting Modes 4 P Mode 5 Playback Mode 6 Setting Menu 7 Accessories 8 Appendix Index - Canon PowerShot SX400 IS | User Guide - Page 117
mm (1.36 x 1.58 x 0.20 in.) Weight: Approx. 15 g (approx. 0.53 oz.) Battery Charger CB-2LF/CB-2LFE Rated Input: 100 - 240 V AC (50/60 Hz) Rated Output: 4.2 V Basic Guide Advanced Guide 1 Camera Basics 2 Auto Mode 3 Other Shooting Modes 4 P Mode 5 Playback Mode 6 Setting Menu 7 Accessories 8 - Canon PowerShot SX400 IS | User Guide - Page 118
stabilization 60 Indicator 26 Infinity (focusing range) 55 ISO speed 51 L Lamp 40 Live View Control (shooting mode) 42 Long shutter (shooting mode) 47 Low light (shooting mode) 43 M Macro (focusing range) 54 Magnified display 65 Memory cards 2 Recording time 116 Menu Basic operations 25 Table 107 - Canon PowerShot SX400 IS | User Guide - Page 119
charger → Battery pack Power saving 23 Printing 92 Program AE 49 Protecting 67 R Red-eye correction 37, 75 Reset all 83 Resizing images 73 Resolution (image size) 37 Rotating 71 S Saving images to a computer 90 Screen Display language 18 Icons 105, 106 Menu → FUNC. menu SD/SDHC/SDXC memory cards - Canon PowerShot SX400 IS | User Guide - Page 120
actual equipment. ●● The above items notwithstanding, Canon cannot be held liable for any loss arising from the use of this product. Before Use Basic Guide Advanced Guide 1 Camera Basics 2 Auto Mode 3 Other Shooting Modes 4 P Mode 5 Playback Mode 6 Setting Menu 7 Accessories 8 Appendix Index 120
-
 1
1 -
 2
2 -
 3
3 -
 4
4 -
 5
5 -
 6
6 -
 7
7 -
8
-
9
-
10
-
11
-
12
-
13
-
14
-
15
-
16
-
17
-
18
-
19
-
20
-
21
-
22
-
23
-
24
-
25
-
26
-
27
-
28
-
29
-
30
-
31
-
32
-
33
-
34
-
35
-
36
-
37
-
38
-
39
-
40
-
41
-
42
-
43
-
44
-
45
-
46
-
47
-
48
-
49
-
50
-
51
-
52
-
53
-
54
-
55
-
56
-
57
-
58
-
59
-
60
-
61
-
62
-
63
-
64
-
65
-
66
-
67
-
68
-
69
-
70
-
71
-
72
-
73
-
74
-
75
-
76
-
77
-
78
-
79
-
80
-
81
-
82
-
83
-
84
-
85
-
86
-
87
-
88
-
89
-
90
-
91
-
92
-
93
-
94
-
95
-
96
-
97
-
98
-
99
-
100
-
101
-
102
-
103
-
104
-
105
-
106
-
107
-
108
-
109
-
110
-
111
-
112
-
113
-
114
-
115
-
116
-
117
-
118
-
119
-
120
 |
 |

1
ENGLISH
Before Use
Basic Guide
Advanced Guide
1
Camera Basics
2
Auto Mode
3
Other Shooting Modes
5
Playback Mode
6
Setting Menu
7
Accessories
8
Appendix
Index
4
P Mode
Camera User Guide
©CANON INC. 2014
CDD-E601-010
●
Make sure you read this guide, including the “Safety Precautions”
(
=
11) section, before using the camera.
●
Reading this guide will help you learn to use the camera properly.
●
Store this guide safely so that you can use it in the future.
●
Click the buttons in the lower right to access other pages.
: Next page
: Previous page
: Page before you clicked a link
●
To jump to the beginning of a chapter, click the chapter title at right.