Canon PowerShot SX400 IS User Guide - Page 91
Save the images to the computer.
 |
View all Canon PowerShot SX400 IS manuals
Add to My Manuals
Save this manual to your list of manuals |
Page 91 highlights
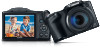
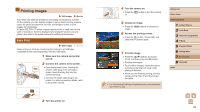
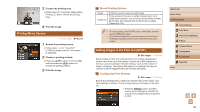
●●Windows: Follow the steps introduced below. ●●In the screen that displays, click the [ ] link to modify the program. ●●Choose [Downloads Images From Canon Camera] and then click [OK]. ●●Double-click [ ]. 3 Save the images to the computer. ●●Click [Import Images from Camera], and then click [Import Untransferred Images]. ●●Images are now saved to the Pictures folder on the computer, in separate folders named by date. ●●After images are saved, close CameraWindow, press the [ ] button to turn the camera off, and unplug the cable. ●●For instructions on viewing images on a computer, refer to "Software Instruction Manual" (= 89). ●● Windows 7: If the screen in step 2 is not displayed, click the [ ] icon in the taskbar. ●● Mac OS: If CameraWindow is not displayed after step 2, click the [CameraWindow] icon in the Dock. ●● Although you can save images to a computer simply by connecting your camera to the computer without using the software, the following limitations apply. -- It may take a few minutes after you connect the camera to the computer until camera images are accessible. -- Images shot in vertical orientation may be saved in horizontal orientation. -- Image protection settings may be cleared from images saved to a computer. -- Some problems may occur when saving images or image information, depending on the operating system version, the software in use, or image file sizes. -- Some functions provided by the software may not be available, such as movie editing. Before Use Basic Guide Advanced Guide 1 Camera Basics 2 Auto Mode 3 Other Shooting Modes 4 P Mode 5 Playback Mode 6 Setting Menu 7 Accessories 8 Appendix Index 91
-
 1
1 -
2
-
3
-
4
-
5
-
6
-
7
-
8
-
9
-
10
-
11
-
12
-
13
-
14
-
15
-
16
-
17
-
18
-
19
-
20
-
21
-
22
-
23
-
24
-
25
-
26
-
27
-
28
-
29
-
30
-
31
-
32
-
33
-
34
-
35
-
36
-
37
-
38
-
39
-
40
-
41
-
42
-
43
-
44
-
45
-
46
-
47
-
48
-
49
-
50
-
51
-
52
-
53
-
54
-
55
-
56
-
57
-
58
-
59
-
60
-
61
-
62
-
63
-
64
-
65
-
66
-
67
-
68
-
69
-
70
-
71
-
72
-
73
-
74
-
75
-
76
-
77
-
78
-
79
-
80
-
81
-
82
-
83
-
84
-
85
-
 86
86 -
 87
87 -
 88
88 -
 89
89 -
 90
90 -
 91
91 -
 92
92 -
 93
93 -
 94
94 -
 95
95 -
 96
96 -
97
-
98
-
99
-
100
-
101
-
102
-
103
-
104
-
105
-
106
-
107
-
108
-
109
-
110
-
111
-
112
-
113
-
114
-
115
-
116
-
117
-
118
-
119
-
120
 |
 |