Canon PowerShot SX400 IS User Guide - Page 87
Using Optional Accessories
 |
View all Canon PowerShot SX400 IS manuals
Add to My Manuals
Save this manual to your list of manuals |
Page 87 highlights
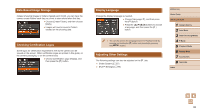
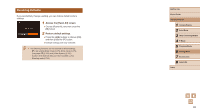
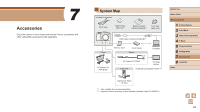
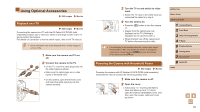
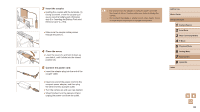
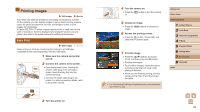
Using Optional Accessories Still Images Movies Playback on a TV Still Images Movies Connecting the camera to a TV with the AV Cable AVC-DC400 (sold separately) enables you to view your shots on the larger screen of the TV as you control the camera. For details on connection or how to switch inputs, refer to the TV manual. ●● Some information may not be displayed when viewing images on a TV (=106). 1 Make sure the camera and TV are off. 2 Connect the camera to the TV. ●●On the TV, insert the cable plugs fully into the video inputs as shown. ●●Make sure the cable plugs are in video inputs of the same color. ●●On the camera, open the terminal cover and insert the cable plug fully into the camera terminal. 3 Turn the TV on and switch to video input. ●●Switch the TV input to the video input you connected the cable to in step 2. 4 Turn the camera on. ●●Press the [ ] button to turn the camera on. ●●Images from the camera are now displayed on the TV. (Nothing is displayed on the camera screen.) ●●When finished, turn off the camera and TV before disconnecting the cable. ●● Correct display is not possible unless the camera video output format (NTSC or PAL) matches the TV format. To change the video output format, press the [ ] button and choose [Video System] on the [ ] tab. Powering the Camera with Household Power Still Images Movies Powering the camera with AC Adapter Kit ACK-DC90 (sold separately) eliminates the need to monitor the remaining battery level. 1 Make sure the camera is off. 2 Open the cover. (2) ●●Follow step 1 in "Inserting the Battery Pack and Memory Card" (=16) to (1) open the memory card/battery cover, and then open the coupler cable port cover as shown. Before Use Basic Guide Advanced Guide 1 Camera Basics 2 Auto Mode 3 Other Shooting Modes 4 P Mode 5 Playback Mode 6 Setting Menu 7 Accessories 8 Appendix Index 87
-
 1
1 -
2
-
3
-
4
-
5
-
6
-
7
-
8
-
9
-
10
-
11
-
12
-
13
-
14
-
15
-
16
-
17
-
18
-
19
-
20
-
21
-
22
-
23
-
24
-
25
-
26
-
27
-
28
-
29
-
30
-
31
-
32
-
33
-
34
-
35
-
36
-
37
-
38
-
39
-
40
-
41
-
42
-
43
-
44
-
45
-
46
-
47
-
48
-
49
-
50
-
51
-
52
-
53
-
54
-
55
-
56
-
57
-
58
-
59
-
60
-
61
-
62
-
63
-
64
-
65
-
66
-
67
-
68
-
69
-
70
-
71
-
72
-
73
-
74
-
75
-
76
-
77
-
78
-
79
-
80
-
81
-
 82
82 -
 83
83 -
 84
84 -
 85
85 -
 86
86 -
 87
87 -
 88
88 -
 89
89 -
 90
90 -
 91
91 -
 92
92 -
93
-
94
-
95
-
96
-
97
-
98
-
99
-
100
-
101
-
102
-
103
-
104
-
105
-
106
-
107
-
108
-
109
-
110
-
111
-
112
-
113
-
114
-
115
-
116
-
117
-
118
-
119
-
120
 |
 |
