Canon PowerShot SX400 IS User Guide - Page 4
Still Images, Movies - digital camera
 |
View all Canon PowerShot SX400 IS manuals
Add to My Manuals
Save this manual to your list of manuals |
Page 4 highlights
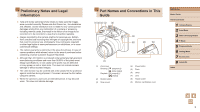
(1) (2) (3) (6) (7) (8) (9) (10) (11) (12) (13) (4) (5) (14) (15) (16) (1) Speaker (2) Microphone (3) AV OUT (Audio/video output) / DIGITAL terminal (4) Screen (LCD monitor) (5) DC coupler cable port (6) Indicator (7) [ (Playback)] button (8) Movie button (9) [ (Auto)] button (10) [ (Exposure compensation)] / Up button (11) FUNC./SET button (12) [ (Flash)] / Right button (13) [ (Self-timer)] / [ (Single-image erase)] / Down button (14) [ (Focusing range)] / Left button (15) [ (Display)] button (16) [ ] button ●● In this guide, icons are used to represent the corresponding camera buttons on which they appear, or which they resemble. ●● The following camera buttons and controls are represented by icons. [ ] Up button (10) on back [ ] Left button (14) on back [ ] Right button (12) on back [ ] Down button (13) on back ●● Shooting modes and on-screen icons and text are indicated in brackets. ●● : Important information you should know ●● : Notes and tips for expert camera use ●● =xx: Pages with related information (in this example, "xx" represents a page number) ●● Instructions in this guide apply to the camera under default settings. ●● For convenience, all supported memory cards are simply referred to as the "memory card". ●● The symbols " Still Images" and " Movies" below titles indicate how the function is used-whether for still images or movies. Before Use Basic Guide Advanced Guide 1 Camera Basics 2 Auto Mode 3 Other Shooting Modes 4 P Mode 5 Playback Mode 6 Setting Menu 7 Accessories 8 Appendix Index 4
-
 1
1 -
 2
2 -
 3
3 -
 4
4 -
 5
5 -
 6
6 -
 7
7 -
 8
8 -
 9
9 -
 10
10 -
11
-
12
-
13
-
14
-
15
-
16
-
17
-
18
-
19
-
20
-
21
-
22
-
23
-
24
-
25
-
26
-
27
-
28
-
29
-
30
-
31
-
32
-
33
-
34
-
35
-
36
-
37
-
38
-
39
-
40
-
41
-
42
-
43
-
44
-
45
-
46
-
47
-
48
-
49
-
50
-
51
-
52
-
53
-
54
-
55
-
56
-
57
-
58
-
59
-
60
-
61
-
62
-
63
-
64
-
65
-
66
-
67
-
68
-
69
-
70
-
71
-
72
-
73
-
74
-
75
-
76
-
77
-
78
-
79
-
80
-
81
-
82
-
83
-
84
-
85
-
86
-
87
-
88
-
89
-
90
-
91
-
92
-
93
-
94
-
95
-
96
-
97
-
98
-
99
-
100
-
101
-
102
-
103
-
104
-
105
-
106
-
107
-
108
-
109
-
110
-
111
-
112
-
113
-
114
-
115
-
116
-
117
-
118
-
119
-
120
 |
 |
