Canon XL-H1 XL H1 Instruction Manual - Page 17
Using a Household Power Outlet, About the Built-in Rechargeable Lithium Battery
 |
UPC - 086753092998
View all Canon XL-H1 manuals
Add to My Manuals
Save this manual to your list of manuals |
Page 17 highlights
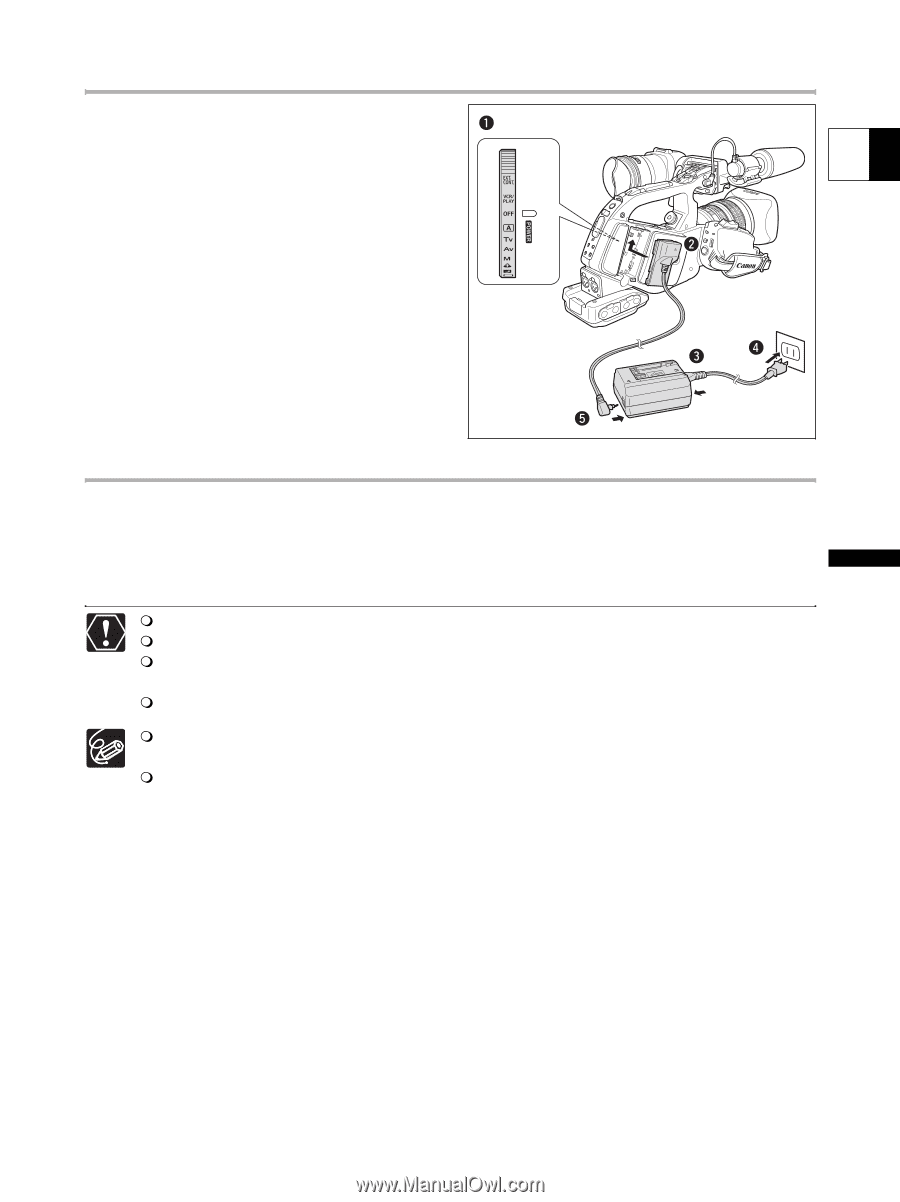
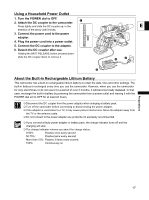
Using a Household Power Outlet 1. Turn the POWER dial to OFF. 2. Attach the DC coupler to the camcorder. Press lightly and slide the DC coupler up, in the E direction of the arrow until it clicks. 3. Connect the power cord to the power adapter. 4. Plug the power cord into a power outlet. 5. Connect the DC coupler to the adapter. 6. Detach the DC coupler after use. Holding the BATT.RELEASE button pressed down, slide the DC coupler down to remove it. Preparations About the Built-in Rechargeable Lithium Battery This camcorder has a built-in rechargeable lithium battery to retain the date, time and other settings. The built-in battery is recharged every time you use the camcorder. However, when you use the camcorder for only short times or do not use it for a period of over 3 months, it will become totally depleted. In that case, recharge the built-in battery by powering the camcorder from a power outlet and leaving it with the POWER dial set to OFF for at least 24 hours. Disconnect the DC coupler from the power adapter when charging a battery pack. Turn off the camcorder before connecting or disconnecting the power adapter. If the adapter is used close to a TV, it may cause picture interference. Move the adapter away from the TV or the antenna cable. Do not connect to the power adapter any products not expressly recommended. If you connect a faulty power adapter or battery pack, the charge indicator turns off and the charging will stop. The charge indicator informs you about the charge status. 0-50%: Flashes once every second 50-75%: Flashes twice every second More than 75%: Flashes 3 times every second 100%: Continuously on 17
-
 1
1 -
2
-
3
-
4
-
5
-
6
-
7
-
8
-
9
-
10
-
11
-
 12
12 -
 13
13 -
 14
14 -
 15
15 -
 16
16 -
 17
17 -
 18
18 -
 19
19 -
 20
20 -
 21
21 -
 22
22 -
23
-
24
-
25
-
26
-
27
-
28
-
29
-
30
-
31
-
32
-
33
-
34
-
35
-
36
-
37
-
38
-
39
-
40
-
41
-
42
-
43
-
44
-
45
-
46
-
47
-
48
-
49
-
50
-
51
-
52
-
53
-
54
-
55
-
56
-
57
-
58
-
59
-
60
-
61
-
62
-
63
-
64
-
65
-
66
-
67
-
68
-
69
-
70
-
71
-
72
-
73
-
74
-
75
-
76
-
77
-
78
-
79
-
80
-
81
-
82
-
83
-
84
-
85
-
86
-
87
-
88
-
89
-
90
-
91
-
92
-
93
-
94
-
95
-
96
-
97
-
98
-
99
-
100
-
101
-
102
-
103
-
104
-
105
-
106
-
107
-
108
-
109
-
110
-
111
-
112
-
113
-
114
-
115
-
116
-
117
-
118
-
119
-
120
-
121
-
122
-
123
-
124
-
125
-
126
-
127
-
128
-
129
-
130
-
131
-
132
-
133
-
134
-
135
-
136
-
137
-
138
-
139
-
140
-
141
-
142
-
143
-
144
-
145
-
146
-
147
-
148
-
149
-
150
-
151
-
152
-
153
-
154
-
155
-
156
-
157
-
158
-
159
-
160
-
161
 |
 |