Canon imageCLASS D340 imageCLASS D320/D340 Basic Guide - Page 34
Making Copies
 |
View all Canon imageCLASS D340 manuals
Add to My Manuals
Save this manual to your list of manuals |
Page 34 highlights
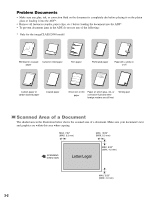
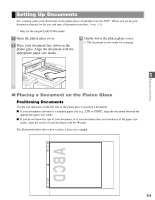
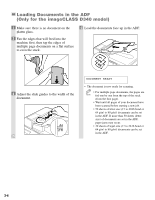
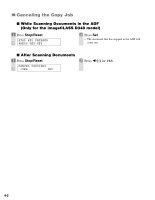
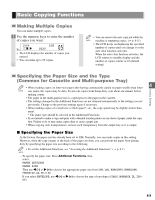
Chapter 4 Making Copies Documents You Can Copy For information on the types of documents you can copy, their requirements, and details on setting up documents, → Chapter 3. Copying Documents 1 Prepare the document and load it face up in the ADF* or place it face down on the platen glass. * Only for the imageCLASS D340 model 2 Set copy features if you wish. You can set the features below. • Copy quantity (→ p. 4-3) • Enlarging/reducing (→ p. 4-5) • Image quality (→ p. 4-6) • Exposure (→ p. 4-6) • Collate (→ p. 4-7) • 2 on 1 (→ p. 4-9) • Please note that you cannot change settings NOTE during copying. 3 Press Start to begin copying. SCANNING Ex: COPY NO. 0001 • If the paper in the cassette or multi-purpose tray runs out during copying, the LCD displays SUPPLY REC. PAPER. Load paper in the cassette or multi- purpose tray. When paper is loaded, the machine automatically resumes copying. • If you load paper while making copies, do NOTE not load a different paper size. • You can reserve the next copy job while the machine is outputting copies. (→ p. 4-11) • After the machine finishes copying, the settings will remain. However, if you press Stop/Reset or no key is pressed for 2 minutes, they will be 4 reset to the default settings ( The time until Making Copies the machine enters the AUTO CLEAR mode can be specified.) (→ p. 9-4). • The capacity of the output tray is 50 sheets (80 g/m2) of paper. To prevent paper jams, remove paper from the output tray before the count reaches 50. 4-1
-
 1
1 -
2
-
3
-
4
-
5
-
6
-
7
-
8
-
9
-
10
-
11
-
12
-
13
-
14
-
15
-
16
-
17
-
18
-
19
-
20
-
21
-
22
-
23
-
24
-
25
-
26
-
27
-
28
-
 29
29 -
 30
30 -
 31
31 -
 32
32 -
 33
33 -
 34
34 -
 35
35 -
 36
36 -
 37
37 -
 38
38 -
 39
39 -
40
-
41
-
42
-
43
-
44
-
45
-
46
-
47
-
48
-
49
-
50
-
51
-
52
-
53
-
54
-
55
-
56
-
57
-
58
-
59
-
60
-
61
-
62
-
63
-
64
-
65
-
66
-
67
-
68
-
69
-
70
-
71
-
72
-
73
-
74
-
75
-
76
-
77
-
78
-
79
-
80
-
81
-
82
-
83
-
84
-
85
-
86
 |
 |