Canon imageCLASS D340 imageCLASS D320/D340 Basic Guide - Page 64
Troubleshooting
 |
View all Canon imageCLASS D340 manuals
Add to My Manuals
Save this manual to your list of manuals |
Page 64 highlights
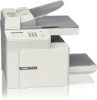
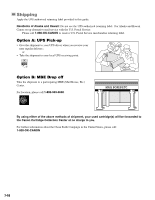
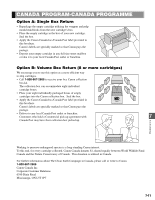
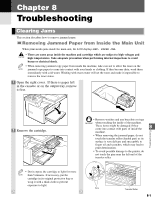
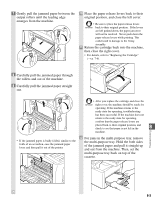
Chapter 8 Troubleshooting Clearing Jams This section describes how to remove jammed paper. Removing Jammed Paper from Inside the Main Unit When print media jams inside the main unit, the LCD displays REC. PAPER JAM. • There are some areas inside the machine and cartridge which are subject to high voltages and CAUTION high temperatures. Take adequate precaution when performing internal inspections to avoid burns or electrical shock. • When removing jammed copy paper from inside the machine, take care not to allow the toner on the NOTE jammed copy paper to come into contact with your hands or clothing. If they become dirty, wash them immediately with cold water. Washing with warm water will set the toner and make it impossible to remove the toner stains. 1 Open the right cover. If there is paper left in the cassette or on the output tray, remove it first. 2 Remove the cartridge. • Remove watches and any bracelets or rings IMPORTANT when touching the inside of the machine. These items might be damaged if they come into contact with parts of inside the 8 Troubleshooting machine. • When removing the jammed paper, do not touch the transfer roller (shaded part) as its surface is very delicate and susceptible to finger oil and scratches, which may lead to print deterioration. • To avoid possible damage to the printer, do not touch the pins near the left end of the transfer roller. • Don't expose the cartridge to light for more NOTE than 5 minutes. If necessary, put the cartridge in its original protective bag or wrap it with a thick cloth to prevent exposure to light. Pins Transfer Roller 8-1
-
 1
1 -
2
-
3
-
4
-
5
-
6
-
7
-
8
-
9
-
10
-
11
-
12
-
13
-
14
-
15
-
16
-
17
-
18
-
19
-
20
-
21
-
22
-
23
-
24
-
25
-
26
-
27
-
28
-
29
-
30
-
31
-
32
-
33
-
34
-
35
-
36
-
37
-
38
-
39
-
40
-
41
-
42
-
43
-
44
-
45
-
46
-
47
-
48
-
49
-
50
-
51
-
52
-
53
-
54
-
55
-
56
-
57
-
58
-
 59
59 -
 60
60 -
 61
61 -
 62
62 -
 63
63 -
 64
64 -
 65
65 -
 66
66 -
 67
67 -
 68
68 -
 69
69 -
70
-
71
-
72
-
73
-
74
-
75
-
76
-
77
-
78
-
79
-
80
-
81
-
82
-
83
-
84
-
85
-
86
 |
 |