Canon imageCLASS D530 Basic Guide - Page 47
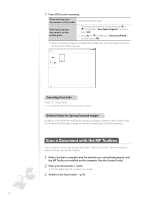
When the scan setting window appears, specify the scan settings as, When scanning is complete, click - software
 |
View all Canon imageCLASS D530 manuals
Add to My Manuals
Save this manual to your list of manuals |
Page 47 highlights
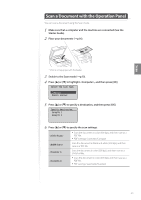
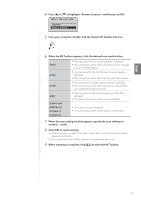
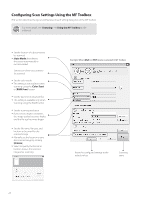
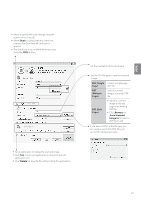
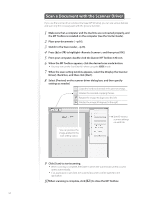
Scan 4 Press [▲] or [▼] to highlight , and then press [OK]. Select the scan type. Computer Remote Scanner 5 From your computer, double-click the [Canon MF Toolbox 4.9] icon. 6 When the MF Toolbox appears, click the desired scan mode button. [Mail] • The scan preset for an e-mail attachment is displayed. • The scanned document will be attached to a new message in your e-mail application. [OCR] • The scan preset for the OCR (Optical Character Reader) is displayed. • The scanned document will be read by your OCR software. [Save] • The scan preset for a high quality scanning is displayed. • The scanned document will be saved in the default folder or in a destination that you specify. [PDF] [Color Scan] [B&W Scan] [Custom 1] [Custom 2] • The scan preset for the multiple page searchable PDF is displayed. • The scanned document will be saved as a PDF file. • The custom setting is displayed. • The scanned document will be saved in a destination. 7 When the scan setting window appears, specify the scan settings as needed (→p.48). 8 Click [OK] to start scanning. • When scanning is complete, the folder in which the scanned document is saved is opened automatically. • The scanned document will be opened in the registered application. 9 When scanning is complete, click [ ] to close the MF Toolbox. 47
-
 1
1 -
2
-
3
-
4
-
5
-
6
-
7
-
8
-
9
-
10
-
11
-
12
-
13
-
14
-
15
-
16
-
17
-
18
-
19
-
20
-
21
-
22
-
23
-
24
-
25
-
26
-
27
-
28
-
29
-
30
-
31
-
32
-
33
-
34
-
35
-
36
-
37
-
38
-
39
-
40
-
41
-
 42
42 -
 43
43 -
 44
44 -
 45
45 -
 46
46 -
 47
47 -
 48
48 -
 49
49 -
 50
50 -
 51
51 -
 52
52 -
53
-
54
-
55
-
56
-
57
-
58
-
59
-
60
-
61
-
62
-
63
-
64
-
65
-
66
-
67
-
68
-
69
-
70
-
71
-
72
-
73
-
74
-
75
-
76
 |
 |