Canon imagePROGRAF iPF770 MFP M40 Basics Guide - Page 17
Removing the Roll from the Printer, ManageRemainRoll, Paper Reference Guide
 |
View all Canon imagePROGRAF iPF770 MFP M40 manuals
Add to My Manuals
Save this manual to your list of manuals |
Page 17 highlights
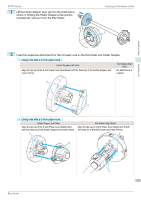
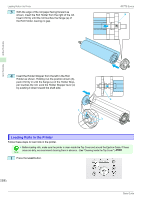
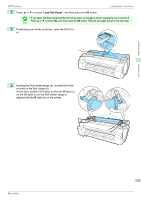
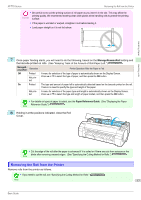
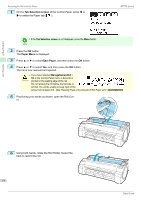
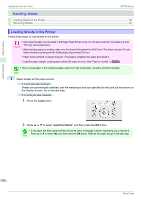
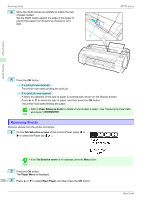
Handling Paper iPF770 Series Removing the Roll from the Printer • Be careful not to soil the printing surface of roll paper as you insert it in the slot. This may affect the printing quality. We recommend wearing clean cloth gloves when handling rolls to protect the printing Important surface. • If the paper is wrinkled or warped, straighten it out before loading it. • Load paper straight so it is not fed askew. 7 Once paper feeding starts, you will need to do the following, based on the ManageRemainRoll setting and the barcode printed on rolls. (See "Keeping Track of the Amount of Roll Paper Left.") ➔User's Guide ManageRemainRoll Barcodes Printer Operation After the Paper is Fed Off Printed A menu for selection of the type of paper is automatically shown on the Display Screen. Not prin- Press ▲ or ▼ to select the type of paper, and then press the OK button. ted On Printed The type and amount of paper left is automatically detected based on the barcode printed on the roll. There is no need to specify the type and length of the paper. Not printed A menu for selection of the paper type and length is automatically shown on the Display Screen. Press ▲ or ▼ to select the type and length of paper loaded, and then press the OK button. • For details on types of paper to select, see the Paper Reference Guide. (See "Displaying the Paper Note Reference Guide.") ➔User's Guide 8 Holding it at the positions indicated, close the Roll Cover. Handling rolls • Cut the edge of the roll after the paper is advanced if it is soiled or if there are cuts from scissors or the blade after removing creased edges. (See "Specifying the Cutting Method for Rolls.") ➔User's Guide Note Removing the Roll from the Printer Remove rolls from the printer as follows. • If you need to cut the roll, see "Specifying the Cutting Method for Rolls." ➔User's Guide Note 17 Basic Guide
-
 1
1 -
2
-
3
-
4
-
5
-
6
-
7
-
8
-
9
-
10
-
11
-
 12
12 -
 13
13 -
 14
14 -
 15
15 -
 16
16 -
 17
17 -
 18
18 -
 19
19 -
 20
20 -
 21
21 -
 22
22 -
23
-
24
-
25
-
26
-
27
-
28
-
29
-
30
-
31
-
32
-
33
-
34
-
35
-
36
-
37
-
38
-
39
-
40
-
41
-
42
-
43
-
44
-
45
-
46
-
47
-
48
-
49
-
50
-
51
-
52
-
53
-
54
-
55
-
56
-
57
-
58
-
59
-
60
-
61
-
62
-
63
-
64
-
65
-
66
-
67
-
68
-
69
-
70
-
71
-
72
-
73
-
74
-
75
-
76
-
77
-
78
-
79
-
80
-
81
-
82
-
83
-
84
-
85
-
86
-
87
-
88
-
89
-
90
-
91
-
92
-
93
-
94
-
95
-
96
-
97
-
98
-
99
-
100
-
101
-
102
-
103
-
104
-
105
-
106
-
107
-
108
-
109
-
110
-
111
-
112
-
113
-
114
-
115
-
116
-
117
-
118
-
119
-
120
-
121
-
122
-
123
-
124
-
125
-
126
-
127
-
128
-
129
-
130
-
131
-
132
 |
 |
