Canon imagePROGRAF iPF770 MFP M40 Basics Guide - Page 99
Image edges are blurred or white banding occurs, The contrast becomes uneven during printing
 |
View all Canon imagePROGRAF iPF770 MFP M40 manuals
Add to My Manuals
Save this manual to your list of manuals |
Page 99 highlights
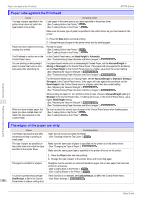
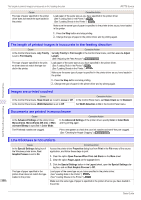
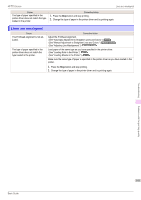
Troubleshooting iPF770 Series Image edges are blurred or white banding occurs Cause Printed colors may be uneven if you set the Print Quality too low. Corrective Action (See "Giving Priority to Particular Graphic Elements and Colors for Printing.") ➔User's Guide Color may be uneven between dark Select Unidirectional Printing in the Advanced Settings of the printer driver. and light image areas. When borderless printing is used, the edge of the paper is cut during printing. Thus, ink density may be slightly uneven at the leading edges. Specify No in Auto Cut in the printer driver before printing. In this case, the paper can be printed without borders on the left and right sides only. Cut the printed document ejected from the printer, and then use scissors or a cutting tool to cut away the edges on the top and bottom. Choose a higher level of Print Quality in the Advanced Settings of the printer driver. (See "Giving Priority to Particular Graphic Elements and Colors for Printing.") ➔User's Guide The Printhead is out of alignment. Adjust the Printhead alignment. (See "Automatic Adjustment to Straighten Lines and Colors.") ➔P.78 Allowing printed documents to dry on top of each other may cause uneven colors. To avoid uneven colors, we recommend drying each sheet separately. Density may be uneven if you use Glossy Paper or Coated Paper. In Advanced Settings of the printer driver, choose Highest or High in Print Quality. The type of paper specified in the printer driver does not match the type loaded in the printer. Load paper of the same type as you have specified in the printer driver. (See "Loading Rolls in the Printer.") ➔P.14 (See "Loading Sheets in the Printer.") ➔P.20 Make sure the same type of paper is specified in the printer driver as you have loaded in the printer. 1. Press the Stop button and stop printing. 2. Change the type of paper in the printer driver and try printing again. Scan Wait Time > Area in the Control Panel menu is set to Leading edge. When Scan Wait Time > Area is set to Leading edge, colors may be uneven 110-140 mm from the leading edge. (The position varies depending on the Print Quality setting.) In this case, select Scan Wait Time > Area > Entire area. However, note that printing will now take longer. (See "Menu Settings.") ➔User's Guide Image edges are blurred or white banding occurs Cause The Platen suction is too strong. Incorrect Printhead alignment value. The type of paper specified in the printer driver does not match the type loaded in the printer. Corrective Action In the Control Panel menu, reduce the level of VacuumStrngth. (See "Adjusting the Vacuum Strength.") ➔User's Guide In the Control Panel menu, set Head Height to a lower height. (See "Troubleshooting Paper Abrasion and Blurry Images.") ➔User's Guide Load paper of the same type as you have specified in the printer driver. (See "Loading Rolls in the Printer.") ➔P.14 (See "Loading Sheets in the Printer.") ➔P.20 Make sure the same type of paper is specified in the printer driver as you have loaded in the printer. 1. Press the Stop button and stop printing. 2. Change the type of paper in the printer driver and try printing again. The contrast becomes uneven during printing Cause Corrective Action The paper feed amount is out of adjust- Adjust the feed amount. ment. (See "Adjusting the Feed Amount.") ➔User's Guide 99 Problems with the printing quality Basic Guide
-
 1
1 -
2
-
3
-
4
-
5
-
6
-
7
-
8
-
9
-
10
-
11
-
12
-
13
-
14
-
15
-
16
-
17
-
18
-
19
-
20
-
21
-
22
-
23
-
24
-
25
-
26
-
27
-
28
-
29
-
30
-
31
-
32
-
33
-
34
-
35
-
36
-
37
-
38
-
39
-
40
-
41
-
42
-
43
-
44
-
45
-
46
-
47
-
48
-
49
-
50
-
51
-
52
-
53
-
54
-
55
-
56
-
57
-
58
-
59
-
60
-
61
-
62
-
63
-
64
-
65
-
66
-
67
-
68
-
69
-
70
-
71
-
72
-
73
-
74
-
75
-
76
-
77
-
78
-
79
-
80
-
81
-
82
-
83
-
84
-
85
-
86
-
87
-
88
-
89
-
90
-
91
-
92
-
93
-
 94
94 -
 95
95 -
 96
96 -
 97
97 -
 98
98 -
 99
99 -
 100
100 -
 101
101 -
 102
102 -
 103
103 -
 104
104 -
105
-
106
-
107
-
108
-
109
-
110
-
111
-
112
-
113
-
114
-
115
-
116
-
117
-
118
-
119
-
120
-
121
-
122
-
123
-
124
-
125
-
126
-
127
-
128
-
129
-
130
-
131
-
132
 |
 |