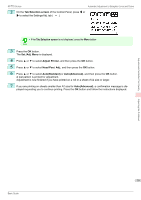
Canon imagePROGRAF iPF770 MFP M40 Basics Guide - Page 78
Adjustments for Better Print Quality, Adjusting the Printhead
 |
View all Canon imagePROGRAF iPF770 MFP M40 manuals
Add to My Manuals
Save this manual to your list of manuals |
Page 78 highlights
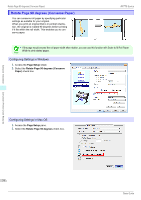
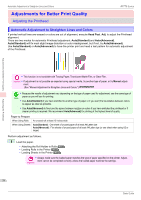
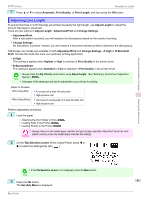
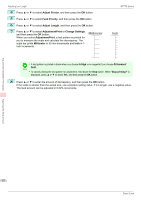
Automatic Adjustment to Straighten Lines and Colors Adjustments for Better Print Quality Adjusting the Printhead iPF770 Series Automatic Adjustment to Straighten Lines and Colors If printed vertical lines are warped or colors are out of alignment, execute Head Posi. Adj. to adjust the Printhead alignment. There are two modes for automatic Printhead adjustment: Auto(Standard) and Auto(Advanced). Auto(Standard) will fix most slight image distortion or color misalignment, but if not, try Auto(Advanced). Use Auto(Standard) or Auto(Advanced) to have the printer print and read a test pattern for automatic adjustment of the Printhead. Adjustments for Better Print Quality Adjusting the Printhead • This function is not available with Tracing Paper, Translucent Matte Film, or Clear Film. Important • If adjustment is not possible as expected using special media, try another type of paper, or try Manual adjust- ment. (See "Manual Adjustment to Straighten Lines and Colors.") ➔User's Guide • Because the results of adjustment vary depending on the type of paper used for adjustment, use the same type of paper as you will use for printing. Note • Use Auto(Standard) if you have switched to another type of paper or if you want the boundaries between colors to appear as clear as possible. • Use Auto(Advanced) to fine-tune the space between nozzles or colors if you have switched the printhead or if clearer printing is required. We recommend Auto(Advanced) for printing at the highest level of quality. Paper to Prepare When Using Rolls When Using Sheets An unused roll at least 10 inches wide Auto(Standard) : One sheet of unused paper of at least A4/Letter size Auto(Advanced) : Five sheets of unused paper of at least A4/Letter size (or one sheet when using A2 or larger) Perform adjustment as follows. 1 Load the paper. • Attaching the Roll Holder to Rolls ➔P.12 • Loading Rolls in the Printer ➔P.14 • Loading Sheets in the Printer ➔P.20 • Always make sure the loaded paper matches the type of paper specified on the printer. Adjust- Important ment cannot be completed correctly unless the loaded paper matches the settings. 78 Basic Guide
-
 1
1 -
2
-
3
-
4
-
5
-
6
-
7
-
8
-
9
-
10
-
11
-
12
-
13
-
14
-
15
-
16
-
17
-
18
-
19
-
20
-
21
-
22
-
23
-
24
-
25
-
26
-
27
-
28
-
29
-
30
-
31
-
32
-
33
-
34
-
35
-
36
-
37
-
38
-
39
-
40
-
41
-
42
-
43
-
44
-
45
-
46
-
47
-
48
-
49
-
50
-
51
-
52
-
53
-
54
-
55
-
56
-
57
-
58
-
59
-
60
-
61
-
62
-
63
-
64
-
65
-
66
-
67
-
68
-
69
-
70
-
71
-
72
-
 73
73 -
 74
74 -
 75
75 -
 76
76 -
 77
77 -
 78
78 -
 79
79 -
 80
80 -
 81
81 -
 82
82 -
 83
83 -
84
-
85
-
86
-
87
-
88
-
89
-
90
-
91
-
92
-
93
-
94
-
95
-
96
-
97
-
98
-
99
-
100
-
101
-
102
-
103
-
104
-
105
-
106
-
107
-
108
-
109
-
110
-
111
-
112
-
113
-
114
-
115
-
116
-
117
-
118
-
119
-
120
-
121
-
122
-
123
-
124
-
125
-
126
-
127
-
128
-
129
-
130
-
131
-
132
 |
 |