Cisco AS5400XM Installation Guide - Page 61
Installing the Universal Port or Dial-Only Feature Card in the Cisco AS5400XM
 |
UPC - 746320997261
View all Cisco AS5400XM manuals
Add to My Manuals
Save this manual to your list of manuals |
Page 61 highlights
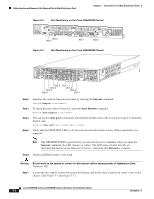
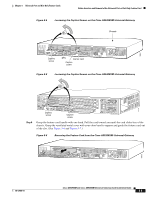
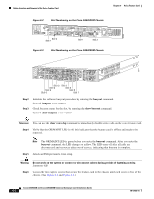
Chapter 5 Universal Port and Dial-Only Feature Cards Online Insertion and Removal of the Universal Port or Dial-Only Feature Card Figure 5-10 Installing the Universal Port or Dial-Only Feature Card in the Cisco AS5400XM Universal Gateway 37201 Step 3 Step 4 Step 5 Align the captive screws with their holes, and then seat the card completely. Seat the feature card in the carrier by pushing the card firmly until the captive screws are aligned with their holes. Tighten the screws to secure the feature card to the chassis. (See Figure 5-11 and Figure 5-12.) Figure 5-11 Tightening the Captive Screws on the Cisco AS5350XM Universal Gateway Chassis 36818 Captive screw DFC Carrier card Captive screw Figure 5-12 Tightening the Captive Screws on the Cisco AS5400XM Universal Gateway 37202 78-17406-01 Captive screw Captive screw Cisco AS5350XM and Cisco AS5400XM Universal Gateways Card Installation Guide 5-9
-
 1
1 -
2
-
3
-
4
-
5
-
6
-
7
-
8
-
9
-
10
-
11
-
12
-
13
-
14
-
15
-
16
-
17
-
18
-
19
-
20
-
21
-
22
-
23
-
24
-
25
-
26
-
27
-
28
-
29
-
30
-
31
-
32
-
33
-
34
-
35
-
36
-
37
-
38
-
39
-
40
-
41
-
42
-
43
-
44
-
45
-
46
-
47
-
48
-
49
-
50
-
51
-
52
-
53
-
54
-
55
-
 56
56 -
 57
57 -
 58
58 -
 59
59 -
 60
60 -
 61
61 -
 62
62 -
 63
63 -
 64
64 -
 65
65 -
 66
66 -
67
-
68
-
69
-
70
-
71
-
72
-
73
-
74
-
75
-
76
-
77
-
78
-
79
-
80
-
81
-
82
-
83
-
84
-
85
-
86
-
87
-
88
-
89
-
90
-
91
-
92
-
93
-
94
-
95
-
96
-
97
-
98
-
99
-
100
-
101
-
102
-
103
-
104
 |
 |
