Cisco SPA2102-NA User Guide - Page 57
For Windows XP, Internet Protocol TCP/IP Properties, Local Area Connection Properties
 |
View all Cisco SPA2102-NA manuals
Add to My Manuals
Save this manual to your list of manuals |
Page 57 highlights
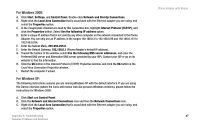
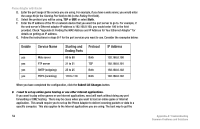
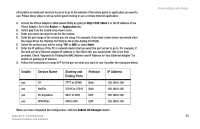
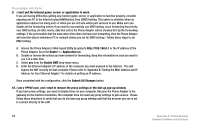
4. Click the OK button in the Internet Protocol (TCP/IP) Properties window, and click the OK button in the Local Area Connection Properties window. 5. Restart the computer if asked. 6. Click the OK button in the Internet Protocol (TCP/IP) Properties window, and click the OK button in the Local Area Connection Properties window. 7. Restart the computer if asked. For Windows XP: The following instructions assume you are running Windows XP with the default interface. If you are using the Classic interface (where the icons and menus look like previous Windows versions), please follow the instructions for Windows 2000. 1. Click Start and Control Panel. 2. Click the Network and Internet Connections icon and then the Network Connections icon. 3. Right-click the Local Area Connection that is associated with the Ethernet adapter you are using, and select the Properties option. 4. In the This connection uses the following items box, highlight Internet Protocol (TCP/IP), and click the Properties button. Make sure that Obtain an IP address automatically and Obtain DNS server address automatically are selected. B. Open a command prompt. • For Windows 98 and Millennium, click Start and Run. In the Open field, type command. Press the Enter key or click the OK button. • For Windows 2000 and XP, click Start and Run. In the Open field, type cmd. Press the Enter key or click the OK button. C. In the command prompt, type ping 192.168.0.1 and press the Enter key. • If you get a reply, the computer is communicating with the Phone Adapter. Appendix A: Troubleshooting Common Problems and Solutions Phone Adapter with Router 49
-
 1
1 -
2
-
3
-
4
-
5
-
6
-
7
-
8
-
9
-
10
-
11
-
12
-
13
-
14
-
15
-
16
-
17
-
18
-
19
-
20
-
21
-
22
-
23
-
24
-
25
-
26
-
27
-
28
-
29
-
30
-
31
-
32
-
33
-
34
-
35
-
36
-
37
-
38
-
39
-
40
-
41
-
42
-
43
-
44
-
45
-
46
-
47
-
48
-
49
-
50
-
51
-
 52
52 -
 53
53 -
 54
54 -
 55
55 -
 56
56 -
 57
57 -
 58
58 -
 59
59 -
 60
60 -
 61
61 -
 62
62 -
63
-
64
-
65
-
66
-
67
-
68
-
69
-
70
-
71
-
72
-
73
-
74
-
75
-
76
-
77
-
78
-
79
-
80
-
81
-
82
-
83
-
84
-
85
-
86
-
87
-
88
-
89
-
90
 |
 |