Compaq Portable 286 Compaq Portable Computer, Compaq Plus Personal Computer, a - Page 65
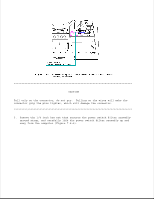
Slide the power supply assembly toward the rear of the computer
 |
View all Compaq Portable 286 manuals
Add to My Manuals
Save this manual to your list of manuals |
Page 65 highlights
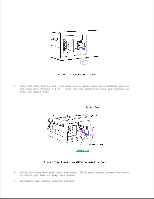
4. Using the two piece socket tool and the socket or a 5/16 inch box end wrench, unscrew the spring loaded hexhead screw that is on the lower corner of the power supply assembly (Figure 7.8-8). 5. Partially close the access door panel to allow the standoffs to disengage the chassis. 6. Slide the power supply assembly toward the rear of the computer to disengage the three standoffs from the slots in the chassis. This
-
 1
1 -
2
-
3
-
4
-
5
-
6
-
7
-
8
-
9
-
10
-
11
-
12
-
13
-
14
-
15
-
16
-
17
-
18
-
19
-
20
-
21
-
22
-
23
-
24
-
25
-
26
-
27
-
28
-
29
-
30
-
31
-
32
-
33
-
34
-
35
-
36
-
37
-
38
-
39
-
40
-
41
-
42
-
43
-
44
-
45
-
46
-
47
-
48
-
49
-
50
-
51
-
52
-
53
-
54
-
55
-
56
-
57
-
58
-
59
-
 60
60 -
 61
61 -
 62
62 -
 63
63 -
 64
64 -
 65
65 -
 66
66 -
 67
67 -
 68
68 -
 69
69 -
 70
70 -
71
-
72
-
73
-
74
-
75
-
76
-
77
-
78
-
79
-
80
-
81
-
82
-
83
-
84
-
85
-
86
-
87
-
88
-
89
-
90
-
91
-
92
-
93
-
94
-
95
-
96
-
97
-
98
-
99
-
100
-
101
-
102
-
103
-
104
-
105
-
106
-
107
-
108
-
109
-
110
-
111
-
112
-
113
-
114
-
115
-
116
-
117
-
118
-
119
-
120
-
121
-
122
-
123
-
124
-
125
-
126
-
127
-
128
-
129
 |
 |

4. Using the two piece socket tool and the socket or a 5/16 inch box end
wrench, unscrew the spring loaded hexhead screw that is on the lower
corner of the power supply assembly (Figure 7.8-8).
5. Partially close the access door panel to allow the standoffs to disengage
the chassis.
6. Slide the power supply assembly toward the rear of the computer to
disengage the three standoffs from the slots in the chassis. This