D-Link DWL-8500AP Product Manual - Page 23
Dynamic and Static IP Addressing on the AP, Recovering an IP Address - manual
 |
UPC - 790069297212
View all D-Link DWL-8500AP manuals
Add to My Manuals
Save this manual to your list of manuals |
Page 23 highlights
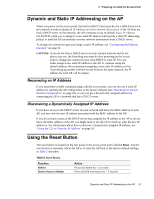
2 Preparing to Install the Access Point Dynamic and Static IP Addressing on the AP When you power on the access point, the built-in DHCP client searches for a DHCP server on the network in order to obtain an IP Address and other network information. If the AP does not find a DHCP server on the network, the AP continues to use its default Static IP Address (10.90.90.91) until you re-assign it a new static IP address (and specify a static IP addressing policy) or until the AP successfully receives network information from a DHCP server. To change the connection type and assign a static IP address, see "Configuring the Ethernet Interface" on page 31. CAUTION: If you do not have a DHCP server on your internal network and do not plan to use one, the first thing you must do after powering on the access point is change the connection type from DHCP to static IP. You can either assign a new static IP address to the AP or continue using the default address. We recommend assigning a new static IP address so that if you bring up another Unified Access Point on the same network, the IP address for each AP will be unique. Recovering an IP Address If you experience trouble communicating with the access point, you can recover a static IP address by resetting the AP configuration to the factory defaults (see "Resetting the Factory Default Configuration" on page 82), or you can get a dynamically assigned address by connecting the AP to a network that has a DHCP server. Discovering a Dynamically Assigned IP Address If you have access to the DHCP server on your network and know the MAC address of your AP, you can view the new IP address associated with the MAC address of the AP. If you do not have access to the DHCP server that assigned the IP address to the AP or do not know the MAC address of the AP, you might need to use the CLI to find out what the new IP address is. For information about how to discover a dynamically assigned IP address, see "Using the CLI to View the IP Address" on page 30. Using the Reset Button The reset button is located on the rear panel of the access point and is labeled Reset. Use the reset button to manually reboot the AP or to reset the AP back to the factory default settings, as Table 5 describes. Table 5. Reset Button Function Reboot Reset to factory defaults Action Press reset button for < 2 seconds Press and hold reset button for > 5 seconds Dynamic and Static IP Addressing on the AP 23
-
 1
1 -
2
-
3
-
4
-
5
-
6
-
7
-
8
-
9
-
10
-
11
-
12
-
13
-
14
-
15
-
16
-
17
-
 18
18 -
 19
19 -
 20
20 -
 21
21 -
 22
22 -
 23
23 -
 24
24 -
 25
25 -
 26
26 -
 27
27 -
 28
28 -
29
-
30
-
31
-
32
-
33
-
34
-
35
-
36
-
37
-
38
-
39
-
40
-
41
-
42
-
43
-
44
-
45
-
46
-
47
-
48
-
49
-
50
-
51
-
52
-
53
-
54
-
55
-
56
-
57
-
58
-
59
-
60
-
61
-
62
-
63
-
64
-
65
-
66
-
67
-
68
-
69
-
70
-
71
-
72
-
73
-
74
-
75
-
76
-
77
-
78
-
79
-
80
-
81
-
82
-
83
-
84
-
85
-
86
-
87
-
88
-
89
-
90
-
91
-
92
-
93
-
94
-
95
-
96
-
97
-
98
-
99
-
100
-
101
-
102
-
103
-
104
-
105
-
106
-
107
-
108
-
109
-
110
-
111
-
112
-
113
-
114
-
115
-
116
-
117
-
118
-
119
-
120
-
121
-
122
-
123
-
124
-
125
-
126
-
127
-
128
-
129
-
130
-
131
-
132
-
133
-
134
-
135
-
136
-
137
-
138
-
139
-
140
-
141
-
142
-
143
-
144
-
145
-
146
-
147
-
148
-
149
-
150
-
151
-
152
-
153
-
154
-
155
-
156
-
157
-
158
-
159
-
160
-
161
-
162
-
163
-
164
-
165
-
166
-
167
-
168
 |
 |
