Dell Dimension 2200 Dell Dimension 2200 Owner's Manual - Page 73
Adding Cards
 |
View all Dell Dimension 2200 manuals
Add to My Manuals
Save this manual to your list of manuals |
Page 73 highlights
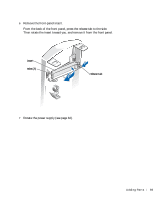
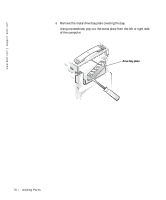
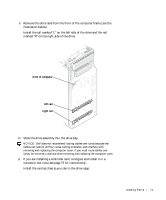
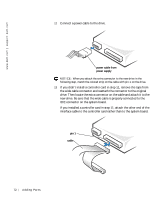
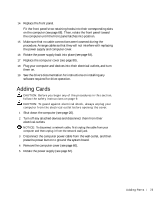
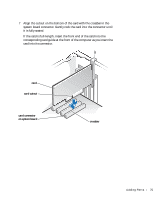
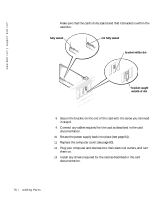
14 Replace the front panel. Fit the front panel's two retaining hooks into their corresponding slots on the computer (see page 68). Then, rotate the front panel toward the computer until the front panel latches into position. 15 Make sure that no cable connections were loosened during the procedure. Arrange cables so that they will not interfere with replacing the power supply and computer cover. 16 Rotate the power supply back into place (see page 64). 17 Replace the computer cover (see page 80). 18 Plug your computer and devices into their electrical outlets, and turn them on. 19 See the drive's documentation for instructions on installing any software required for drive operation. Adding Cards CAUTION: Before you begin any of the procedures in this section, follow the safety instructions on page 9. CAUTION: To guard against electrical shock, always unplug your computer from the electrical outlet before opening the cover. 1 Shut down the computer (see page 20). 2 Turn off any attached devices and disconnect them from their electrical outlets. NOTICE: To disconnect a network cable, first unplug the cable from your computer and then unplug it from the network wall jack. 3 Disconnect the computer power cable from the wall outlet, and then press the power button to ground the system board. 4 Remove the computer cover (see page 60). 5 Rotate the power supply (see page 62). Adding Pa rts 73
-
 1
1 -
2
-
3
-
4
-
5
-
6
-
7
-
8
-
9
-
10
-
11
-
12
-
13
-
14
-
15
-
16
-
17
-
18
-
19
-
20
-
21
-
22
-
23
-
24
-
25
-
26
-
27
-
28
-
29
-
30
-
31
-
32
-
33
-
34
-
35
-
36
-
37
-
38
-
39
-
40
-
41
-
42
-
43
-
44
-
45
-
46
-
47
-
48
-
49
-
50
-
51
-
52
-
53
-
54
-
55
-
56
-
57
-
58
-
59
-
60
-
61
-
62
-
63
-
64
-
65
-
66
-
67
-
 68
68 -
 69
69 -
 70
70 -
 71
71 -
 72
72 -
 73
73 -
 74
74 -
 75
75 -
 76
76 -
 77
77 -
 78
78 -
79
-
80
-
81
-
82
-
83
-
84
-
85
-
86
-
87
-
88
-
89
-
90
-
91
-
92
-
93
-
94
-
95
-
96
-
97
-
98
-
99
-
100
-
101
-
102
-
103
-
104
-
105
-
106
-
107
-
108
-
109
-
110
-
111
-
112
-
113
-
114
-
115
-
116
-
117
-
118
-
119
-
120
-
121
-
122
-
123
-
124
-
125
-
126
-
127
-
128
-
129
-
130
-
131
-
132
-
133
-
134
-
135
-
136
-
137
-
138
-
139
-
140
 |
 |