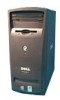
Dell Dimension 2200 Dell Dimension 2200 Owner's Manual - Page 80
Replacing the Computer Cover
 |
View all Dell Dimension 2200 manuals
Add to My Manuals
Save this manual to your list of manuals |
Page 80 highlights
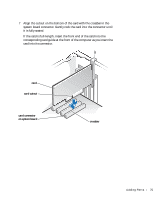
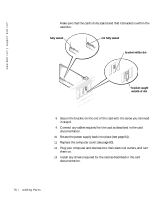
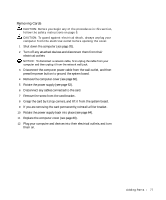
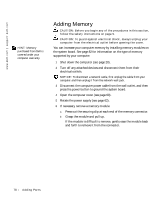
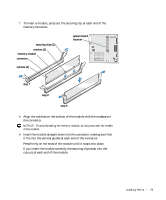
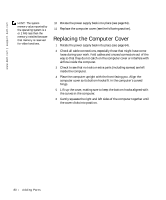
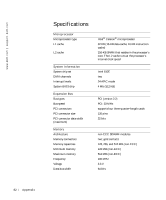
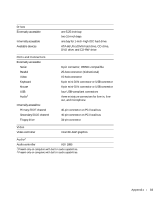
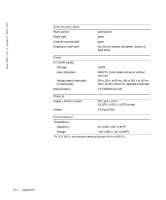
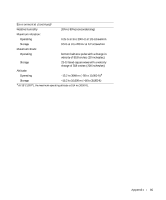
www.dell.com | support.dell.com HINT: The system memory value reported by the operating system is 1 or 2 MB less than the memory installed because that memory is reserved for video functions. 10 Rotate the power supply back into place (see page 64). 11 Replace the computer cover (see the following section). Replacing the Computer Cover 1 Rotate the power supply back into place (see page 64). 2 Check all cable connections, especially those that might have come loose during your work. Fold cables and unused connectors out of the way so that they do not catch on the computer cover or interfere with airflow inside the computer. 3 Check to see that no tools or extra parts (including screws) are left inside the computer. 4 Place the computer upright with the front facing you. Align the computer cover so its bottom hooks fit in the computer's curved hinge. 5 Lift up the cover, making sure to keep the bottom hooks aligned with the curves in the computer. 6 Gently squeeze the right and left sides of the computer together until the cover clicks into position. 80 A d d i n g Pa r ts
-
 1
1 -
2
-
3
-
4
-
5
-
6
-
7
-
8
-
9
-
10
-
11
-
12
-
13
-
14
-
15
-
16
-
17
-
18
-
19
-
20
-
21
-
22
-
23
-
24
-
25
-
26
-
27
-
28
-
29
-
30
-
31
-
32
-
33
-
34
-
35
-
36
-
37
-
38
-
39
-
40
-
41
-
42
-
43
-
44
-
45
-
46
-
47
-
48
-
49
-
50
-
51
-
52
-
53
-
54
-
55
-
56
-
57
-
58
-
59
-
60
-
61
-
62
-
63
-
64
-
65
-
66
-
67
-
68
-
69
-
70
-
71
-
72
-
73
-
74
-
 75
75 -
 76
76 -
 77
77 -
 78
78 -
 79
79 -
 80
80 -
 81
81 -
 82
82 -
 83
83 -
 84
84 -
 85
85 -
86
-
87
-
88
-
89
-
90
-
91
-
92
-
93
-
94
-
95
-
96
-
97
-
98
-
99
-
100
-
101
-
102
-
103
-
104
-
105
-
106
-
107
-
108
-
109
-
110
-
111
-
112
-
113
-
114
-
115
-
116
-
117
-
118
-
119
-
120
-
121
-
122
-
123
-
124
-
125
-
126
-
127
-
128
-
129
-
130
-
131
-
132
-
133
-
134
-
135
-
136
-
137
-
138
-
139
-
140
 |
 |