Dell Latitude XT2 XFR Service Manual - Page 69
USB Module Bay Cover
 |
View all Dell Latitude XT2 XFR manuals
Add to My Manuals
Save this manual to your list of manuals |
Page 69 highlights
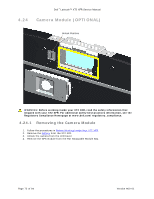
Dell™ Latitude™ XT2 XFR Service Manual 4.21.3 Removing the Power Door 1. Follow the procedures in Before Working Inside Your XT2 XFR. 2. Remove the two(2.5 x 5-mm) screws from the door hinge connected to the bottom chassis. 3. Rotate the pull tab to release the lock and open the door to remove. 4.21.4 Removing the Audio/Card Socket Door 1. Follow the procedures in Before Working Inside Your XT2 XFR. 2. Remove the two(2.5 x 5-mm) screws from the door hinge connected to the bottom chassis. 3. Rotate the pull tab to release the lock and open the door to remove. 4.22 USB Module Bay Cover Page 69 of 94 Version A00-01
-
 1
1 -
2
-
3
-
4
-
5
-
6
-
7
-
8
-
9
-
10
-
11
-
12
-
13
-
14
-
15
-
16
-
17
-
18
-
19
-
20
-
21
-
22
-
23
-
24
-
25
-
26
-
27
-
28
-
29
-
30
-
31
-
32
-
33
-
34
-
35
-
36
-
37
-
38
-
39
-
40
-
41
-
42
-
43
-
44
-
45
-
46
-
47
-
48
-
49
-
50
-
51
-
52
-
53
-
54
-
55
-
56
-
57
-
58
-
59
-
60
-
61
-
62
-
63
-
 64
64 -
 65
65 -
 66
66 -
 67
67 -
 68
68 -
 69
69 -
 70
70 -
 71
71 -
 72
72 -
 73
73 -
 74
74 -
75
-
76
-
77
-
78
-
79
-
80
-
81
-
82
-
83
-
84
-
85
-
86
-
87
-
88
-
89
-
90
-
91
-
92
-
93
-
94
 |
 |

Dell
™
Latitude™ XT2 XFR Service Manual
Page 69 of 94
Version A00-01
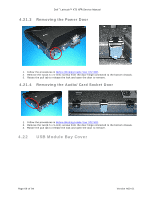
4.21.3
Removing the Power Door
1.
Follow the procedures in
Before Working Inside Your XT2 XFR
.
2.
Remove the two(2.5 x 5-mm) screws from the door hinge connected to the bottom chassis.
3.
Rotate the pull tab to release the lock and open the door to remove.
4.21.4
Removing the Audio/Card Socket Door
1.
Follow the procedures in
Before Working Inside Your XT2 XFR
.
2.
Remove the two(2.5 x 5-mm) screws from the door hinge connected to the bottom chassis.
3.
Rotate the pull tab to release the lock and open the door to remove.
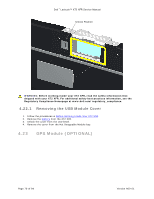
4.22
USB Module Bay Cover