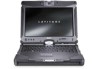
Dell Latitude XT2 XFR Service Manual - Page 75
Starting the Dell Diagnostics From the Drivers and Utilities Media - reviews
 |
View all Dell Latitude XT2 XFR manuals
Add to My Manuals
Save this manual to your list of manuals |
Page 75 highlights
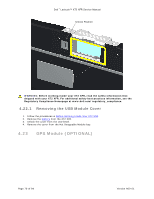
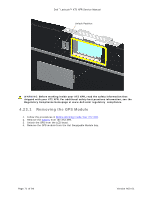
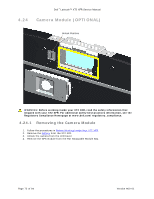
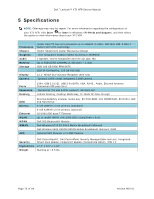
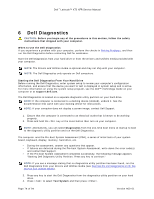
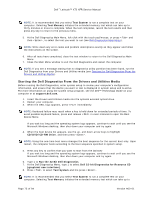
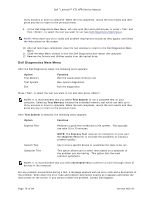
Dell™ Latitude™ XT2 XFR Service Manual NOTE: It is recommended that you select Test System to run a complete test on your computer. Selecting Test Memory initiates the extended memory test which can take up to thirty minutes or more to complete. When the test completes, record the test results and then press any key to return to the previous menu. 5. At the Dell Diagnostics Main Menu, left-click with the touch pad/mouse, or press and then , to select the test you want to run (see Dell Diagnostics Main Menu). NOTE: Write down any error codes and problem descriptions exactly as they appear and follow the instructions on the screen. 6. After all tests have completed, close the test window to return to the Dell Diagnostics Main Menu. 7. Close the Main Menu window to exit the Dell Diagnostics and restart the computer. NOTE: If you see a message stating that no diagnostics utility partition has been found, run the Dell Diagnostics from your Drivers and Utilities media (see Starting the Dell Diagnostics From the Drivers and Utilities Media). Starting the Dell Diagnostics From the Drivers and Utilities Media Before running the Dell Diagnostics, enter system setup to review your computer's configuration information, and ensure that the device you want to test is displayed in system setup and is active. For more information on using the system setup program, see the Dell™ Technology Guide on your computer or at support.dell.com. 1. Insert the Drivers and Utilities media into the optional external optical drive. 2. Restart your computer. 3. When the DELL logo appears, press immediately. NOTE: Keyboard failure may result when a key is held down for extended periods of time. To avoid possible keyboard failure, press and release in even intervals to open the Boot Device Menu. If you wait too long and the operating system logo appears, continue to wait until you see the Microsoft Windows desktop, then shut down your computer and try again. 4. When the boot device list appears, use the up- and down-arrow keys to highlight CD/DVD/CD-RW Drive, and then press . NOTE: Using the one-time boot menu changes the boot sequence for the current boot only. Upon restart, the computer boots according to the boot sequence specified in system setup. 5. Press any key to confirm that you want to start from the CD/DVD If you wait too long and the operating system logo appears, continue to wait until you see the Microsoft Windows desktop, then shut down your computer and try again. 6. Type 1 to Run the 32 Bit Dell Diagnostics. 7. At the Dell Diagnostics Menu, type 1 to select Dell 32-bit Diagnostics for Resource CD (graphical user interface). 8. Press to select Test System and the press . NOTE: It is recommended that you select Test System to run a complete test on your computer. Selecting Test Memory initiates the extended memory test which can take up to Page 75 of 94 Version A00-01
-
 1
1 -
2
-
3
-
4
-
5
-
6
-
7
-
8
-
9
-
10
-
11
-
12
-
13
-
14
-
15
-
16
-
17
-
18
-
19
-
20
-
21
-
22
-
23
-
24
-
25
-
26
-
27
-
28
-
29
-
30
-
31
-
32
-
33
-
34
-
35
-
36
-
37
-
38
-
39
-
40
-
41
-
42
-
43
-
44
-
45
-
46
-
47
-
48
-
49
-
50
-
51
-
52
-
53
-
54
-
55
-
56
-
57
-
58
-
59
-
60
-
61
-
62
-
63
-
64
-
65
-
66
-
67
-
68
-
69
-
 70
70 -
 71
71 -
 72
72 -
 73
73 -
 74
74 -
 75
75 -
 76
76 -
 77
77 -
 78
78 -
 79
79 -
 80
80 -
81
-
82
-
83
-
84
-
85
-
86
-
87
-
88
-
89
-
90
-
91
-
92
-
93
-
94
 |
 |
