Dell PowerVault MD1000 Hardware Owners Manual - Page 28
Removing and Installing Drives, CAUTION, NOTICE - sata
 |
View all Dell PowerVault MD1000 manuals
Add to My Manuals
Save this manual to your list of manuals |
Page 28 highlights
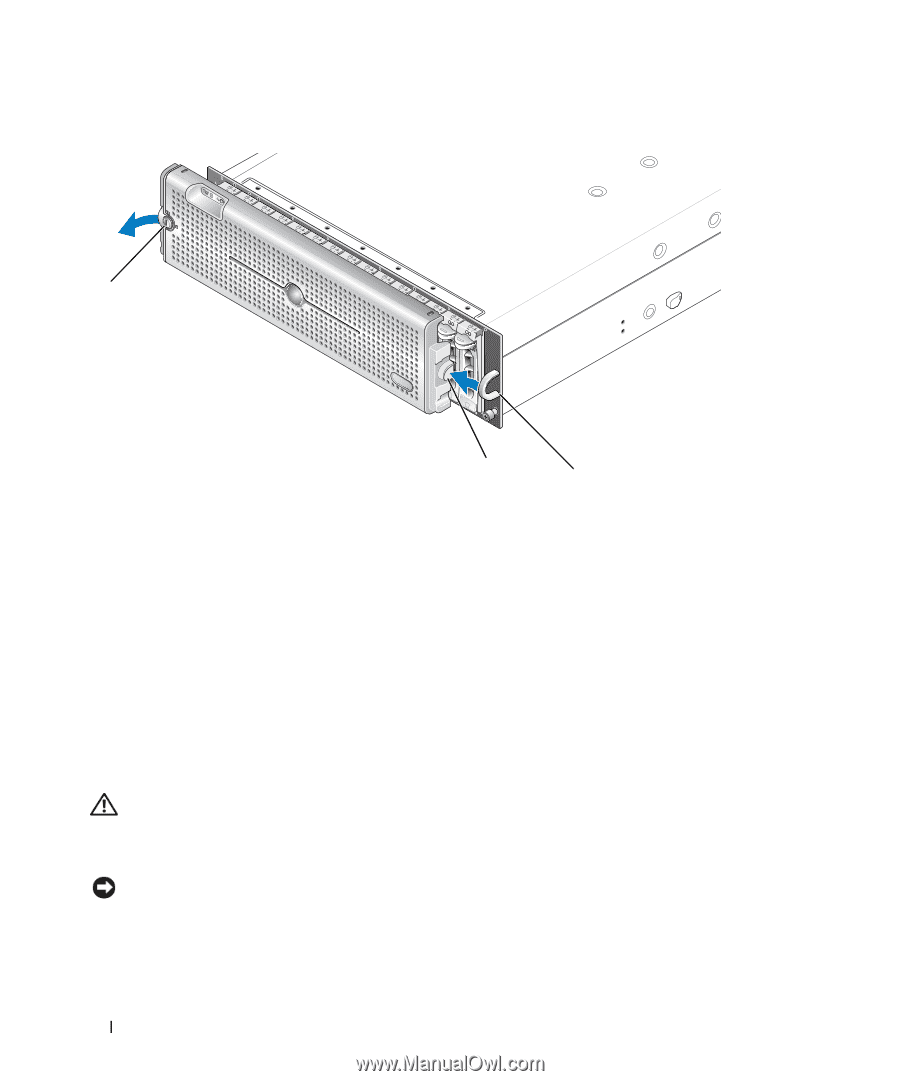
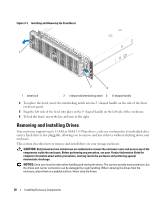
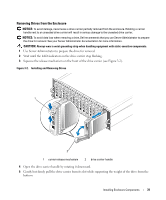
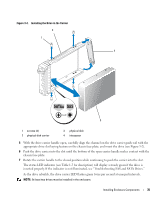
Figure 3-1. Installing and Removing the Front Bezel 1 2 3 1 bezel lock 2 release tab/interlocking notch 3 U-shaped handle 4 To replace the bezel, insert the interlocking notch into the U-shaped handle on the side of the front enclosure panel. 5 Snap the left side of the bezel into place in the U-shaped handle on the left side of the enclosure. 6 To lock the bezel, insert the key and turn to the right. Removing and Installing Drives Your enclosure supports up to 15 SAS or SATA 3.0-Gbps drives, each one contained in its individual drive carrier. Each drive is hot-pluggable, allowing you to remove and insert drives without shutting down your enclosure. This section describes how to remove and install drives in your storage enclosure. CAUTION: Only trained service technicians are authorized to remove the enclosure cover and access any of the components inside the enclosure. Before performing any procedure, see your Product Information Guide for complete information about safety precautions, working inside the enclosure and protecting against electrostatic discharge. NOTICE: Extra care must be taken when handling and storing the drives. The carriers provide some protection, but the drives and carrier connectors can be damaged by rough handling. When removing the drives from the enclosure, place them on a padded surface. Never drop the drives. 30 Installing Enclosure Components
-
 1
1 -
2
-
3
-
4
-
5
-
6
-
7
-
8
-
9
-
10
-
11
-
12
-
13
-
14
-
15
-
16
-
17
-
18
-
19
-
20
-
21
-
22
-
 23
23 -
 24
24 -
 25
25 -
 26
26 -
 27
27 -
 28
28 -
 29
29 -
 30
30 -
 31
31 -
 32
32 -
 33
33 -
34
-
35
-
36
-
37
-
38
-
39
-
40
-
41
-
42
-
43
-
44
-
45
-
46
-
47
-
48
-
49
-
50
-
51
-
52
-
53
-
54
-
55
-
56
-
57
-
58
-
59
-
60
-
61
-
62
-
63
-
64
 |
 |