Electrolux CEI30EF5GS Service Manual - Page 33
With the outer door panel remove the door filler trims
 |
View all Electrolux CEI30EF5GS manuals
Add to My Manuals
Save this manual to your list of manuals |
Page 33 highlights
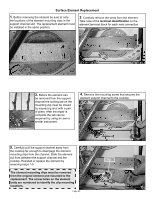
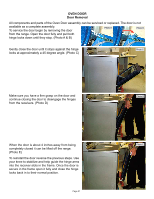
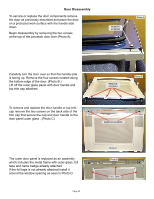
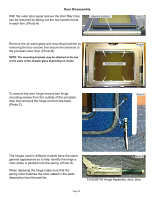
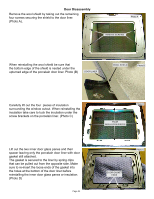
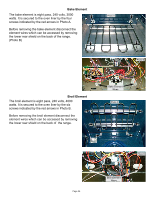
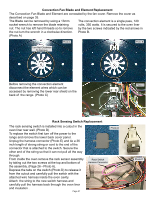
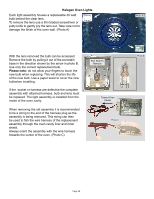
Door Disassembly With the outer door panel remove the door filler trims can be removed by taking out the two screws found in each trim. (Photo A) REMOVE SCREWS Photo A Remove the air wash glass and mounting brackets by removing the four screws that secure the brackets to the porcelain door liner. (Photo B) NOTE: The mounting brackets may be attached to the top or the sides of the airwash glass depending on model. Photo B REMOVE SCREWS To remove the door hinge remove two hinge mounting screws from the outside of the porcelain door liner and pull the hinge out from the back. (Photo C) REMOVE SCREWS Photo C The hinges used in different models have the same general appearance so to help identify the hinge a color stripe is painted onto the spring. (Photo D) When replacing the hinge make sure that the spring color matches the color stated in the parts description from the part list. Photo D 7316508700 Hinge Assembly, door, blue Page 33
-
 1
1 -
2
-
3
-
4
-
5
-
6
-
7
-
8
-
9
-
10
-
11
-
12
-
13
-
14
-
15
-
16
-
17
-
18
-
19
-
20
-
21
-
22
-
23
-
24
-
25
-
26
-
27
-
 28
28 -
 29
29 -
 30
30 -
 31
31 -
 32
32 -
 33
33 -
 34
34 -
 35
35 -
 36
36 -
 37
37 -
 38
38 -
39
-
40
-
41
-
42
-
43
-
44
-
45
-
46
-
47
 |
 |
