Epson 1250 Scanner Basics - Page 10
the first time you use EPSON Smart Panel. For subsequent scans, it is
 |
UPC - 010343836976
View all Epson 1250 manuals
Add to My Manuals
Save this manual to your list of manuals |
Page 10 highlights
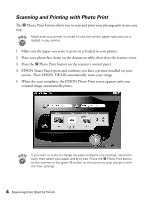
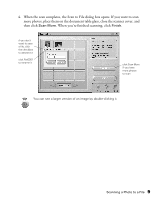
4. When the scan completes, the Scan to E-mail dialog box opens. Select your e-mail program and then click Launch. (You only need to select your e-mail program the first time you use EPSON Smart Panel. For subsequent scans, it is automatically selected.) select your e-mail program click Launch 5. An e-mail dialog box opens with your photo(s) attached. Enter the recipient's e-mail address, type in a message, and then click Send. click Send to deliver your e-mail recipient's e-mail address attached photos 6 Scanning from Start to Finish
-
 1
1 -
2
-
3
-
4
-
 5
5 -
 6
6 -
 7
7 -
 8
8 -
 9
9 -
 10
10 -
 11
11 -
 12
12 -
 13
13 -
 14
14 -
 15
15 -
16
-
17
-
18
-
19
-
20
-
21
-
22
-
23
-
24
-
25
-
26
-
27
-
28
-
29
-
30
-
31
-
32
-
33
-
34
-
35
-
36
-
37
-
38
-
39
-
40
-
41
-
42
-
43
-
44
-
45
-
46
-
47
-
48
 |
 |

6
Scanning from Start to Finish
4.
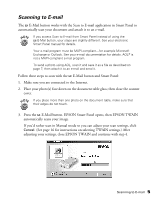
When the scan completes, the Scan to E-mail dialog box opens. Select your e-mail
program and then click
Launch
. (You only need to select your e-mail program
the first time you use EPSON Smart Panel. For subsequent scans, it is
automatically selected.)
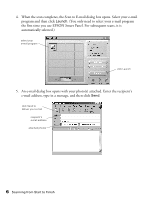
5.
An e-mail dialog box opens with your photo(s) attached. Enter the recipient
’
s
e-mail address, type in a message, and then click
Send
.
select your
e-mail program
click Launch
recipient
’
s
e-mail address
click Send to
deliver your e-mail
attached photos