Epson 1250 Scanner Basics - Page 32
Scanner Problems, AC adapter Macintosh. - perfection power cord
 |
UPC - 010343836976
View all Epson 1250 manuals
Add to My Manuals
Save this manual to your list of manuals |
Page 32 highlights
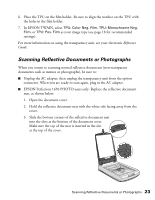
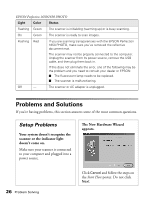
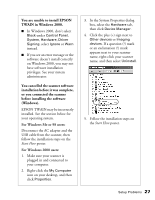
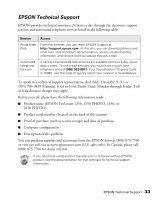
Scanner Problems The fluorescent lamp isn't on. I The scanner has a power saving function (sleep mode); press the ] Start button to "wake" the scanner. Or unplug the USB cable or power cable, then plug it back in. I Make sure the power cord is connected to the scanner and plugged into a power outlet. The scanner doesn't scan. I Wait until the fluorescent lamp stays on (ready for scanning). You may need to preview your scan to make the lamp come on. I If you are using a USB hub, try connecting the scanner directly to the computer's USB port. Use only the USB cable that came with your scanner. I If you see your scanner in the Windows Control Panel, but you can't scan, uninstall and reinstall your scanner software. The scanner buttons don't work after plugging in the USB cable or AC adapter (Macintosh). If you unplug your USB cable or AC adapter, then plug it back in, wait until the scanner has initialized before using the scanner buttons. If you press a scanner button and nothing happens, initialize the scanner by scanning an image from Smart Panel. Then you can use the buttons. You're having trouble scanning while using the transparency unit. I Make sure the transparency unit is correctly installed and connected to the scanner's option interface. I Make sure you select the correct Document Source setting for the option and your image: TPU: Color Neg. Film, TPU: Monochrome Neg. Film, or TPU: Pos. Film (see page 18). I If you're scanning in Manual Mode on a Macintosh, the watch icon may not change back to a pointer after scanning is complete. The pointer returns to normal after you close EPSON TWAIN. I If you're using the EPSON Perfection 1650 PHOTO, make sure you've removed the reflective document mat and positioned the film holder correctly (see page 20). I If the edges of your image aren't scanned, see page 30. 28 Problem Solving
-
 1
1 -
2
-
3
-
4
-
5
-
6
-
7
-
8
-
9
-
10
-
11
-
12
-
13
-
14
-
15
-
16
-
17
-
18
-
19
-
20
-
21
-
22
-
23
-
24
-
25
-
26
-
 27
27 -
 28
28 -
 29
29 -
 30
30 -
 31
31 -
 32
32 -
 33
33 -
 34
34 -
 35
35 -
 36
36 -
 37
37 -
38
-
39
-
40
-
41
-
42
-
43
-
44
-
45
-
46
-
47
-
48
 |
 |