Epson 1250 Scanner Basics - Page 6
Using the Scanner Buttons, Using EPSON Smart Panel
 |
UPC - 010343836976
View all Epson 1250 manuals
Add to My Manuals
Save this manual to your list of manuals |
Page 6 highlights
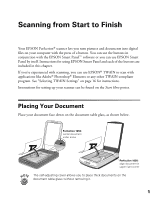
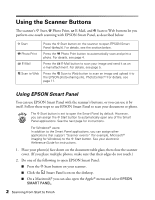
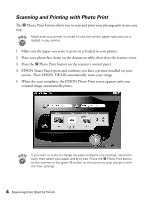
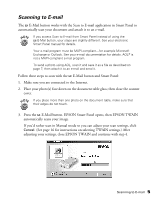
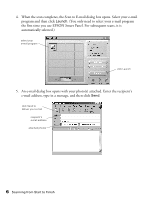
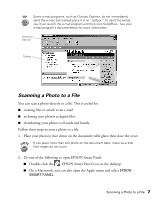
Using the Scanner Buttons The scanner's ] Start, { Photo Print, | E-Mail, and } Scan to Web buttons let you perform one-touch scanning with EPSON Smart Panel, as described below: ] Start Press the ] Start button on the scanner to open EPSON Smart Panel (default). For details, see the section below. { Photo Print Press the { Photo Print button to automatically scan and print a photo. For details, see page 4. | E-Mail Press the | E-Mail button to scan your image and send it as an e-mail attachment. For details, see page 5. } Scan to Web Press the } Scan to Web button to scan an image and upload it to the EPSON photo-sharing site, PhotoCenter.SM For details, see page 11. Using EPSON Smart Panel You can use EPSON Smart Panel with the scanner's buttons, or you can use it by itself. Follow these steps to use EPSON Smart Panel to scan your document or photo. The ] Start button is set to open the Smart Panel by default. However, you can assign the ] Start button to automatically open any of the Smart Panel applications. See the next page for instructions. For Windows® users: In addition to the Smart Panel applications, you can assign other applications that support "Scanner events" (for example, Microsoft® Imaging for Windows) to the ] Start button. See your electronic Reference Guide for instructions. 1. Place your photo(s) face down on the document table glass; then close the scanner cover. (If you place multiple photos, make sure that their edges do not touch.) 2. Do one of the following to open EPSON Smart Panel: I Press the ] Start button on your scanner. I Click the Smart Panel icon on the desktop. I On a Macintosh,® you can also open the Apple® menu and select EPSON SMART PANEL. 2 Scanning from Start to Finish
-
 1
1 -
 2
2 -
 3
3 -
 4
4 -
 5
5 -
 6
6 -
 7
7 -
 8
8 -
 9
9 -
 10
10 -
 11
11 -
 12
12 -
13
-
14
-
15
-
16
-
17
-
18
-
19
-
20
-
21
-
22
-
23
-
24
-
25
-
26
-
27
-
28
-
29
-
30
-
31
-
32
-
33
-
34
-
35
-
36
-
37
-
38
-
39
-
40
-
41
-
42
-
43
-
44
-
45
-
46
-
47
-
48
 |
 |