Epson 836XL User Setup Information - Page 29
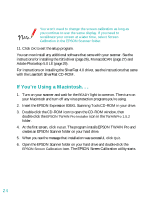
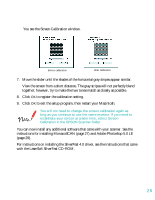
Pro Setup window., scanner to your screen. You see the Screen Calibration window.
 |
UPC - 010343820098
View all Epson 836XL manuals
Add to My Manuals
Save this manual to your list of manuals |
Page 29 highlights
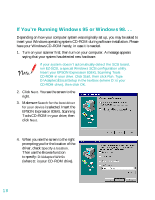
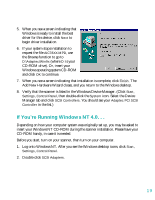
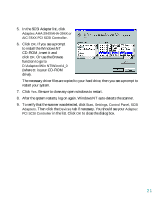
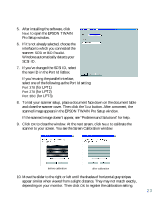
5. After installing the software, click Next to open the EPSON TWAIN Pro Setup window. 6. If it's not already selected, choose the interface to which you connected the scanner: SCSI or BiD Parallel. Windows automatically detects your SCSI ID. 7. If you've changed the SCSI ID, select the new ID in the Port Id listbox. If you're using the parallel interface, select one of the following as the Port Id setting: Port 378 (for LPT1) Port 278 (for LPT2) Port 3BC (for LPT3) 8. To test your scanner setup, place a document face down on the document table and close the scanner cover. Then click the Test button. After a moment, the scanned image appears in the EPSON TWAIN Pro Setup window. If the scanned image doesn't appear, see "Problems and Solutions" for help. 9. Click OK to close the window. At the next screen, click Next to calibrate the scanner to your screen. You see the Screen Calibration window. before calibration after calibration 10. Move the slider to the right or left until the shades of horizontal gray stripes appear similar when viewed from a slight distance. They may not match exactly, depending on your monitor. Then click OK to register the calibration setting. 23
-
 1
1 -
2
-
3
-
4
-
5
-
6
-
7
-
8
-
9
-
10
-
11
-
12
-
13
-
14
-
15
-
16
-
17
-
18
-
19
-
20
-
21
-
22
-
23
-
 24
24 -
 25
25 -
 26
26 -
 27
27 -
 28
28 -
 29
29 -
 30
30 -
 31
31 -
 32
32 -
 33
33 -
 34
34 -
35
-
36
-
37
-
38
-
39
-
40
-
41
-
42
-
43
-
44
-
45
-
46
-
47
-
48
-
49
-
50
-
51
-
52
-
53
-
54
-
55
-
56
-
57
-
58
-
59
-
60
-
61
-
62
-
63
-
64
-
65
-
66
-
67
-
68
-
69
-
70
-
71
-
72
-
73
 |
 |
