Epson ActionNote 4SLC/33 User Manual - Page 69
Adding Memory Modules or a Numeric Coprocessor, Removing the Keyboard, Epson Connection.
 |
View all Epson ActionNote 4SLC/33 manuals
Add to My Manuals
Save this manual to your list of manuals |
Page 69 highlights
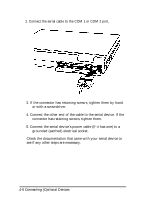
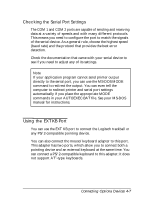
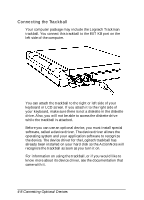
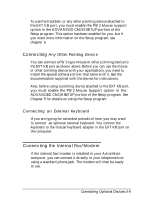
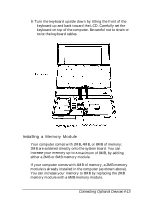
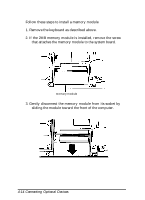
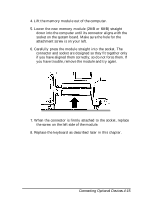
Adding Memory Modules or a Numeric Coprocessor The sections below describe how to add memory to your computer and install a numeric coprocessor. To access the sockets for these options, you need to remove the keyboard. Caution It is best to have your Authorized Epson Servicer install the memory module or a numeric coprocessor for you because they can be damaged easily if installed incorrectly. If you prefer to install them yourself, carefully follow all the instructions in this section. If you have any questions at all, please contact your Authorized Epson Servicer or call the Epson Connection. Removing the Keyboard To remove the keyboard, follow these steps: 1. Make sure the computer is turned off. 2. Disconnect all cables from the ports and connectors on both the sides and back of the computer. (Unplug the AC adapter from its wall outlet, if necessary.) 3. Turn the computer upside down with the front facing you. 4. Remove the battery pack (as described in Chapter 3). Connecting Optional Devices 4-11
-
 1
1 -
2
-
3
-
4
-
5
-
6
-
7
-
8
-
9
-
10
-
11
-
12
-
13
-
14
-
15
-
16
-
17
-
18
-
19
-
20
-
21
-
22
-
23
-
24
-
25
-
26
-
27
-
28
-
29
-
30
-
31
-
32
-
33
-
34
-
35
-
36
-
37
-
38
-
39
-
40
-
41
-
42
-
43
-
44
-
45
-
46
-
47
-
48
-
49
-
50
-
51
-
52
-
53
-
54
-
55
-
56
-
57
-
58
-
59
-
60
-
61
-
62
-
63
-
 64
64 -
 65
65 -
 66
66 -
 67
67 -
 68
68 -
 69
69 -
 70
70 -
 71
71 -
 72
72 -
 73
73 -
 74
74 -
75
-
76
-
77
-
78
-
79
-
80
-
81
-
82
-
83
-
84
-
85
-
86
-
87
-
88
-
89
-
90
-
91
-
92
-
93
-
94
-
95
-
96
-
97
-
98
-
99
-
100
-
101
-
102
-
103
-
104
-
105
-
106
-
107
-
108
-
109
-
110
-
111
-
112
-
113
-
114
-
115
-
116
-
117
-
118
-
119
-
120
-
121
-
122
-
123
-
124
-
125
-
126
-
127
-
128
-
129
-
130
-
131
-
132
-
133
-
134
-
135
-
136
-
137
-
138
-
139
-
140
-
141
-
142
-
143
-
144
-
145
-
146
-
147
-
148
-
149
-
150
-
151
-
152
-
153
-
154
-
155
-
156
-
157
-
158
-
159
-
160
-
161
-
162
-
163
-
164
-
165
-
166
-
167
-
168
-
169
-
170
-
171
-
172
-
173
-
174
 |
 |
