Epson ActionNote 4SLC/33 User Manual - Page 72
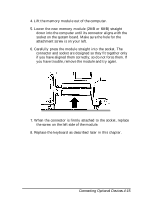
Gently disconnect the memory module from its socket
 |
View all Epson ActionNote 4SLC/33 manuals
Add to My Manuals
Save this manual to your list of manuals |
Page 72 highlights
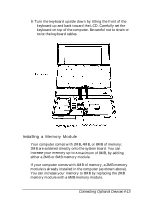
Follow these steps to install a memory module 1. Remove the keyboard as described above. 2. If the 2MB memory module is installed, remove the screw that attaches the memory module to the system board. memory module 3. Gently disconnect the memory module from its socket by sliding the module toward the front of the computer. 4-14 Connecting Optional Devices
-
 1
1 -
2
-
3
-
4
-
5
-
6
-
7
-
8
-
9
-
10
-
11
-
12
-
13
-
14
-
15
-
16
-
17
-
18
-
19
-
20
-
21
-
22
-
23
-
24
-
25
-
26
-
27
-
28
-
29
-
30
-
31
-
32
-
33
-
34
-
35
-
36
-
37
-
38
-
39
-
40
-
41
-
42
-
43
-
44
-
45
-
46
-
47
-
48
-
49
-
50
-
51
-
52
-
53
-
54
-
55
-
56
-
57
-
58
-
59
-
60
-
61
-
62
-
63
-
64
-
65
-
66
-
 67
67 -
 68
68 -
 69
69 -
 70
70 -
 71
71 -
 72
72 -
 73
73 -
 74
74 -
 75
75 -
 76
76 -
 77
77 -
78
-
79
-
80
-
81
-
82
-
83
-
84
-
85
-
86
-
87
-
88
-
89
-
90
-
91
-
92
-
93
-
94
-
95
-
96
-
97
-
98
-
99
-
100
-
101
-
102
-
103
-
104
-
105
-
106
-
107
-
108
-
109
-
110
-
111
-
112
-
113
-
114
-
115
-
116
-
117
-
118
-
119
-
120
-
121
-
122
-
123
-
124
-
125
-
126
-
127
-
128
-
129
-
130
-
131
-
132
-
133
-
134
-
135
-
136
-
137
-
138
-
139
-
140
-
141
-
142
-
143
-
144
-
145
-
146
-
147
-
148
-
149
-
150
-
151
-
152
-
153
-
154
-
155
-
156
-
157
-
158
-
159
-
160
-
161
-
162
-
163
-
164
-
165
-
166
-
167
-
168
-
169
-
170
-
171
-
172
-
173
-
174
 |
 |

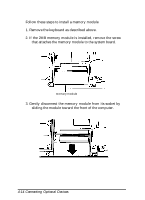
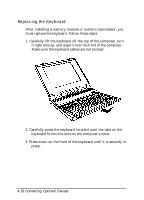
Follow these steps to install a memory module
1. Remove the keyboard as described above.
2. If the 2MB memory module is installed, remove the screw
that attaches the memory module to the system board.
memory module
3.
Gently disconnect the memory module from its socket by
sliding the module toward the front of the computer.
4-14
Connecting Optional Devices