Epson ActionNote 4SLC/33 User Manual - Page 73
Connecting Optional Devices 4-15, you have trouble, remove the module and try again.
 |
View all Epson ActionNote 4SLC/33 manuals
Add to My Manuals
Save this manual to your list of manuals |
Page 73 highlights
4. Lift the memory module out of the computer. 5. Lower the new memory module (2MB or 6MB) straight down into the computer until its connector aligns with the socket on the system board. Make sure the hole for the attachment screw is on your left. 6. Carefully press the module straight into the socket. The connector and socket are designed so they fit together only if you have aligned them correctly; so do not force them. If you have trouble, remove the module and try again. 7. When the connector is firmly attached to the socket, replace the screw on the left side of the module. 8. Replace the keyboard as described later in this chapter. Connecting Optional Devices 4-15
-
 1
1 -
2
-
3
-
4
-
5
-
6
-
7
-
8
-
9
-
10
-
11
-
12
-
13
-
14
-
15
-
16
-
17
-
18
-
19
-
20
-
21
-
22
-
23
-
24
-
25
-
26
-
27
-
28
-
29
-
30
-
31
-
32
-
33
-
34
-
35
-
36
-
37
-
38
-
39
-
40
-
41
-
42
-
43
-
44
-
45
-
46
-
47
-
48
-
49
-
50
-
51
-
52
-
53
-
54
-
55
-
56
-
57
-
58
-
59
-
60
-
61
-
62
-
63
-
64
-
65
-
66
-
67
-
 68
68 -
 69
69 -
 70
70 -
 71
71 -
 72
72 -
 73
73 -
 74
74 -
 75
75 -
 76
76 -
 77
77 -
 78
78 -
79
-
80
-
81
-
82
-
83
-
84
-
85
-
86
-
87
-
88
-
89
-
90
-
91
-
92
-
93
-
94
-
95
-
96
-
97
-
98
-
99
-
100
-
101
-
102
-
103
-
104
-
105
-
106
-
107
-
108
-
109
-
110
-
111
-
112
-
113
-
114
-
115
-
116
-
117
-
118
-
119
-
120
-
121
-
122
-
123
-
124
-
125
-
126
-
127
-
128
-
129
-
130
-
131
-
132
-
133
-
134
-
135
-
136
-
137
-
138
-
139
-
140
-
141
-
142
-
143
-
144
-
145
-
146
-
147
-
148
-
149
-
150
-
151
-
152
-
153
-
154
-
155
-
156
-
157
-
158
-
159
-
160
-
161
-
162
-
163
-
164
-
165
-
166
-
167
-
168
-
169
-
170
-
171
-
172
-
173
-
174
 |
 |

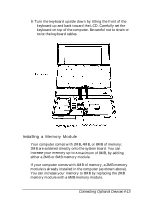
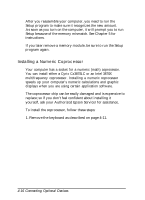
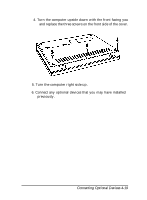
4. Lift the memory module out of the computer.
5. Lower the new memory module (2MB or 6MB) straight
down into the computer until its connector aligns with the
socket on the system board. Make sure the hole for the
attachment screw is on your left.
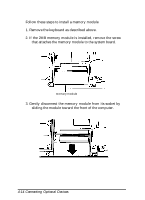
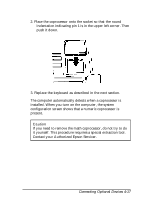
6. Carefully press the module straight into the socket. The
connector and socket are designed so they fit together only
if you have aligned them correctly; so do not force them. If
you have trouble, remove the module and try again.
7. When the connector is firmly attached to the socket, replace
the screw on the left side of the module.
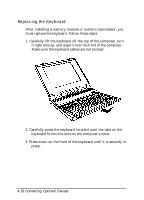
8. Replace the keyboard as described later in this chapter.
Connecting Optional Devices 4-15