Epson C80N User Setup Information - Page 17
Installing the Print Server Hardware
 |
UPC - 010343840935
View all Epson C80N manuals
Add to My Manuals
Save this manual to your list of manuals |
Page 17 highlights
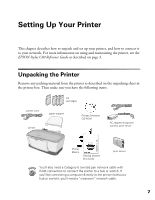
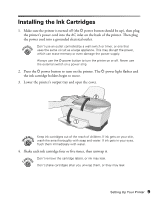
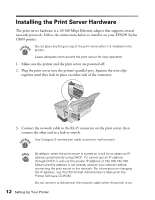
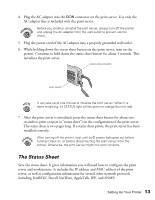
Installing the Print Server Hardware The print server hardware is a 10/100 Mbps Ethernet adapter that supports several network protocols. Follow the instructions below to install it on your EPSON Stylus C80N printer. Do not place anything on top of the print server after it is installed in the printer. Leave adequate room around the print server for easy operation. 1. Make sure the printer and the print server are powered off. 2. Plug the print server into the printer's parallel port. Squeeze the wire clips together until they lock in place on either side of the connector. 3. Connect the network cable to the RJ-45 connector on the print server, then connect the other end to a hub or switch. Use Category 5 twisted pair cable to prevent malfunctions. By default, when the print server is turned on it will try to obtain an IP address automatically using DHCP. If it cannot get an IP address through DHCP, it will use the private IP address of 192.168.192.168. Make sure this address is not already used on your network before connecting the print server to the network. For information on changing the IP address, see the PDF-format Administrator's Manual on the Printer Software CD-ROM. Do not connect or disconnect the network cable when the printer is on. 12 Setting Up Your Printer
-
 1
1 -
2
-
3
-
4
-
5
-
6
-
7
-
8
-
9
-
10
-
11
-
 12
12 -
 13
13 -
 14
14 -
 15
15 -
 16
16 -
 17
17 -
 18
18 -
 19
19 -
 20
20 -
 21
21 -
 22
22 -
23
-
24
-
25
-
26
-
27
-
28
-
29
-
30
-
31
-
32
-
33
-
34
-
35
-
36
-
37
-
38
-
39
-
40
-
41
-
42
-
43
-
44
-
45
-
46
-
47
-
48
-
49
-
50
-
51
-
52
-
53
-
54
-
55
-
56
-
57
-
58
 |
 |