Epson C80N User Setup Information - Page 18
The Status Sheet, including NetBEUI, Novell NetWare, AppleTalk, IPP, and SNMP.
 |
UPC - 010343840935
View all Epson C80N manuals
Add to My Manuals
Save this manual to your list of manuals |
Page 18 highlights
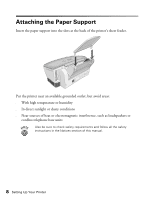
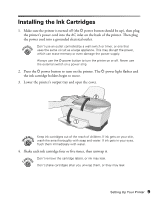
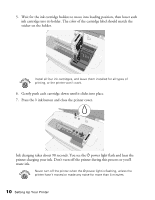
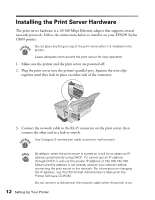
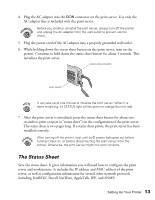
4. Plug the AC adapter into the DCIN connector on the print server. Use only the AC adapter that is included with the print server. Before you install or uninstall the print server, always turn off the printer and unplug the AC adapter from the wall outlet to prevent electric shock. 5. Plug the power cord of the AC adapter into a properly grounded wall outlet. 6. While holding down the status sheet button on the print server, turn on the printer. Continue to hold down the status sheet button for about 5 seconds. This initializes the print server. status sheet button print server It can take up to one minute to initialize the print server. When it is done initializing, its STATUS light will be green or orange (but not red). 7. After the print server is initialized, press the status sheet button for about two seconds to print a report (a "status sheet") on the configuration of the print server. The status sheet is two pages long. If a status sheet prints, the print server has been installed correctly. After turning off the printer, wait until its P power light goes out before turning it back on, or before disconnecting the print server from the printer. Otherwise, the print server might not work correctly. The Status Sheet Save the status sheet. It gives information you will need later to configure the print server and workstations. It includes the IP address and MAC address of the print server, as well as configuration information for several other network protocols including NetBEUI, Novell NetWare, AppleTalk, IPP, and SNMP. Setting Up Your Printer 13
-
 1
1 -
2
-
3
-
4
-
5
-
6
-
7
-
8
-
9
-
10
-
11
-
12
-
 13
13 -
 14
14 -
 15
15 -
 16
16 -
 17
17 -
 18
18 -
 19
19 -
 20
20 -
 21
21 -
 22
22 -
 23
23 -
24
-
25
-
26
-
27
-
28
-
29
-
30
-
31
-
32
-
33
-
34
-
35
-
36
-
37
-
38
-
39
-
40
-
41
-
42
-
43
-
44
-
45
-
46
-
47
-
48
-
49
-
50
-
51
-
52
-
53
-
54
-
55
-
56
-
57
-
58
 |
 |