Epson C80N User Setup Information - Page 30
Changing the Printer Port Setting, In Windows NT 4.0 - c80 driver
 |
UPC - 010343840935
View all Epson C80N manuals
Add to My Manuals
Save this manual to your list of manuals |
Page 30 highlights
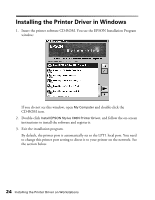
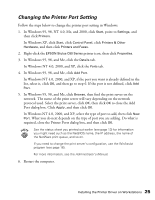
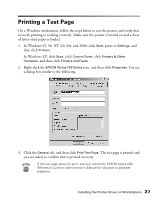
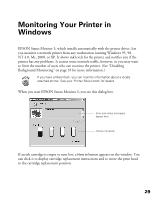
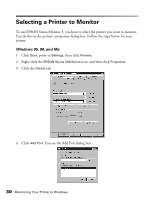
Changing the Printer Port Setting Follow the steps below to change the printer port setting in Windows. 1. In Windows 95, 98, NT 4.0, Me, and 2000, click Start, point to Settings, and then click Printers. In Windows XP, click Start, click Control Panel, click Printers & Other Hardware, and then click Printers and Faxes. 2. Right-click the EPSON Stylus C80 Series printer icon, then click Properties. 3. In Windows 95, 98, and Me, click the Details tab. In Windows NT 4.0, 2000, and XP, click the Ports tab. 4. In Windows 95, 98, and Me, click Add Port. In Windows NT 4.0, 2000, and XP, if the port you want is already defined in the list, select it, click OK, and then go to step 6. If the port is not defined, click Add Port. 5. In Windows 95, 98, and Me, click Browse, then find the print server on the network. The name of the print server will vary depending on the network protocol used. Select the print server, click OK, then click OK to close the Add Port dialog box. Click Apply, and then click OK. In Windows NT 4.0, 2000, and XP, select the type of port to add, then click New Port. What you do next depends on the type of port you are adding. Do what is required, close the Printer Ports dialog box, and then click OK. See the status sheet you printed out earlier (see page 13) for information you might need such as the NetBIOS name, the IP address, the name of the NetWare print queue, and so on. If you need to change the print server's configuration, use the WinAssist program (see page 16). For more information, see the Administrator's Manual. 6. Restart the computer. Installing the Printer Driver on Workstations 25
-
 1
1 -
2
-
3
-
4
-
5
-
6
-
7
-
8
-
9
-
10
-
11
-
12
-
13
-
14
-
15
-
16
-
17
-
18
-
19
-
20
-
21
-
22
-
23
-
24
-
 25
25 -
 26
26 -
 27
27 -
 28
28 -
 29
29 -
 30
30 -
 31
31 -
 32
32 -
 33
33 -
 34
34 -
 35
35 -
36
-
37
-
38
-
39
-
40
-
41
-
42
-
43
-
44
-
45
-
46
-
47
-
48
-
49
-
50
-
51
-
52
-
53
-
54
-
55
-
56
-
57
-
58
 |
 |