Epson C80N User Setup Information - Page 36
Windows NT 4.0
 |
UPC - 010343840935
View all Epson C80N manuals
Add to My Manuals
Save this manual to your list of manuals |
Page 36 highlights
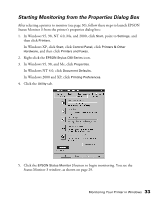
5. Click Browse, and then find the printer you want to monitor. 6. Select the printer, then click OK. 7. Click OK to close the Add Port dialog box. 8. Your printer's name and network address appear in the Print to the following port box on the Details tab. Click Apply to apply the change. 9. Click OK to close the Properties dialog box. Now you're ready to monitor the printer you've selected. Windows NT 4.0, 2000, and XP: 1. In Windows NT 4.0 and 2000, click Start, point to Settings, and then click Printers. In Windows XP, click Start, click Control Panel, click Printers & Other Hardware, and then click Printers and Faxes. 2. Right-click the EPSON Stylus C80 Series icon, and then click Properties. Monitoring Your Printer in Windows 31
-
 1
1 -
2
-
3
-
4
-
5
-
6
-
7
-
8
-
9
-
10
-
11
-
12
-
13
-
14
-
15
-
16
-
17
-
18
-
19
-
20
-
21
-
22
-
23
-
24
-
25
-
26
-
27
-
28
-
29
-
30
-
 31
31 -
 32
32 -
 33
33 -
 34
34 -
 35
35 -
 36
36 -
 37
37 -
 38
38 -
 39
39 -
 40
40 -
 41
41 -
42
-
43
-
44
-
45
-
46
-
47
-
48
-
49
-
50
-
51
-
52
-
53
-
54
-
55
-
56
-
57
-
58
 |
 |

Monitoring Your Printer in Windows
31
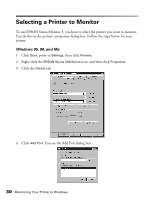
5.
Click
Browse
, and then find the printer you want to monitor.
6.
Select the printer, then click
OK
.
7.
Click
OK
to close the Add Port dialog box.
8.
Your printer’s name and network address appear in the
Print to the following port
box on the Details tab. Click
Apply
to apply the change.
9.
Click
OK
to close the Properties dialog box.
Now you’re ready to monitor the printer you’ve selected.
Windows NT 4.0, 2000, and XP:
1.
In Windows NT 4.0 and 2000, click
Start
, point to
Settings
, and then click
Printers
.
In Windows XP, click
Start
, click
Control Panel
, click
Printers & Other
Hardware
, and then click
Printers and Faxes
.
2.
Right-click the
EPSON Stylus C80 Series
icon, and then click
Properties
.