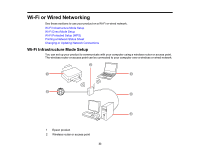
Epson ET-3600 Users Guide - Page 35
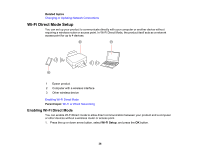
Start, Parent topic, Related tasks, Wi-Fi Infrastructure Mode Setup
 |
View all Epson ET-3600 manuals
Add to My Manuals
Save this manual to your list of manuals |
Page 35 highlights
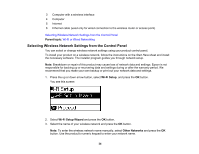
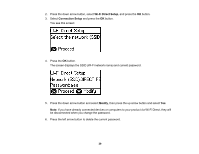
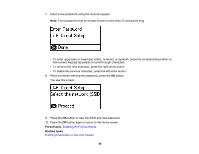
4. Enter your wireless password using the numeric keypad. Note: The network name and password are case sensitive. Be sure to correctly enter uppercase and lowercase letters, and numeric or special characters. • To enter uppercase or lowercase letters, numbers, or symbols, press the corresponding button on the numeric keypad to scroll through characters. • To move to the next character, press the right arrow button. • To delete the previous character, press the left arrow button. 5. Press the OK button when you finish entering your password. 6. Confirm the displayed network settings and press the OK button to save them. Note: If you need to change a setting, press the back button. 7. If you want to print a network setup report, press one of the Start buttons. (Otherwise, press the OK button.) If the network connection is successful, the LCD screen. Wi-Fi icon appears in the upper-right corner of the Note: If the Wi-Fi icon is not displayed on the LCD screen, you may have selected the wrong network name or entered the password incorrectly. Repeat these steps to try again. Parent topic: Wi-Fi Infrastructure Mode Setup Related tasks Entering Characters on the LCD Screen 35
-
 1
1 -
2
-
3
-
4
-
5
-
6
-
7
-
8
-
9
-
10
-
11
-
12
-
13
-
14
-
15
-
16
-
17
-
18
-
19
-
20
-
21
-
22
-
23
-
24
-
25
-
26
-
27
-
28
-
29
-
 30
30 -
 31
31 -
 32
32 -
 33
33 -
 34
34 -
 35
35 -
 36
36 -
 37
37 -
 38
38 -
 39
39 -
 40
40 -
41
-
42
-
43
-
44
-
45
-
46
-
47
-
48
-
49
-
50
-
51
-
52
-
53
-
54
-
55
-
56
-
57
-
58
-
59
-
60
-
61
-
62
-
63
-
64
-
65
-
66
-
67
-
68
-
69
-
70
-
71
-
72
-
73
-
74
-
75
-
76
-
77
-
78
-
79
-
80
-
81
-
82
-
83
-
84
-
85
-
86
-
87
-
88
-
89
-
90
-
91
-
92
-
93
-
94
-
95
-
96
-
97
-
98
-
99
-
100
-
101
-
102
-
103
-
104
-
105
-
106
-
107
-
108
-
109
-
110
-
111
-
112
-
113
-
114
-
115
-
116
-
117
-
118
-
119
-
120
-
121
-
122
-
123
-
124
-
125
-
126
-
127
-
128
-
129
-
130
-
131
-
132
-
133
-
134
-
135
-
136
-
137
-
138
-
139
-
140
-
141
-
142
-
143
-
144
-
145
-
146
-
147
-
148
-
149
-
150
-
151
-
152
-
153
-
154
-
155
-
156
-
157
-
158
-
159
-
160
-
161
-
162
-
163
-
164
-
165
-
166
-
167
-
168
-
169
-
170
-
171
-
172
-
173
-
174
-
175
-
176
-
177
-
178
-
179
-
180
-
181
-
182
-
183
-
184
-
185
-
186
-
187
-
188
-
189
-
190
-
191
-
192
-
193
-
194
-
195
-
196
-
197
-
198
-
199
-
200
-
201
-
202
 |
 |
