Epson ET-3600 Users Guide - Page 41
Wi-Fi Protected Setup (WPS), Using WPS to Connect to a Network
 |
View all Epson ET-3600 manuals
Add to My Manuals
Save this manual to your list of manuals |
Page 41 highlights
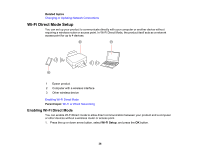
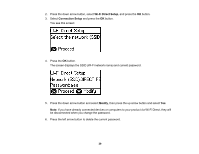
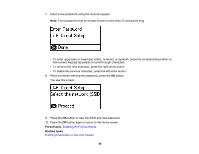
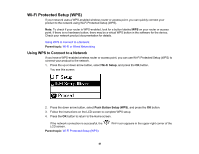
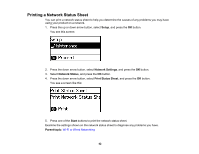
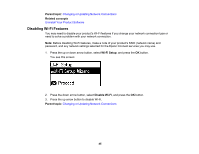
Wi-Fi Protected Setup (WPS) If your network uses a WPS-enabled wireless router or access point, you can quickly connect your product to the network using Wi-Fi Protected Setup (WPS). Note: To check if your router is WPS-enabled, look for a button labeled WPS on your router or access point. If there is no hardware button, there may be a virtual WPS button in the software for the device. Check your network product documentation for details. Using WPS to Connect to a Network Parent topic: Wi-Fi or Wired Networking Using WPS to Connect to a Network If you have a WPS-enabled wireless router or access point, you can use Wi-Fi Protected Setup (WPS) to connect your product to the network. 1. Press the up or down arrow button, select Wi-Fi Setup, and press the OK button. You see this screen: 2. Press the down arrow button, select Push Button Setup (WPS), and press the OK button. 3. Follow the instructions on the LCD screen to complete WPS setup. 4. Press the OK button to return to the Home screen. If the network connection is successful, the LCD screen. Parent topic: Wi-Fi Protected Setup (WPS) Wi-Fi icon appears in the upper-right corner of the 41
-
 1
1 -
2
-
3
-
4
-
5
-
6
-
7
-
8
-
9
-
10
-
11
-
12
-
13
-
14
-
15
-
16
-
17
-
18
-
19
-
20
-
21
-
22
-
23
-
24
-
25
-
26
-
27
-
28
-
29
-
30
-
31
-
32
-
33
-
34
-
35
-
 36
36 -
 37
37 -
 38
38 -
 39
39 -
 40
40 -
 41
41 -
 42
42 -
 43
43 -
 44
44 -
 45
45 -
 46
46 -
47
-
48
-
49
-
50
-
51
-
52
-
53
-
54
-
55
-
56
-
57
-
58
-
59
-
60
-
61
-
62
-
63
-
64
-
65
-
66
-
67
-
68
-
69
-
70
-
71
-
72
-
73
-
74
-
75
-
76
-
77
-
78
-
79
-
80
-
81
-
82
-
83
-
84
-
85
-
86
-
87
-
88
-
89
-
90
-
91
-
92
-
93
-
94
-
95
-
96
-
97
-
98
-
99
-
100
-
101
-
102
-
103
-
104
-
105
-
106
-
107
-
108
-
109
-
110
-
111
-
112
-
113
-
114
-
115
-
116
-
117
-
118
-
119
-
120
-
121
-
122
-
123
-
124
-
125
-
126
-
127
-
128
-
129
-
130
-
131
-
132
-
133
-
134
-
135
-
136
-
137
-
138
-
139
-
140
-
141
-
142
-
143
-
144
-
145
-
146
-
147
-
148
-
149
-
150
-
151
-
152
-
153
-
154
-
155
-
156
-
157
-
158
-
159
-
160
-
161
-
162
-
163
-
164
-
165
-
166
-
167
-
168
-
169
-
170
-
171
-
172
-
173
-
174
-
175
-
176
-
177
-
178
-
179
-
180
-
181
-
182
-
183
-
184
-
185
-
186
-
187
-
188
-
189
-
190
-
191
-
192
-
193
-
194
-
195
-
196
-
197
-
198
-
199
-
200
-
201
-
202
 |
 |
