Epson Ensemble HD 6500 User's Guide - Page 54
Cleaning System Components, Adjusting the Screen Length
 |
View all Epson Ensemble HD 6500 manuals
Add to My Manuals
Save this manual to your list of manuals |
Page 54 highlights
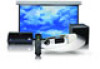
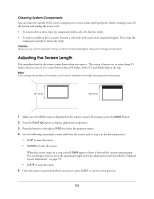
Cleaning System Components You can clean the outside of the system components to remove dust and fingerprints. Before cleaning, turn off the system and unplug the power cord. • To remove dirt or dust, wipe the component with a soft, dry, lint-free cloth. • To remove stubborn dirt or stains, moisten a soft cloth with water and a neutral detergent. Then wipe the component and dry it with a dry cloth. Caution Never use wax, alcohol, benzene, thinner, or other chemical detergents. These can damage components. Adjusting the Screen Length You can adjust how far the screen comes down when you open it. The screen is factory-set to come down 55 inches, but you can set it to come down as far as 64 inches, with a 12-inch black drop at the top. Note If you change the position of the screen, you'll have to reposition the image. See page 56 for instructions. 55 inches 64 inches 1 Make sure the MAIN menu is displayed on the remote control. If necessary, press the MAIN button. 2 Press the PAGE button to display additional components. 3 Press the button to the right of PROJ to select the projector menu. 4 Use the following commands to raise and lower the screen, and to stop it at the desired position: • S-UP to raise the screen • S-DWN to lower the screen When the screen comes to a stop, press S-DWN again to lower it beyond the current stop-position. You can bring it down as far as the maximum length set by the adjustment screw described in "Manual Screen Adjustment" on page 55. • S-STP to stop the screen 5 Once the screen is positioned where you want it, press S-SET to set the screen position. 54
-
 1
1 -
2
-
3
-
4
-
5
-
6
-
7
-
8
-
9
-
10
-
11
-
12
-
13
-
14
-
15
-
16
-
17
-
18
-
19
-
20
-
21
-
22
-
23
-
24
-
25
-
26
-
27
-
28
-
29
-
30
-
31
-
32
-
33
-
34
-
35
-
36
-
37
-
38
-
39
-
40
-
41
-
42
-
43
-
44
-
45
-
46
-
47
-
48
-
 49
49 -
 50
50 -
 51
51 -
 52
52 -
 53
53 -
 54
54 -
 55
55 -
 56
56 -
 57
57 -
 58
58 -
 59
59 -
60
-
61
-
62
-
63
-
64
-
65
-
66
-
67
-
68
-
69
-
70
-
71
-
72
-
73
-
74
-
75
-
76
-
77
-
78
-
79
-
80
-
81
-
82
-
83
-
84
-
85
-
86
-
87
-
88
-
89
-
90
-
91
-
92
-
93
-
94
-
95
-
96
-
97
-
98
-
99
-
100
-
101
-
102
-
103
-
104
-
105
-
106
-
107
-
108
-
109
-
110
-
111
-
112
-
113
-
114
-
115
-
116
-
117
-
118
-
119
-
120
-
121
-
122
-
123
-
124
-
125
-
126
-
127
-
128
-
129
-
130
-
131
-
132
 |
 |