Epson Ensemble HD 6500 User's Guide - Page 82
button to display all the devices., On the next screen, finish adjusting the selected setting
 |
View all Epson Ensemble HD 6500 manuals
Add to My Manuals
Save this manual to your list of manuals |
Page 82 highlights
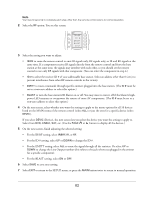
Note You have 30 seconds to complete each step. After that, the remote control returns to normal operation. 2 Select the RF option. You see this screen: RF IR/RF ID EMITT BLAST EXIT 3 Select the setting you want to adjust: • IR/RF to cause the remote control to emit IR signals only, RF signals only, or IR and RF signals at the same time. If a component receives IR signals directly from the remote control and from the base station at the same time, the signals may interfere with each other, so you should set the remote control to use only RF signals with that component. (You can select the component in step 4.) • ID # to select the receiver ID # of your addressable base station. Select an address other than 0 (zero) to prevent interference from other RF remote controls in the vicinity. • EMITT to route commands through specific emitters plugged into the base station. (The ID # must be set to a non-zero address to select this option.) • BLAST to turn the base station's IR blaster on or off. You may want to turn it off if the blaster's highpower LED saturates or overpowers the sensors of some AV components. (The ID # must be set to a non-zero address to select this option.) 4 On the next screen, select whether you want the setting to apply to the menu options for all 10 devices listed on the MAIN menu of the remote control (select ALL) or just the ones for a specific device (select DEVIC). If you select DEVIC (Device), the next screen lets you select the device you want the setting to apply to. Select from DVD, CABLE, SAT, etc. (Use the PAGE or button to display all the devices.) 5 On the next screen, finish adjusting the selected setting: • For the IR/RF setting, select IR&RF, IR, or RF. • For the ID # setting, select UP or DOWN to change the ID #. • For the EMITT setting, select ALL to route the signal through all the emitters. Or select UP or DOWN to change the Line Output number (this refers to the jack where you plugged in the emitter for a specific component). • For the BLAST setting, select ON or OFF. 6 Select SAVE to save your setting. 7 Select EXIT to return to the SETUP menu, or press the MAIN button twice to return to normal operation. 82
-
 1
1 -
2
-
3
-
4
-
5
-
6
-
7
-
8
-
9
-
10
-
11
-
12
-
13
-
14
-
15
-
16
-
17
-
18
-
19
-
20
-
21
-
22
-
23
-
24
-
25
-
26
-
27
-
28
-
29
-
30
-
31
-
32
-
33
-
34
-
35
-
36
-
37
-
38
-
39
-
40
-
41
-
42
-
43
-
44
-
45
-
46
-
47
-
48
-
49
-
50
-
51
-
52
-
53
-
54
-
55
-
56
-
57
-
58
-
59
-
60
-
61
-
62
-
63
-
64
-
65
-
66
-
67
-
68
-
69
-
70
-
71
-
72
-
73
-
74
-
75
-
76
-
 77
77 -
 78
78 -
 79
79 -
 80
80 -
 81
81 -
 82
82 -
 83
83 -
 84
84 -
 85
85 -
 86
86 -
 87
87 -
88
-
89
-
90
-
91
-
92
-
93
-
94
-
95
-
96
-
97
-
98
-
99
-
100
-
101
-
102
-
103
-
104
-
105
-
106
-
107
-
108
-
109
-
110
-
111
-
112
-
113
-
114
-
115
-
116
-
117
-
118
-
119
-
120
-
121
-
122
-
123
-
124
-
125
-
126
-
127
-
128
-
129
-
130
-
131
-
132
 |
 |
