Epson Expression 636 User Manual - Page 39
tighten the screws with a coin., Close the transparency unit.
 |
View all Epson Expression 636 manuals
Add to My Manuals
Save this manual to your list of manuals |
Page 39 highlights
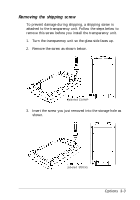
3. Locate the two screws at the back of the scanner and slide the slots on the transparency unit forward underneath these two screws. 4. Insert the two screws provided with the transparency unit into the holes in the scanner as shown below, and then tighten the screws with a coin. 5. Close the transparency unit. OPtions 3-5
-
 1
1 -
2
-
3
-
4
-
5
-
6
-
7
-
8
-
9
-
10
-
11
-
12
-
13
-
14
-
15
-
16
-
17
-
18
-
19
-
20
-
21
-
22
-
23
-
24
-
25
-
26
-
27
-
28
-
29
-
30
-
31
-
32
-
33
-
 34
34 -
 35
35 -
 36
36 -
 37
37 -
 38
38 -
 39
39 -
 40
40 -
 41
41 -
 42
42 -
 43
43 -
 44
44 -
45
-
46
-
47
-
48
-
49
-
50
-
51
-
52
-
53
-
54
-
55
-
56
-
57
-
58
-
59
-
60
-
61
-
62
-
63
-
64
-
65
-
66
-
67
-
68
-
69
-
70
-
71
-
72
-
73
-
74
-
75
 |
 |

3.
Locate the two screws at the back of the scanner and slide
the slots on the transparency unit forward underneath
these two screws.
4.
Insert the two screws provided with the transparency unit
into the holes in the scanner as shown below, and then
tighten the screws with a coin.
5.
Close the transparency unit.
OPt
ions 3-5