Epson PP-100II Users Guide for Mac - Page 130
For PP-100/PP-50, Open the disc cover.
 |
View all Epson PP-100II manuals
Add to My Manuals
Save this manual to your list of manuals |
Page 130 highlights
For PP-100/PP-50 1 Turn the product off. See "Turning Off the Power" on page 20. 2 After the Power light goes off, unplug the power plug from the outlet. 3 Remove the two screws to remove the rear printer cover. If the disc can be removed, eject the disc and reattach the rear printer cover. If the disc cannot be removed, proceed to the procedure below. 4 Grasp the fixture as shown in the figure below, and push the printer tray in the direction of the arrow indicated below. 5 Open the disc cover. 130
-
 1
1 -
2
-
3
-
4
-
5
-
6
-
7
-
8
-
9
-
10
-
11
-
12
-
13
-
14
-
15
-
16
-
17
-
18
-
19
-
20
-
21
-
22
-
23
-
24
-
25
-
26
-
27
-
28
-
29
-
30
-
31
-
32
-
33
-
34
-
35
-
36
-
37
-
38
-
39
-
40
-
41
-
42
-
43
-
44
-
45
-
46
-
47
-
48
-
49
-
50
-
51
-
52
-
53
-
54
-
55
-
56
-
57
-
58
-
59
-
60
-
61
-
62
-
63
-
64
-
65
-
66
-
67
-
68
-
69
-
70
-
71
-
72
-
73
-
74
-
75
-
76
-
77
-
78
-
79
-
80
-
81
-
82
-
83
-
84
-
85
-
86
-
87
-
88
-
89
-
90
-
91
-
92
-
93
-
94
-
95
-
96
-
97
-
98
-
99
-
100
-
101
-
102
-
103
-
104
-
105
-
106
-
107
-
108
-
109
-
110
-
111
-
112
-
113
-
114
-
115
-
116
-
117
-
118
-
119
-
120
-
121
-
122
-
123
-
124
-
 125
125 -
 126
126 -
 127
127 -
 128
128 -
 129
129 -
 130
130 -
 131
131 -
 132
132 -
 133
133 -
 134
134 -
 135
135 -
136
-
137
-
138
-
139
-
140
-
141
-
142
-
143
-
144
-
145
-
146
-
147
-
148
-
149
-
150
-
151
 |
 |
130
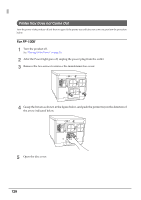
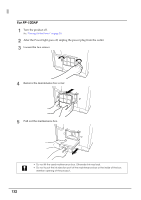
For PP-100/PP-50
1
Turn the product off.
See
“Turning Off the Power” on page 20
.
2
After the Power light goes off, unplug the power plug from the outlet.
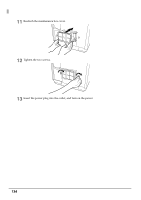
3
Remove the two screws to remove the rear printer cover.
If the disc can be removed, eject the disc and reattach the rear printer cover. If the disc cannot be removed,
proceed to the procedure below.
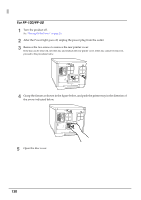
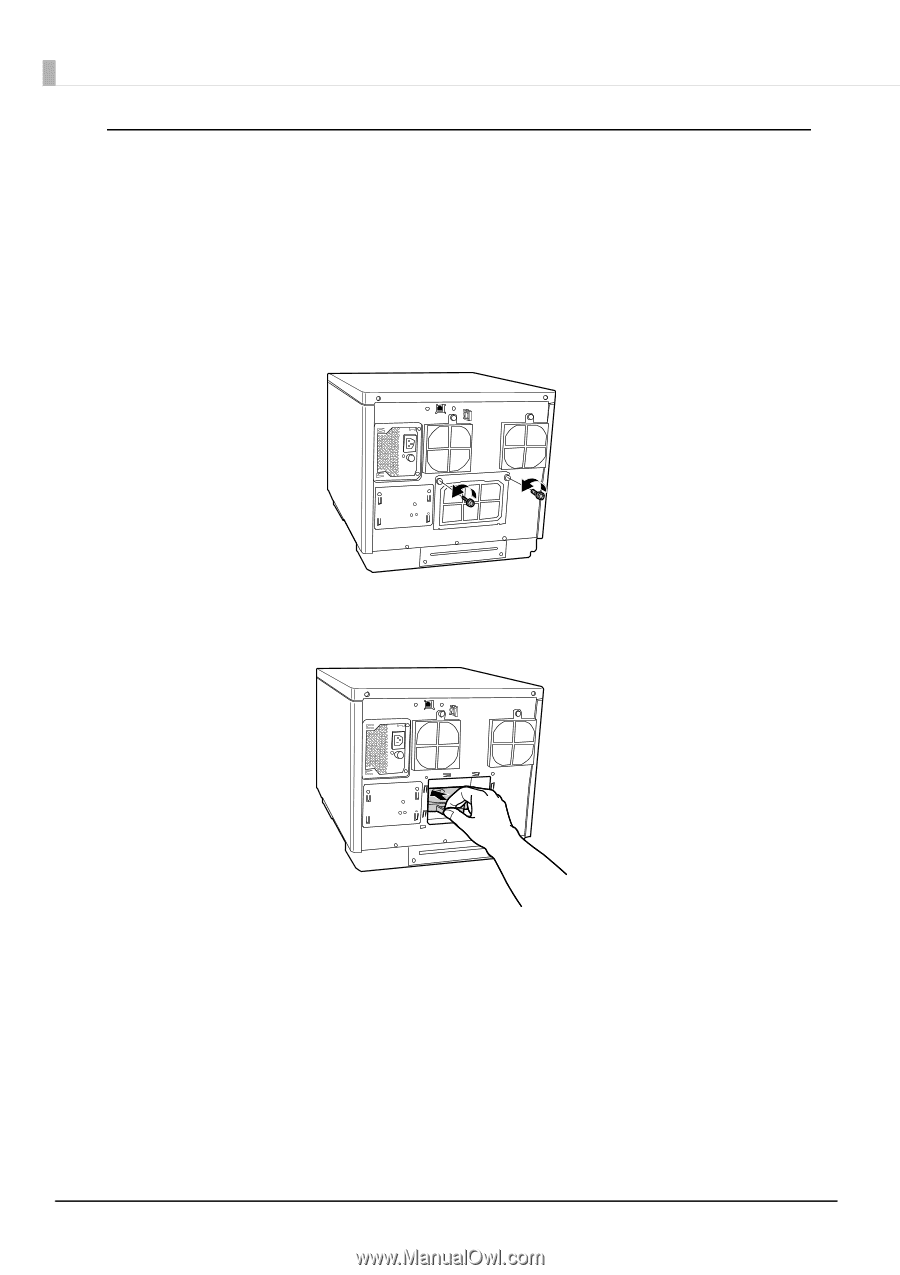
4
Grasp the fixture as shown in the figure below, and push the printer tray in the direction of
the arrow indicated below.
5
Open the disc cover.