Epson PP-100II Users Guide for Mac - Page 95
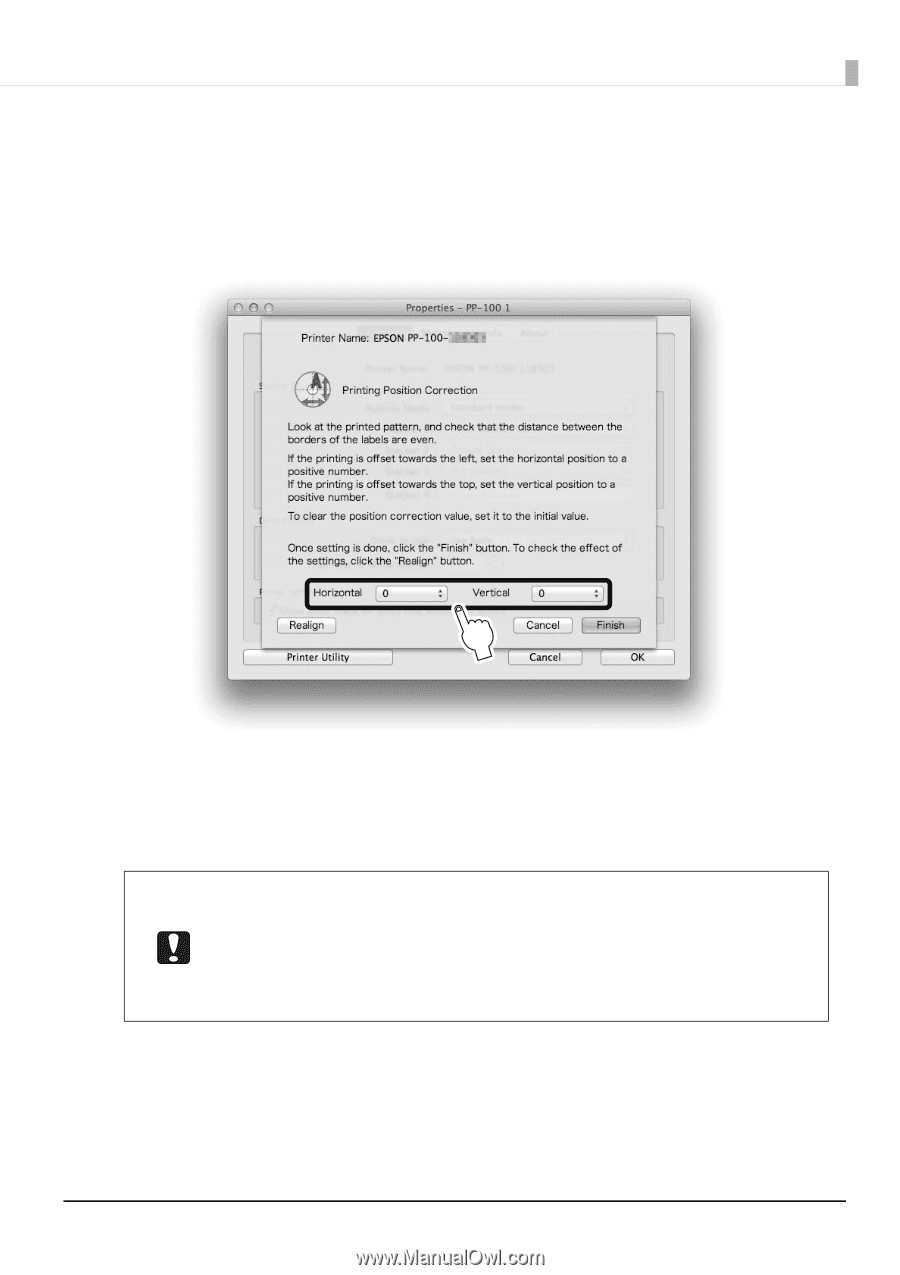
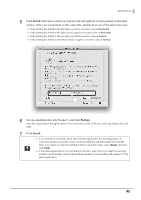
Finish, Realign, Set one unprinted disc into Stacker 1, and click
 |
View all Epson PP-100II manuals
Add to My Manuals
Save this manual to your list of manuals |
Page 95 highlights
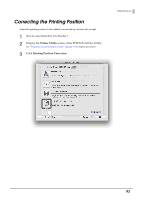
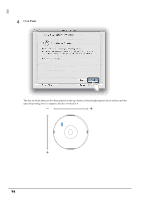
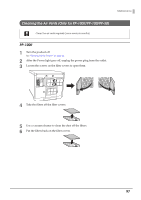
Maintenance 5 Click Finish if the lines on the top, bottom, left and right are evenly printed on the label surface. If they are not printed evenly, adjust the alignment in one of the following ways. • If the printing has shifted to the left: Select a positive correction value in Horizontal. • If the printing has shifted to the right: Select a negative correction value in Horizontal. • If the printing has shifted to the top: Select a positive correction value in Vertical. • If the printing has shifted to the bottom: Select a negative correction value in Vertical. 6 Set one unprinted disc into Stacker 1, and click Realign. After this, repeat Steps 4 through 6 until the lines are printed evenly on the disc on the top, bottom, left, and right. 7 Click Finish. • If you reenter a correction value after the first adjustment, the printing position is corrected using a correction value combined with the adjusted value from the first time. If you want to clear the printing position correction value, select Reset, and then click Finish. • If the label application is not centered on the disc, even after you adjust the printing position using the steps above, the printing appears to have shifted with respect to the label application. 95
-
 1
1 -
2
-
3
-
4
-
5
-
6
-
7
-
8
-
9
-
10
-
11
-
12
-
13
-
14
-
15
-
16
-
17
-
18
-
19
-
20
-
21
-
22
-
23
-
24
-
25
-
26
-
27
-
28
-
29
-
30
-
31
-
32
-
33
-
34
-
35
-
36
-
37
-
38
-
39
-
40
-
41
-
42
-
43
-
44
-
45
-
46
-
47
-
48
-
49
-
50
-
51
-
52
-
53
-
54
-
55
-
56
-
57
-
58
-
59
-
60
-
61
-
62
-
63
-
64
-
65
-
66
-
67
-
68
-
69
-
70
-
71
-
72
-
73
-
74
-
75
-
76
-
77
-
78
-
79
-
80
-
81
-
82
-
83
-
84
-
85
-
86
-
87
-
88
-
89
-
 90
90 -
 91
91 -
 92
92 -
 93
93 -
 94
94 -
 95
95 -
 96
96 -
 97
97 -
 98
98 -
 99
99 -
 100
100 -
101
-
102
-
103
-
104
-
105
-
106
-
107
-
108
-
109
-
110
-
111
-
112
-
113
-
114
-
115
-
116
-
117
-
118
-
119
-
120
-
121
-
122
-
123
-
124
-
125
-
126
-
127
-
128
-
129
-
130
-
131
-
132
-
133
-
134
-
135
-
136
-
137
-
138
-
139
-
140
-
141
-
142
-
143
-
144
-
145
-
146
-
147
-
148
-
149
-
150
-
151
 |
 |