Epson PowerLite Pro G5650W Operation Guide - EasyMP Network Projection - Page 9
Insert the EPSON Projector Software CD-ROM into the, For Mac OS
 |
View all Epson PowerLite Pro G5650W manuals
Add to My Manuals
Save this manual to your list of manuals |
Page 9 highlights
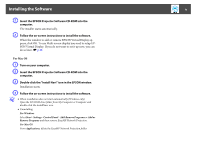
Installing the Software 9 B Insert the EPSON Projector Software CD-ROM into the computer. The installer starts automatically. C Follow the on-screen instructions to install the software. When the window to add or remove EPSON Virtual Display appears, click OK. To use Multi-screen display you need to setup EPSON Virtual Display. If you do not want to set it up now, you can do so later. s p.28 For Mac OS A Turn on your computer. B Insert the EPSON Projector Software CD-ROM into the computer. C Double-click the "Install Navi" icon in the EPSON window. Installation starts. D Follow the on-screen instructions to install the software. q • When installation does not start automatically (Windows only) Open the CD-ROM drive folder from My Computer or Computer and double-click the InstallNavi icon. • Uninstalling For Windows Select Start - Settings - Control Panel - Add-Remove Programs or Add or Remove Programs and then remove EasyMP Network Projection. For Mac OS From Applications, delete the EasyMP Network Projection folder.
-
 1
1 -
2
-
3
-
 4
4 -
 5
5 -
 6
6 -
 7
7 -
 8
8 -
 9
9 -
 10
10 -
 11
11 -
 12
12 -
 13
13 -
 14
14 -
15
-
16
-
17
-
18
-
19
-
20
-
21
-
22
-
23
-
24
-
25
-
26
-
27
-
28
-
29
-
30
-
31
-
32
-
33
-
34
-
35
-
36
-
37
-
38
-
39
-
40
-
41
-
42
-
43
-
44
-
45
-
46
-
47
-
48
-
49
-
50
-
51
-
52
-
53
-
54
-
55
-
56
-
57
-
58
 |
 |