Epson SureColor T3170x Users Guide - Page 116
Properties, Device and Document Settings, Custom Properties, Document Size, Output Size, Source
 |
View all Epson SureColor T3170x manuals
Add to My Manuals
Save this manual to your list of manuals |
Page 116 highlights
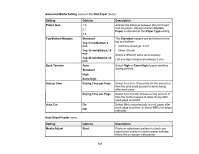
Note: If lines in your drawing are not printed properly, print the drawing using HP-GL/2 or HP RTL mode using the product control panel. 1. Open the file you want to print in your CAD software. 2. Click Plot and select your product as the printer. 3. Click Properties. 4. On the Device and Document Settings tab, click Custom Properties. You see the printer driver window: 5. Select the Document Size and Output Size settings as necessary. 6. Select the Source setting. 7. Select the Media Type setting. 8. Choose one of the CAD/Line Drawing options as the Select Target setting. 9. Select any other printing settings as necessary and click OK. 116
-
 1
1 -
2
-
3
-
4
-
5
-
6
-
7
-
8
-
9
-
10
-
11
-
12
-
13
-
14
-
15
-
16
-
17
-
18
-
19
-
20
-
21
-
22
-
23
-
24
-
25
-
26
-
27
-
28
-
29
-
30
-
31
-
32
-
33
-
34
-
35
-
36
-
37
-
38
-
39
-
40
-
41
-
42
-
43
-
44
-
45
-
46
-
47
-
48
-
49
-
50
-
51
-
52
-
53
-
54
-
55
-
56
-
57
-
58
-
59
-
60
-
61
-
62
-
63
-
64
-
65
-
66
-
67
-
68
-
69
-
70
-
71
-
72
-
73
-
74
-
75
-
76
-
77
-
78
-
79
-
80
-
81
-
82
-
83
-
84
-
85
-
86
-
87
-
88
-
89
-
90
-
91
-
92
-
93
-
94
-
95
-
96
-
97
-
98
-
99
-
100
-
101
-
102
-
103
-
104
-
105
-
106
-
107
-
108
-
109
-
110
-
 111
111 -
 112
112 -
 113
113 -
 114
114 -
 115
115 -
 116
116 -
 117
117 -
 118
118 -
 119
119 -
 120
120 -
 121
121 -
122
-
123
-
124
-
125
-
126
-
127
-
128
-
129
-
130
-
131
-
132
-
133
-
134
-
135
-
136
-
137
-
138
-
139
-
140
-
141
-
142
-
143
-
144
-
145
-
146
-
147
-
148
-
149
-
150
-
151
-
152
-
153
-
154
-
155
-
156
-
157
-
158
-
159
-
160
-
161
-
162
-
163
-
164
-
165
-
166
-
167
-
168
-
169
-
170
-
171
-
172
-
173
-
174
-
175
-
176
-
177
-
178
-
179
-
180
-
181
-
182
-
183
-
184
-
185
-
186
-
187
-
188
-
189
-
190
-
191
-
192
-
193
-
194
-
195
-
196
-
197
-
198
-
199
-
200
-
201
-
202
-
203
-
204
-
205
-
206
-
207
-
208
-
209
-
210
-
211
-
212
-
213
-
214
-
215
-
216
 |
 |

116
Note:
If lines in your drawing are not printed properly, print the drawing using HP-GL/2 or HP RTL mode
using the product control panel.
1.
Open the file you want to print in your CAD software.
2.
Click
Plot
and select your product as the printer.
3.
Click
Properties
.
4.
On the
Device and Document Settings
tab, click
Custom Properties
.
You see the printer driver window:
5.
Select the
Document Size
and
Output Size
settings as necessary.
6.
Select the
Source
setting.
7.
Select the
Media Type
setting.
8.
Choose one of the CAD/Line Drawing options as the
Select Target
setting.
9.
Select any other printing settings as necessary and click
OK
.