Epson SureColor T3170x Users Guide - Page 132
Maintenance Menu, Print Head Nozzle Check
 |
View all Epson SureColor T3170x manuals
Add to My Manuals
Save this manual to your list of manuals |
Page 132 highlights
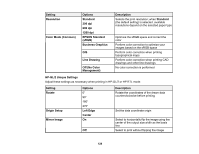
Maintenance Menu Select Settings > Maintenance to run nozzle checks, cleaning cycles, and other maintenance operations. Caution: Follow the instructions in the topic links below the table to use these menu settings correctly. Setting Print Quality Adjustment Print Head Nozzle Check Head Cleaning Paper Guide Cleaning Reset Ink Level Ink Level Setting Replace Maintenance Box Replace Cutter Powerful Cleaning* Power Ink Flushing* Description Perform when there are streaks in printouts, ruled lines are duplicated, or text is blurred Prints a nozzle check pattern so you can check for clogged nozzles Perform if the nozzle check pattern has faint or missing areas Perform if printouts are smeared when printing from the auto sheet feeder Resets the current ink level information. This option automatically appears on the LCD screen when you refill the ink tanks. Adjust how often the printer prompts you to confirm the current ink level information. Displays the maintenance box replacement procedure Displays the cutter replacement procedure Perform if the nozzle check pattern still has faint or missing areas after performing a head cleaning three times in a row Replaces all of the ink in the ink tubes. This may improve print quality, but consumes more ink than the head cleaning or powerful cleaning options. You should only perform a power ink flushing after completely refilling the ink tanks. You may need to replace the maintenance box after performing this operation. * The Powerful Cleaning and Power Ink Flushing settings can be locked by an administrator. If you cannot access or change these settings, contact your administrator for assistance. Parent topic: Using the Control Panel Menus 132
-
 1
1 -
2
-
3
-
4
-
5
-
6
-
7
-
8
-
9
-
10
-
11
-
12
-
13
-
14
-
15
-
16
-
17
-
18
-
19
-
20
-
21
-
22
-
23
-
24
-
25
-
26
-
27
-
28
-
29
-
30
-
31
-
32
-
33
-
34
-
35
-
36
-
37
-
38
-
39
-
40
-
41
-
42
-
43
-
44
-
45
-
46
-
47
-
48
-
49
-
50
-
51
-
52
-
53
-
54
-
55
-
56
-
57
-
58
-
59
-
60
-
61
-
62
-
63
-
64
-
65
-
66
-
67
-
68
-
69
-
70
-
71
-
72
-
73
-
74
-
75
-
76
-
77
-
78
-
79
-
80
-
81
-
82
-
83
-
84
-
85
-
86
-
87
-
88
-
89
-
90
-
91
-
92
-
93
-
94
-
95
-
96
-
97
-
98
-
99
-
100
-
101
-
102
-
103
-
104
-
105
-
106
-
107
-
108
-
109
-
110
-
111
-
112
-
113
-
114
-
115
-
116
-
117
-
118
-
119
-
120
-
121
-
122
-
123
-
124
-
125
-
126
-
 127
127 -
 128
128 -
 129
129 -
 130
130 -
 131
131 -
 132
132 -
 133
133 -
 134
134 -
 135
135 -
 136
136 -
 137
137 -
138
-
139
-
140
-
141
-
142
-
143
-
144
-
145
-
146
-
147
-
148
-
149
-
150
-
151
-
152
-
153
-
154
-
155
-
156
-
157
-
158
-
159
-
160
-
161
-
162
-
163
-
164
-
165
-
166
-
167
-
168
-
169
-
170
-
171
-
172
-
173
-
174
-
175
-
176
-
177
-
178
-
179
-
180
-
181
-
182
-
183
-
184
-
185
-
186
-
187
-
188
-
189
-
190
-
191
-
192
-
193
-
194
-
195
-
196
-
197
-
198
-
199
-
200
-
201
-
202
-
203
-
204
-
205
-
206
-
207
-
208
-
209
-
210
-
211
-
212
-
213
-
214
-
215
-
216
 |
 |
