Epson WorkForce WF-2660 User Manual - Page 108
Checking the Printer Status - Windows, Removing Jammed Paper
 |
View all Epson WorkForce WF-2660 manuals
Add to My Manuals
Save this manual to your list of manuals |
Page 108 highlights
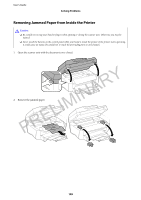
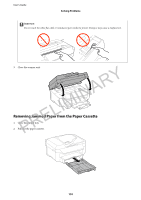
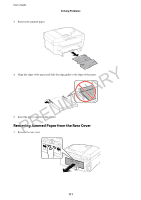
User's Guide Solving Problems * In some print cycles a very small amount of surplus ink may be collected in the ink pad. To prevent ink leakage from the pad, the product is designed to stop printing when the pad has reached its limit. Whether and how often this is required will vary according to the number of pages you print, the type of material that you print and the number of cleaning cycles that the printer performs. The need for replacement of the pad does not mean that your printer has ceased to operate in accordance with its specifications. The printer will advise you when the pad requires replacing and this can only be performed by an authorised Epson Service provider. The Epson warranty does not cover the cost of this replacement. Checking the Printer Status - Windows PRELIMINARY 1. Accesstheprinterdriverwindow. 2. Click EPSON Status Monitor 3 on the Maintenance tab, and then click Details. Note: If EPSON Status Monitor 3 is disabled, click Extended Settings on the Maintenance tab, and then select Enable EPSON Status Monitor 3. Checking Printer Status - Mac OS X 1. Select System Preferences from the then select the printer. menu > Printers & Scanners (or Print & Scan, Print & Fax), and 2. Click Options & Supplies > Utility > Open Printer Utility. 3. Click EPSON Status Monitor. Removing Jammed Paper Check the error displayed on the control panel and follow the instructions to remove the jammed paper including any torn pieces. Next, clear the error. c Important: Remove the jammed paper carefully. Removing the paper vigorously may cause damage to the printer. 108
-
 1
1 -
2
-
3
-
4
-
5
-
6
-
7
-
8
-
9
-
10
-
11
-
12
-
13
-
14
-
15
-
16
-
17
-
18
-
19
-
20
-
21
-
22
-
23
-
24
-
25
-
26
-
27
-
28
-
29
-
30
-
31
-
32
-
33
-
34
-
35
-
36
-
37
-
38
-
39
-
40
-
41
-
42
-
43
-
44
-
45
-
46
-
47
-
48
-
49
-
50
-
51
-
52
-
53
-
54
-
55
-
56
-
57
-
58
-
59
-
60
-
61
-
62
-
63
-
64
-
65
-
66
-
67
-
68
-
69
-
70
-
71
-
72
-
73
-
74
-
75
-
76
-
77
-
78
-
79
-
80
-
81
-
82
-
83
-
84
-
85
-
86
-
87
-
88
-
89
-
90
-
91
-
92
-
93
-
94
-
95
-
96
-
97
-
98
-
99
-
100
-
101
-
102
-
 103
103 -
 104
104 -
 105
105 -
 106
106 -
 107
107 -
 108
108 -
 109
109 -
 110
110 -
 111
111 -
 112
112 -
 113
113 -
114
-
115
-
116
-
117
-
118
-
119
-
120
-
121
-
122
-
123
-
124
-
125
-
126
-
127
-
128
-
129
-
130
-
131
-
132
-
133
-
134
-
135
-
136
-
137
-
138
-
139
-
140
 |
 |
