Epson tmu375 User Manual - Page 12
Unpacking, Removing the Protective Materials - ribbon
 |
View all Epson tmu375 manuals
Add to My Manuals
Save this manual to your list of manuals |
Page 12 highlights
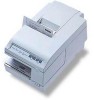
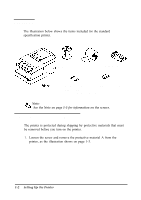
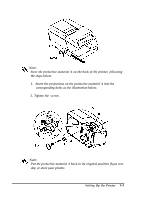
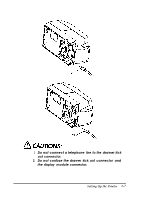
Unpacking The illustration below shows the items included for the standard specification printer. Take-up spool Paper roll (1 pc) Ribbon cassette Hexagonal lock Power switch cover screws (2 pcs) (only for the serial interface) , Note: Q&A See the Note on page 1-5 for information on the screws. Removing the Protective Materials The printer is protected during shipping by protective materials that must be removed before you turn on the printer. 1. Loosen the screw and remove the protective material A from the printer, as the illustration shows on page 1-3. 1-2 Setting Up the Printer
-
 1
1 -
2
-
3
-
4
-
5
-
6
-
 7
7 -
 8
8 -
 9
9 -
 10
10 -
 11
11 -
 12
12 -
 13
13 -
 14
14 -
 15
15 -
 16
16 -
 17
17 -
18
-
19
-
20
-
21
-
22
-
23
-
24
-
25
-
26
-
27
-
28
-
29
-
30
-
31
-
32
-
33
-
34
-
35
-
36
-
37
-
38
-
39
-
40
-
41
-
42
-
43
-
44
-
45
-
46
-
47
-
48
-
49
-
50
-
51
-
52
-
53
-
54
-
55
-
56
-
57
-
58
-
59
-
60
-
61
-
62
-
63
-
64
-
65
-
66
-
67
-
68
-
69
-
70
-
71
-
72
 |
 |

Unpacking
The illustration below shows the items included for the standard
specification printer.
Take-up spool
Paper roll (1
pc)
Ribbon
cassette
Hexagonal lock
Power switch cover
screws (2
pcs)
(only for the
serial interface)
,
Q&A
Note:
See the Note on page 1-5 for information on the screws.
Removing the Protective Materials
The printer is protected during shipping by protective materials that must
be removed before you turn on the printer.
1.
Loosen the screw and remove the protective material A from the
printer, as the illustration shows on page 1-3.
1-2
Setting Up the Printer