Epson tmu375 User Manual - Page 25
Make sure that the ribbon is installed between the print head and - printer ribbons
 |
View all Epson tmu375 manuals
Add to My Manuals
Save this manual to your list of manuals |
Page 25 highlights
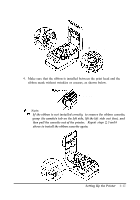
2 or 3 more times Knob 4. Make sure that the ribbon is installed between the print head and the ribbon mask without wrinkles or creases, as shown below. Print head * Note: Q3.l If the ribbon is not installed correctly, to remove the ribbon cassette, grasp the cassette's tab on the left side, lift the left side out first, and then pull the cassette out of the printer. Repeat steps 2, 3 and 4 above to install the ribbon cassette again. Tab Setting Up the Printer 1 - 1 5
-
 1
1 -
2
-
3
-
4
-
5
-
6
-
7
-
8
-
9
-
10
-
11
-
12
-
13
-
14
-
15
-
16
-
17
-
18
-
19
-
 20
20 -
 21
21 -
 22
22 -
 23
23 -
 24
24 -
 25
25 -
 26
26 -
 27
27 -
 28
28 -
 29
29 -
 30
30 -
31
-
32
-
33
-
34
-
35
-
36
-
37
-
38
-
39
-
40
-
41
-
42
-
43
-
44
-
45
-
46
-
47
-
48
-
49
-
50
-
51
-
52
-
53
-
54
-
55
-
56
-
57
-
58
-
59
-
60
-
61
-
62
-
63
-
64
-
65
-
66
-
67
-
68
-
69
-
70
-
71
-
72
 |
 |

2
or 3 more times
Knob
4.
Make sure that the ribbon is installed between the print head and the
ribbon mask without wrinkles or creases, as shown below.
Print head
*
Q3.l
Note:
If
the
ribbon is not installed
correctly,
to remove
the
ribbon cassette,
grasp
the
cassette's tab on
the
left side,
lift
the
left
side out first, and
then
pull
the
cassette out of
the
printer.
Repeat steps
2,
3 and
4
above to install
the
ribbon cassette again.
Tab
Setting Up the Printer
1-15