Epson tmu375 User Manual - Page 26
Installing the Paper Roll, PAPER LOAD
 |
View all Epson tmu375 manuals
Add to My Manuals
Save this manual to your list of manuals |
Page 26 highlights
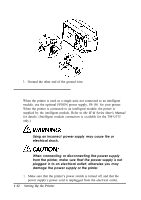
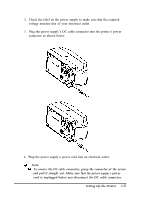
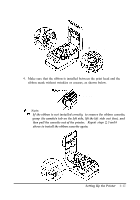
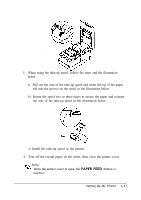
Installing the Paper Roll Use a paper roll that matches the specifications. , Note: Q3 The printer must be turned on before installing the paper roll. 1. Fold the paper so it is exactly straight and even, as shown in the illustration, and will not tear off jaggedly. No No Correct 2. Turn on the printer, open the printer cover, and remove the take-up spool. 3. Insert the paper roll as shown below. 4. Insert the tip of the paper into the paper inlet as far as it will go, and push the PAPER LOAD switch to feed the paper roll until the paper comes out from the top of the printer. Note that the arrow in the exploded drawing below points towards the front of the printer. 1-16 Setting Up the Printer
-
 1
1 -
2
-
3
-
4
-
5
-
6
-
7
-
8
-
9
-
10
-
11
-
12
-
13
-
14
-
15
-
16
-
17
-
18
-
19
-
20
-
 21
21 -
 22
22 -
 23
23 -
 24
24 -
 25
25 -
 26
26 -
 27
27 -
 28
28 -
 29
29 -
 30
30 -
 31
31 -
32
-
33
-
34
-
35
-
36
-
37
-
38
-
39
-
40
-
41
-
42
-
43
-
44
-
45
-
46
-
47
-
48
-
49
-
50
-
51
-
52
-
53
-
54
-
55
-
56
-
57
-
58
-
59
-
60
-
61
-
62
-
63
-
64
-
65
-
66
-
67
-
68
-
69
-
70
-
71
-
72
 |
 |

Installing
the Paper Roll
Use a paper roll that matches the specifications.
,
Q3
Note:
The
printer must be turned on before installing
the
paper roll.
1.
Fold the paper so it is exactly straight and even, as shown in the
illustration, and will not tear off jaggedly.
No
No
Correct
2.
Turn on the printer, open the printer cover, and remove the take-up
spool.
3.
Insert the paper roll as shown below.
4.
Insert the tip of the paper into the paper inlet as far as it will go, and
push the
PAPER LOAD
switch
to
feed the paper roll until the paper
comes out from the top of the printer.
Note that the arrow in the exploded drawing below points towards the
front of the printer.
1-16
Setting Up the Printer