Epson tmu375 User Manual - Page 41
Replacing the Paper Roll
 |
View all Epson tmu375 manuals
Add to My Manuals
Save this manual to your list of manuals |
Page 41 highlights
1. Send the appropriate control commands from the computer to print on validation paper. 2. When the VALIDATION/SLIP light flashes, insert a sheet of validation paper into the validation paper inlet (see the illustration below); printing will then begin. Make sure you insert the validation paper into the inlet as far as it will go. * Note: Qb When the VALIDATION/SLIP light flashes (this depends on the application software), remove the paper from the paper path. Replacing the Paper Roll To change the paper roll, follow the steps below. 1. Cut the journal paper on the cutter; then remove the take-up spool. Using the Printer 2-5
-
 1
1 -
2
-
3
-
4
-
5
-
6
-
7
-
8
-
9
-
10
-
11
-
12
-
13
-
14
-
15
-
16
-
17
-
18
-
19
-
20
-
21
-
22
-
23
-
24
-
25
-
26
-
27
-
28
-
29
-
30
-
31
-
32
-
33
-
34
-
35
-
 36
36 -
 37
37 -
 38
38 -
 39
39 -
 40
40 -
 41
41 -
 42
42 -
 43
43 -
 44
44 -
 45
45 -
 46
46 -
47
-
48
-
49
-
50
-
51
-
52
-
53
-
54
-
55
-
56
-
57
-
58
-
59
-
60
-
61
-
62
-
63
-
64
-
65
-
66
-
67
-
68
-
69
-
70
-
71
-
72
 |
 |

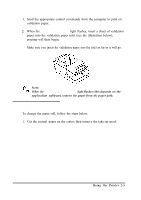
1.
Send the appropriate control commands from the computer to print on
validation paper.
2.
When the
VALIDATION/SLIP
light flashes, insert a sheet of validation
paper into the validation paper inlet (see the illustration below);
printing will then begin.
Make sure you insert
the
validation paper into the inlet as far as it will go.
*
Qb
Note:
When
the
VALIDATION/SLIP
light flashes (this depends on the
application software), remove
the
paper from
the
paper
path.
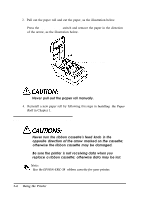
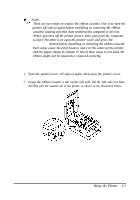
Replacing the Paper Roll
To change the paper roll, follow the steps below.
1.
Cut the journal paper on the cutter; then remove the take-up spool.
Using the Printer 2-5