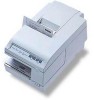
Epson tmu375 User Manual - Page 9

Using this guide, Setting Up the Printer, Using the Printer - paper

Page 9 highlights

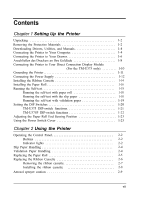
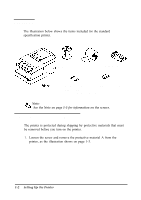
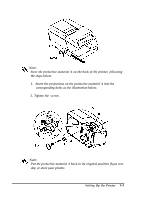
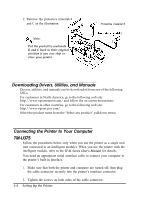
Contents Chapter 1 Setting Up the Printer Unpacking l-2 Removing the Protective Materials l-2 Downloading Drivers, Utilities, and Manu.al.s l-4 Connecting the Printer to Your Computer l-4 Connecting the Printer to Your Drawer l-6 Anschließen des Druckers an Ihre Geldladee l-8 Connecting the Printer to Your Direct Connection Display Module (For the TM-U375 only 1-10 Grounding the Printer l-11 Connecting the Power Supply 1-12 Installing the Ribbon Cassette 1-14 Installing the Paper Roll 1-16 Running the Self-test 1-18 Running the self-test with paper roll 1-18 Running the self-test with the slip paper 1-18 Running the self-test with validation paper l-19 Setting the DIP Switches l-20 TM-U375 DIP-switch functions l-21 TM-U375P DIP-switch functions l-22 Adjusting the Paper Roll End Sensing Position l-23 Using the Power Switch Cover l-25 Chapter 2 Using the Printer Operating the Control Panel 2-2 Buttons 2-2 Indicator lights 2-2 Slip Paper Handling 2-4 Validation Paper Handling 2-4 Replacing the Paper Roll 2-5 Replacing the Ribbon Cassette 2-6 Removing the ribbon cassette 2-7 Installing the ribbon cassette 2-8 Aerosol sprayer caution 2-9 vii

  • 1
  • 2
  • 3
  • 4
  • 5
  • 6
  • 7
  • 8
  • 9
  • 10
  • 11
  • 12
  • 13
  • 14
  • 15
  • 16
  • 17
  • 18
  • 19
  • 20
  • 21
  • 22
  • 23
  • 24
  • 25
  • 26
  • 27
  • 28
  • 29
  • 30
  • 31
  • 32
  • 33
  • 34
  • 35
  • 36
  • 37
  • 38
  • 39
  • 40
  • 41
  • 42
  • 43
  • 44
  • 45
  • 46
  • 47
  • 48
  • 49
  • 50
  • 51
  • 52
  • 53
  • 54
  • 55
  • 56
  • 57
  • 58
  • 59
  • 60
  • 61
  • 62
  • 63
  • 64
  • 65
  • 66
  • 67
  • 68
  • 69
  • 70
  • 71
  • 72

Contents
Chapter 1
Setting Up the Printer
Unpacking
....................................................
l-2
Removing the Protective Materials
.................................
l-2
Connecting the Printer to Your Computer
. ...........................
l-4
Downloading Drivers, Utilities, and Manuals
. ...........................
l-4
Connecting the Printer to Your Drawer
. .............................
l-6
Anschließen
des Druckers an Ihre Geldlade
e
..........................
l-8
Connecting the Printer to Your Direct Connection Display Module
(For the TM-U375 only)
. .........
1-10
Grounding the Printer
............................................
l-11
Connecting the Power Supply
.....................................
1-12
Installing the Ribbon Cassette
.....................................
1-14
Installing the Paper Roll
..........................................
1-16
Running the Self-test
.............................................
1-18
Running the self-test with paper roll
..........................
1-18
Running the self-test with the slip paper
.......................
1-18
Running the self-test with validation paper
.....................
l-19
Setting the DIP Switches
.........................................
l-20
TM-U375 DIP-switch functions
. .............................
l-21
TM-U375P DIP-switch functions
.............................
l-22
Adjusting the Paper Roll End Sensing Position
.......................
l-23
Using the Power Switch Cover
....................................
l-25
Chapter
2
Using the Printer
Operating the Control Panel
.....................................
Buttons
................................................
Indicator lights
..........................................
Slip Paper Handling
............................................
Validation Paper Handling
. ......................................
Replacing the Paper Roll
........................................
Replacing the Ribbon Cassett
Aerosol sprayer caution . . . . . . . . . . . . . . . . . . . . . . . . . . . . . . . . .
2-9
e
...................................
Removing the ribbon cassette.
..............................
.
Installing the ribbon cassette
.
.............................
.
2-2
2-2
2-2
2-4
2-4
2-5
2-6
2-7
2-8
vii